Followers

Showing posts with label birds nest. Show all posts

Friday, 4 April 2025

Eggs in the nest

Good Morning everyone

Today its time for a new challenge over at Creative artist mixed media where we celebrate all things mixed media

Ive decided to go seasonal again and make a lovely little birds next.  I used these digital bird images for my nieces birthday and had several left over cut out so thats what triggered my idea to build them a little nest. 

8x8" Mdf shadow box frame.  Pictures below show how I built up the background and texture.  Once that was done I made a little nest out of orange and copper soft craft wire which I adhered into the box with glue gel.  I lined the nest with feathers and added a few around outside the nest and added my little eggs into place.  

I then added 2 of the larger birds - yes i know technically they are 2 different birds and wouldn't be a pair but hey this is craft land and artistic license😁

I created a hanging from the same wires used for the nest and 3 matching beads on each side - got to use my beads up some how and this seemed a good way and adds a bit of bling and interest.

You can see into the nest better here - Ive had these feathers for about 10yrs so good to use some!  You can also makes out the gold dora paint better at this angle 

The hanging loop I made with craft wire and beads

**

and onto the step by step background


After making up the mdf box i added die cut feathers (great way to use up scraps of cardstock) and then added a little texture paste through a net effect stencil which I felt would give a little tree bark like feel.  Once dry cover in white gesso

I randomly added yellow, orange, red and turquoise acrylic paints


Then a wash of van dyke brown - yep it looks a mess now but let it pool around the texture....if its too heavy in any area just dab with some tissue.  Once the first wash was dry i added a bit more in areas to make them even darker

Dry brush on antique white, pale blue & lemon chalk paint 

The top coat was Cadence dora paints which have amazing shimmer, you could use gilding waxes instead.  I personally get on better with the dora paint as can dry brush it on very lightly - a little goes a very long way. Difficult to take photos off - but when the light hits it, it really comes to life.

To finish I coated it all in gloss mod podge to seal and protect.


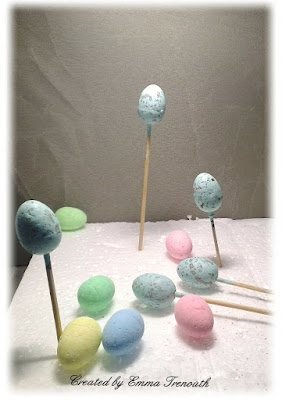
How I made my little birds eggs.  Took little foam eggs from poundland and coated in white gesso and then pastel blue matte acrylic paint and then splattered on darker watered down acrylics to give the speckles and finished with a coat of matt mod podge.  I found it easier to handle them by sticking on a cocktail stick in some polystyrene....this does of course leave a little hole in the bottom of the eggs but easily hid when adhering them to my project 

Items Used 
Mixed Media birds clipart from Double Helix Digitals on etsy
Feather die - joy crafts
Woodware stencil
Texture paste
mini foam eggs - poundland
Cadence dora paint - gold, orange
Folkart Acrylic paints 
1mm soft craft wire
beads from stash

Do hop over to creative artiste mixed media to join in, anything goes as long as you mix your medias, so cards, atc's, tags, art journal pages are just as welcome as 3d makes like mine


Wednesday, 10 April 2024

Nesting Birdies

Good Morning everyone


Today Im sharing another spring card using the katkin krafts 'love nest' stamps


I made a sky background with turquoise brushos, once dry cut to size and added to a white base card.  I added leaf green & lime green brushos another piece of white card and die cut the spellbinders leafy frame from it.  I die cut 4 more of the leafy frames from scrap card and glued them all together to give me depth to the frame and this is easier than trying to apply foam tape to it, it also gives the frame the feel of chipboard.

I worked out where i wanted the frame on the blue background and then stamped the branches into place, i then adhered the frame.

I stamped all the birds and cherry blossom onto white card and watercoloured with derwent inktense pencils, also colouring the base images - the inktense pencils work well over the brusho background.  I then cut out the bird nests and decoupaged onto the base images with pinflair glue gel. I cut out a few of the flowers and added.

Stamped sentiment die cut into an oval to finish.  This 'step into spring' was a magazine freebie and ive used it so much as i think its a lovely sentiment, stepping out of the grey of winter and into the beauty of spring. 


Just close ups.   

Im not sure what my camera/light box did to the colours of these, they arent quite as luminous in real life😀

Items Used:
Katkin krafts stamps 'love nest'
Sentiment stamp
Spellbinders die
Brusho powders
derwent inktense pencils

Thank you all for stopping by once again. Ive got a day with my 5 nieces today and tomorrow so will be crafting up a storm with them, but hopefully we get a bit of the break in the rain to get some fresh air.   Hugs Emmax

Id love to enter the following:


Monday, 24 April 2023

In the birds nest

Good Morning everyone

This is one of those projects that turned out nothing like what i had in my head😀 

 I don't use much double sided tape, but i do use red liner for my envelopes and have been keeping the plastic rings that come in the middle, as thought i could use them instead of adding to landfill as our council won't take them for recycling......so a birds nest seemed a good starting point.....then these rainbow birdies turned out to be real magpies adding everything in sight into their nest😂


Canvas size 6x6".   See below for step by step of my background and nest building.  Once that was finished I stamped and coloured tim holtz crazy bird stamps and cut them out. 

I found a nice dry twig which i cut in half and adhered either side of the nest to give the effect of it being on a tree branch and surrounded with paper flowers picking up on the colour of the birds rather than true spring blossom colours.  

Creative expressions chat stickers which i backed with black card and covered with glossy accents 'Be real not perfect' 'choose happy' 'be unique' & 'dream'

To finish I edges the canvas with black which frames the scene nicely.


To adhere the plastic ring to the canvas i first glued it with glue gel and once that was dry, I tore old tissue paper into small pieces and used mod podge to adhered it, adding plenty over the top and sides of the hoop, i added 3 layers so that i had a good surface for my mediums to stick too rather than the plastic (pics 1&2).

I then took texture paste and smoothed it over the ring with a palette knife, I put some slight grooves in it to give it a look more like twigs (pic3)  I then used the texture paste through a splat stencil on the rest of the canvas (pic 4)  

Once the texture paste was completely dry I dabbed on acrylic paint in the same colours I used to colour my birdies - yes at this stage it looks a right mess (pic 5)

I then dry brushed on white gesso on the canvas and back gesso on the nest area.  This softens the 'mess' but you do still get the colours coming through (pic 6)  Doing layers like this really does make a difference to the finished artwork, rather than just having flat colour.  

I then dry brushed white gesso over the nest to soften the black (pic 7)

I filled the nest with reindeer moss & twine and then feathers in the same colour as my birds.

Then i dry brushed cadence dora paint in 'diamond' & 'gold' over the top to give a lovely shimmer to the finish when the light catches it - these paints give a similar effect as gilding waxes but i personally find them easier to use and of course being an acrylic paint they are far more versatile than some waxes..

Now this was my finished nest for my eggs but once I added the birds It just wasn't working and after days and days of thinking & looking and adding more and more it ended up like the finished result - very eclectic😁

and how i made my bird eggs.  A pack of foam eggs from poundland to start with, so that they were easier to handle i stuck them onto cocktail sticks which i could stand upright in a piece of polystyrene... I first coated them with white gesso, then mixed up the shade of pale blue i wanted in acrylic paint and gave them 2 coats, once dry splattered with brown and blue paint to give the speckled effect............for a first attempt at anything like this I was very pleased with the outcome....as the bag of foam eggs was quite large I will have to make some more in the future.

This just shows the plastic centres from the red liner tape, they are different depths, for my birds nest i used the deepest one of 8mm


Items Used:
Tim Holtz crazy bird stamps
Woodware mini splat stencil
Golden texture paste
Candence Dora paints 'diamond' 'rich gold'
Derwent inktense pencils
Black & White gesso
Pebeo acrylic paints
Creative expressions wordies sheets 'CEW003'

At the bottom of this post is some bead suncatcher ive also made using the plastic hoops if you fancy a peek.   Thank you all for stopping by, I hope my eclectic birdies have brightened your day with a smile and wishing you all a great week.  Big Hugs Emmaxx


Id love to enter the following:


***
https://art-journal-journey.blogspot.com/2023/04/recycle-reuse-repurpose.html - i have repurposed the doublesided tape ring  & used tissue paper from a shoe box in the background

***

***
***


***


I also thought they would make great bases for some wire & bead suncatcher, i used the 4mm plastic inserts for these
This first one is a little garden scene with yellow, orange and red flowers, a little dragonfly is flying by too.  Approx 3" (8cm) in diameter 
I first wrapped them with 1mm craft wire, this one in 2 shades of green.  I often use metal base hoops for my suncatcher so the bonus of these plastic ones is they are so light to start with, so i definitely be keeping them all from now on.  Great to keep them out of landfill and make something pretty with them.  
 

Version 2 is the sun,using gold and orange wire and beads with a large crystal prism in the centre to give off rainbows when the direct sun hits it.


and version 3 is very blue, I found this butterfly broach in the charity shop and its the ideal centre, it is full of crystals that really shimmer in the light, i then used blue wire and beads to give the effect of a blue summer sky the butterfly is flying through.