Followers

Showing posts with label Tattered lace fern die. Show all posts

Monday, 13 July 2020

Who let the dogs out?

Good Morning everyone.

Today im sharing a mixed media picture.  Years ago i did a cat picture and had in mind to do something with the crazy dogs - i finally got around to it.  
As you can see someone let all the dogs out and they have escaped to play in the woods among all the undergrowth and foliage. 

Size approx: 6x12"
So i first made a background base layer with brusho's in lime & lemon.  Once dried i stencilled on paw prints with silver paint and flowers with a gold pearl texture paste.
I stamped and coloured in my crazy dogs with inktense pencils and fussy cut them out.  I went with crazy colours.
Then using all those little pieces of card left from backgrounds over the years i die cut lots of different foliage, i then got arranging my greenery and dogs - which took some time getting a placement that worked for me.
I computer printed my title with a typewriter font, cut on a wonk and matted onto black, I used dies for the word 'dogs', i then covered them all in glossy accents to give an enamelled look.

Close up, the dogs all have glossy accents on their noses and eyes


And lastly the answer as to who let the dogs out....this guy reminds me of mutley....he is sitting on the sideline chuckling at the chaos he's caused😁

Now Mutley is showing my age for those of you who don't know he was/is the side kick of dick dastardly of whacky races

Items Used:
Tim Holtz crazy dogs mini stamps
Tattered lace fern die set
Various leaf die sets
Alpha tile die set
Inktense pencils
Brushos, Oxide & wink of stella for all the foliage

I hope my little piece of wall art has made you smile this Monday morning and that you all have a good week. Im having to rest my hands from wire working so i expect i shall be papercrafting this week.  Stay safe. Hugs Emmaxx


Id love to enter the following:

https://countryviewchallenges.blogspot.com/2020/07/july-2020-do-what-makes-you-happy.html  - Creating these little scenes with stamps makes me very happy and this one had me singing along too with the song....who let the dogs out😁

***


Monday, 28 May 2018

Go Green - Upcycling

Good Morning everyone.

Its time for a new challenge over at Make My Monday,
 the theme this fortnight is:

GO GREEN
Upcycling, recycling, reuse


So i had a dig around and came up with used toothpaste tubes, cat food tins, cat food boxes and plastic packaging and had fun making this wall hanging.  I decided it would be good to go with a nature theme as we can all do our own little bit to help nature and the planet by recycling and reducing our use of plastics and packaging. 


8x8 mountboard panel for the base.  I covered the base with a couple of patterned papers.  I then added a panel of corrugated cardboard with some of the front torn off to reveal the corrugation and texture and added to the base. 
After preparing my recycled items - see below for full details  I arranged them to my liking, 

I added a feather to my birds wing and a couple of others amid my die cut greenery, as well as the foiled foliage i added die cut ferns.

A close up, i added twine in the background for more texture, buttons to my plastic packaging flowers.  Chit Chat stickers used for the title 
'Cherish Everyday  -  Beautiful World'


This shows my used items, 2 toothpaste tubes, ive turned one over so that you can see that although plastic tubes they are foil lined - they are 2 different brands aquafresh & oral B so i think most modern plastic toothpaste tubes are lined, just cut off the top and bottom and cut along one side, wash and they are ready to be used, the cat food tin is foil, plastic packing - some crafty dies came in that and then the cardboard cat food box, has a lovely brown tone to the inside.


This shows them die cut, the leaf swirls are toothpaste tube, the leaf from the foil tin, plastic flowers and the brown bird from the cat food box.  I used my old Sizzix bigz dies to cut them all.


The plastic package flowers, toothpaste & foil all take alcohol inks beautifully to colour them, you can get a lovely marble like effect which adds more interest to them instead of flat colour.  The cat food tin foil is brilliant as you can mold it into shape. 


Items Used:
Sizzix Bigz dies - Flower Layers #5, birds, vine w/leaves, fern
Tattered lace fern dies
Tim Holtz chit chat stickers
Tim Holtz alcohol inks - various colours


I hope i have inspired you to maybe look at some of that 'rubbish' we all produce and think of another way to use it.  Please do hop over and see what the rest of the team has come up with and also what all those entering come up with over the fortnight.  I think this is going to be a good challenge, lets all do a little for our beautiful world.  


Thank you as always for stopping by and all your comments last week. I hope you all enjoy your bank holiday Monday and the sun shines. Emma


Monday, 14 May 2018

Floral birthday

Good Morning all, i hope you had a good weekend.  

Can you believe its a fortnight gone again and time for a new challenge at
The theme this time is:


A Hint of Summer to Come


I found a lovely summery floral paper with blue cornflowers in my stash to go with.  I picked out co-ordinating cardstock and dies to go with.


5.5 x 7" white cardblank.  I first stamped my sentiment direct onto the cardfront and then die cut my pattern paper with a MFT edge die, layered it onto blue cardstock cut with the same edge die,  i added this to the cardfront with foam tape. 

I made up a cornflower using my old Tonic cornflower die and added a button centre.  I die cut different foliage from orange and yellow cardstock to pick up on them in the paper.  Ive had the Sue Wilson foliage die years but its such a pain to cut cleanly that i rarely use it but its perfect with this paper. 

I added a thin strip of blue to the top edge and 3 yellow buttons to finish. 


Exactly the same details as the first one but just reversed with the paper at the bottom and white linen card on top.  


Hopefully summer will arrive soon and i have lots of beautiful flowers in the garden!  So if you fancy joining our challenge or just want to see what the rest of the DT came up with and all the amazing entries, please do hop over to 


Items used:

Paper - B&M
MFT scalloped edge die
Tonic cornflower die
Sue Wilson Fern Trio die set CED1401
Tattered Lace - ferns die set
Clearly besotted sentiment stamp


You might also be interested in:


Thank you for stopping by and all your visits and comments last week, i hope you all have a good week. 


I would like to enter:


Monday, 12 March 2018

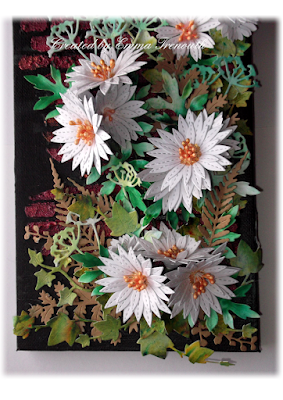
Daisy Mixed Media Canvas

Good Morning all, i hope you all enjoyed your weekend. 

Today i am sharing this Mixed Media Home Decor Canvas that i made for my mum for Mother's Day. 


Box Canvas 16x6" (40x15cm)  After doing the brick background (see below for details) I die cut lots of daisies from white card, made them up, added yellow stamens & florists wires for their stems.  I then die cut various foliage from brusho and inked cardstocks in different shades of greens and ferns from kraft card.  I then slowly built up the layout.


The top half.  I added a lovely big bee metal charm ive had in my stash for years.

The bottom half, i added more foliage and ivy in the bottom as you naturally find at the bottom of a wall


Just close ups. Once it was all stuck on i sealed everything with a matt sealant to keep it all fresh. 


The wall - first i added texture paste through a stencil and once dry i added black acrylic paint over the whole canvas.  Once dry i put the stencil back over and added red and orange starlight paints to the bricks, i found doing it this way kept the black between the bricks better.  I then added touches of green paint to give a kind of mossy effect once everything is added on top. 

Items Used:
Tattered Lace fern dies
Joanna Sheen & Brittania Ivy dies
Heartfelt Aster die set
Stitched Daisy dies
Tim Holtz foliage die
Brick stencil
Imagination crafts starlight paints
Golden Texture paste
Cracked Pistachio & twisted citron oxide inks
Brusho's


Thank you for stopping by and all your visits and comments last week and congratulations on the arrival of my new niece. I hope you all have a good week. Emma 


Monday, 27 February 2017

Floral shutter cards

Good Morning all.  
Sorry I missed Saturdays upload, was down with a major migraine and then we lost electricity so made for a weekend best spent under the covers😞


So today im sharing 3 shutter cards ive made, all flower power as its always one of my favourite to make.   I was sent the shutter card blanks from a good friend and the mats, so the fun was finding stuff in my own stash to go with them. 


Navy card blank, beautiful navy and blue pattern paper from poundland, matted onto kraft card.  I found the peach/salmon paper in my stash which seemed to go well and brighten up the colour.  Die cut with Sue Wilson cornflower dies, i inked the edges, glued together and once dry fluffed up the petals to add dimension.  Tattered lace fern cut in pale blue card. Gem centres to finish.


close up of the flowers


So for this one, grey cardblank and the lovely grey/orange/turquoise check paper came with them, flowers die cut from various matching paper and white card, sizzix dies, little butterflies, grey pearl card used for the foliage.


Close up


Get well shutter.  So for this one the purple card was in the box and i found the pink pattern paper in my stash which matched well and toned in, matted onto white to break up the colour.  Flowers cut in white and inked with blue, blue pearl centres. Butterflies.  Foliage cut in mint green which matches the background of the paper. 

Close up. 


Items used:  Sue Wilson Cornflower die, Tattered lace Fern die, Memory box cross stitch rectangles, Sizzix flowers 658602, spellbinders romantic vines, sizzix butterflies 659971


Thank you for looking and popping by.  I hope you all have a good week. Emma 

Thursday, 22 December 2016

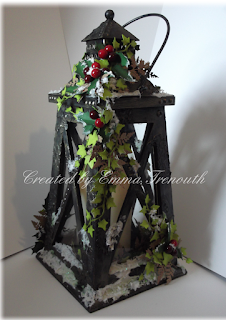
Christmas Lantern Home Decor

Good Morning all.  I hope you are all getting there with your Christmas Preperations.  So today i am sharing this Christmas Lantern project that i made for my mum for Christmas, i gave it to her early so she can enjoy it over the festivities.  Its actually wood so ive added a battery candle.  Its photo heavy so you may need a cup of tea but i hope you enjoy looking at all the little details. 


So first i painted the whole lantern with black gesso, then added lots of texture with texture paste, die cuts & pearl drops to give the rivet effect and then covered in black gesso again, i then highlighted with metallic paint in gold and silver to give it a tarnished metal look.  This is a new technique for me, never done anything like it before but it was great fun. 


White texture paste which faux snow and glitter to give the snow effect.  Lots of die cut holly and ivy in various greens, tattered lace fern die cut in kraft card, red plastic berries.

The little holder i made to keep the candle in place inside


And below is how the lantern was when i bought it, wood base and metal top. 

And for a little Christmas Cheer, here was our late night visitor dropping in! lol   This chap has been on an intensive feeding programme to fatten it up to hibernate, so in the last 2 months its done amazingly well. However as much as i love the little hedgehogs - not in the home thank you! lol  Maybe he was looking for his christmas dinner last night! 


Thank you for looking and taking the time to view all these photos today.  My mum and dad loved the lantern so made all those weeks of work worth it.  

Wishing you all a very Happy Christmas.  Emma