Followers

Showing posts with label pine cones. Show all posts

Friday, 5 December 2025

Christmas Decoration - Creative Artiste December

 Good Morning all

Its the 1st Friday of the month so time for a new challenge over at Creative Artiste where the theme is anything goes mixed media - using at least 3 different mediums.  

The DT have gone with a Christmas theme fitting the season but you can join in with any theme.

Ive made a light up stained glass effect decoration for the wall or internal door.  It is 8x8" in size and Ive thrown lots at it - glitter paste, halo paste, alcohol inks, brusho's and some white gesso for the snowy effect.


I first added gold glitter paste and green halo paste to a piece of acetate with snowflake and star stencils.  Once dry I added blue & purple tone alcohol inks to the back

See below for how I made up the frame... once that was finished I die cut pine branches from brusho powder stained cardstock and my deer from brown card - for the deer I layered 3 together to give them a chipboard like feel and give the antlers more stability.  I tore some white card to fit the bottom and dabbled on white gesso to look like snow for the deer to stand on.  I added the pine branches in place with some mini fir cones.  

To finish I splattered on white gesso to look like snow and dabbed some onto the pine cones and deers antlers. 


You can see the texture paste on the bauble better here, the gold glitter paste is very shimmery and the halo paste is subtle but when the light hits it it has a green pearlescence 

And showing it all lit up


I made up a frame using nesting dies, white card and gold mirror card adhered together and then run through an A4 snowflake embossing folder.  This frame I added over another frame cut using a large bauble shaped die - behind the bauble frame I added the acetate.  By layering several frames together its given it all rigidity to hold upto being handled when turning the lights on and off and hopefully give a few years of enjoyment.

I die cut white card with the largest die I used for the front and adhered clear micro lights to the middle, taping into position.  I then added foam tape around the outside edge and adhered the front panel on top - the foam tape adds space for the lights to sit comfortably in place.  I adhered the light switch and battery pack to the very back of the decoration for easy access.

Items Used:
Cosmic shimmer Ultra sparkle texture paste 'sahara gold'
Stamperia Halo paste 'Green' K3P70B
Tim Holtz alcohol inks - shades of blue
Brusho Powder 'sea green, turquoise'
White gesso
Creative Craft XL Stretch circle dies
Spellbinders ornament die set (old)
Tattered Lace A4 snowflake embossing folder (old)
MFT deer dies 'die love' (quite old)
Pine branches dies (? so old ive forgotton the brand)
CraftUK ltd smooth white A3 card
Gold mirror card

Hop over to Creative Artiste to see what the rest of the DT and Guest DT have created and to join in with your anything mixed media goes. 


This is the last make for my 1st year on the DT at Creative Artiste as we have a break in January.  Its been great fun stretching my brain cells for so  many different mixed media projects this year.  I thought it would be fun to see them all together, just click on the link below each if you would like full details

     
Snowdrops                    Bee Awesome 

                          
       In the nest                                   Butterfly suncatcher

        
                        Key to the heart                       Mother Earth

                             frog ATC trio                        Lemon Wreath

 
                                Pumpkins                            Autumn


Thank you for all your support and encouragement this year.  Wishing you all a very Merry Christmas and a Happy & Healthy New Year.  Big hugs to you all Emmax


Id love to enter my Christmas decoration into the following:


**


Thursday, 28 November 2024

Advent calendar

Good Morning everyone

This is a type heavy post so you may want a nice cup of tea, coffee, hot cocoa or even glass of mulled wine😁

Every year i refill advent calendars that i made for my 5 nieces and they love them and get so excited to see what each day contains - sometimes a sweet treat, sometimes something fun, or crafty or even sometimes something educational, this is their Christmas present from me and I think gives me as much pleasure to do as they get from opening them each day in December.

When I saw these mdf advent calendars at 'The works' I thought I would do one for my mum.  Well its been a real mission and issue after issue so Im quite glad to see the back of it to be honest but I know I will enjoy collecting little gifts throughout the year to refill it hopefully for many years to come for my mum. 

Overall size is:  17x17"    The inset scene area is: 12x12"

Now on arrival One side was not attached at the bottom so i glued it back together along with a couple of the drawers that the fronts had fallen off and I took all the drawers out assuming them were all the same size - on putting them back i soon found that wasn't the case and after alot of trial I found out which draw fit which slot and wrote the numbers on both to make easier another time!  A few of the drawers were really tight so i had to sand them, I would have liked to paint the whole drawer inside and out but due to being so tight i didn't want the mdf to swell too much so i have just decorated the front of each draw.

I covered the front of each draw with various snippets of Christmas papers - ideal for all the little scraps so they come from a variety of papers, i just made sure they were all in shades of red and greens.  I cut around the handle notch in the top of each drawer and then inked all the edges with white gesso and coated with glossy mod podge to seal and help keep it fresh and clean each year.  


The back removes from the middle inset area, so i added a fabulous paper that came in a 12x12 paper pad from the works and is a lovely snowy tree scene which i thought was ideal background for my snow scene.  I added a set of cheap fairy lights i had from poundland around the square - the micro ones would work better but I didn't have any so these had to do! 

 I gave it a coat of mod podge.  To the bottom of inset i added texture paste with foam balls and faux snow flakes included, coated with white gesso.  

From my stash collected over the years I added a large wire brush tree and some smaller brush trees.  To the big one i added these little fairy little buttons and some faux snow and glitter. 

I paint some wooden snowflakes with white gesso, added a little glitter glue and adhered them to the back panel.

I added a little white fence to the back, leaving a space so it looks like you are going into a park or similar.  I added a little black plastic lamppost which id added a little texture paste 'snow' and a little sledge - the kids have run off into the park to explore the winter wonderland😀

I added faux foliage, real medium and small pine cones and some red berries to frame the scene.  I used red beads for the berries in different finishes so they catch the lights. 


This shows where i wrote the numbers for each drawer on the bottom of the drawer and in the slots so that makes it easier to replace them in the future

Now another big issue was that after decorating the drawers and putting them back in, I really struggled to get them out with the handle notches and the fronts pulled clean off the drawers and realised that my mum who has bad arthritis in her fingers would really struggle so I decided to add little handles to make it much easier to pull them out so she can hopefully manage for many years to come.  

 I only decided this after i had die cut and added the numerals to the middle of each drawer so i punched 1" circles from more scraps of paper to cover up the numerals and add my handles. I then used smaller numeral dies to die cut the numbers again from white and add - these are alot smaller than the original numbers.  Where the numbers didn't stand out very clearly on the busier papers i went around them with a black find liner pen.

These little handles were an ebay find, they are on very long brads which were long enough for the 5mm mdf front, however for longevity and as some of the draws are so tight i also added a good blob of pinflair glue gel behind the metal piece on the front to really hold them in place.  Of course if you don't have a dust allergy and are able to use an electric sander you could easily sand all the drawers to make it so much easier.

Showing it all lit up.  I gave the whole advent a coat of white gesso and then white pearl dora paints which are really shimmery.  On the top of the advent i added a little texture paste and more of the dora paints for a snowy effect.  The whole unit was varnished so will keep it dust and dirt free over the years. 


This is how it looked before i decided it needed extra handles on the drawers.  Having now filled the little drawers with goodies I know i made the right decision as so much easier to get them in and out so my mum can use them with ease.  

I am glad I preserved with this - at one point i was ready to put it on the fire!!!  But its taken so much longer and been way more stressful than it should have been.   I certainly wouldn't buy another one of this style. 

Hopefully mum loves it!

Id love to enter the following:


Monday, 13 December 2021

Christmas Owls

Good Morning everyone

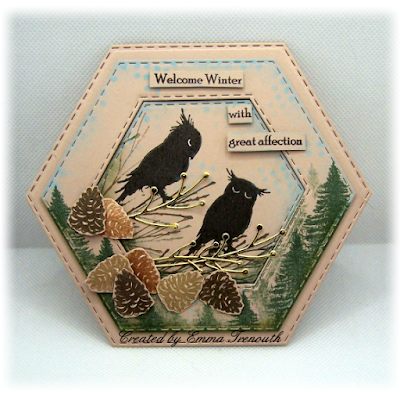
Just this last lavinia stamps card to share as my last Christmas card this year.  I made a couple of these Lavinia owl cards, one for my parents for Christmas.  Ive stamped onto a kind of pinky/coffee colour pearl cardstock.

Approx 6x6" card.  I used the hexagon dies to make my base card and die cut a smaller hexagon from white i cut a smaller one from the middle.  On the frame i stamped the fir trees towards the bottom and stencilled some small dots with oxide ink to act as snow.  I inked around the top edge with the same oxide ink and around the bottom with green distress inks. I added 3d foam tape to the back and added it to the base card.

On the smaller hexagon i first stamped the owls with black archival ink and then i stamped the pine branches around them with archival inks to make it look like they are standing on the branches.  I lightly stencilled patina oxide ink dots to act like snow around them.  I glue this hexagon flat inside the frame.  I die cut a couple of little branches from gold mirror card and glued under the owls.

I stamped lots of pine ones with brown ink tones onto scraps of the pearl card, cut them out and arranged with glue gel.  Stamped quote cut up and added to finish. 

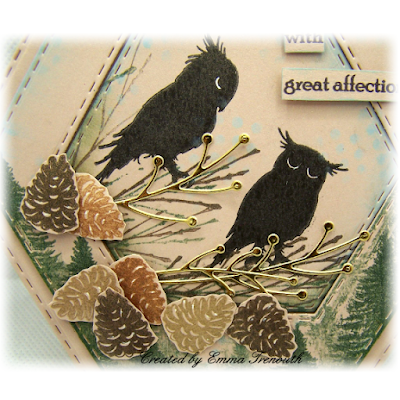
Just a close up, i used a white gel pen on the owls eyes as they were a bit lost and also to highlight the pine cones a bit.

Items Used:
Lavinia Stamps - 'echo & drew' 'fern branch' 'mini pinecone'
 'fir tree' 'seasons change'
Memory box stems die
Hexagon die set
Dotty stencil
Oxide inks - Tumbled glass, salvaged patina
Distress ink - forest moss, pine needles
Archival ink - Library green, sepia, potting soil
Pearl cardstock - payper box
Gold mirror card


Thank you all for stopping by once again.  I hope you all have a good week.  Stay safe and keep warm.  Hugs Emmax


Id love to enter the following:

***

***

***


Saturday, 12 October 2019

Christmas Card

Morning Everyone

Today im sharing a little Christmas card.


6x6 Ivory card base, I was following a sketch by a friend and it had the look of a ribbon wrapped present to me so thats what i went with.  I used papers all from the same paper pad and ivory base card as was softer than white which was too harsh with the paper.  I matted a sheet of the paper onto brown card, wrapped with a lovely red ribbon and added to the base card.  I them die cut the sentiment circle from the same brown card, mounted onto an ivory circle and added to the middle.  I then die cut some pine cones and foliage from the same paper pad and arrange in the top right corner.  A little chipboard birdie to finish - id added a light touch of red to his breast like a little Robin.


A close up on my pine cone and pine branches. 


Items Used:
BasicGrey 'Evergreen' 6x6 paperpad
Ivory & brown cardstocks
Red ribbon
Chipboard Bird
MFT Christmas sentiment circle
Spellbinder circle dies


Thank you everyone for stopping by once again.  I hope you all have a good week, i have 3 weeks of school half terms ahead, with family down from the Isle of Lewis this week for theirs, then its 'my girls' half term next week and then the week after that its more cousins down for their half term. Would be too simple for them to all be the same week wouldn't it😁 Still looking forward to all the family catch up time. Emma


Id love the enter the following challenges:


*****