Followers

Showing posts with label Sizzix. Show all posts

Monday, 14 November 2022

Happy Christmas

Good Morning everyone

Today is a batch of very simple Christmas cards.  I wanted to use up the sizzix biodegradable glitter i was given last year which is very very sparkly, which sadly the photos don't pick up, I wanted it to be the focal point with the sentiment.


Approx card size: 3.5x5"   Using sizzix (658204) die to cut my white base card and a lovely Christmas paper which i matted onto the base.  I die cut the Happy using alpha dies from white card and adhered them to some double sided adhesive sheet, i then sprinkled the glitter over the top and rubbed it in, making sure it got in to all the bits on the letters.  I then cut this to a strip and matted onto green cardstock.  Computer printed the word 'Christmas', cut and matted onto more green card.  I then adhered the christmas word flat to the card front and added the glitter word with foam tape for some dimension. 

I added glossy accents to the berries on the backing paper to finish.

Showing it stood up, this make a lovely little shaped card

Version 2

Version 3.  Difference here is that i used an offcut of the glittered adhesive strip under the Christmas word

Version 4 used a blue grey snowflake paper so i used different colour glitter and also added small gems to the snowflakes to finish


These were a great way to using up all the small off cuts of white card for the alpha's 

Items Used:
Unknown brand alpha dies
Sizzix framelits die 658204
Sizzix biodegradable glitter 663884 - mint julep,663871 - cobblestone,663876 - mango tango,663870 - caramel toffee,663878 - hibiscus
Christmas papers - the works

Thank you all for stopping by once again.  I hope its a good week for you. Emmaxx


Id love to enter the first card in the following:


***

***

***

***


Monday, 29 August 2022

Charlotte is 3

Good Morning everyone

Yesterday my youngest niece Charlotte turned 3, these are the 2 cards i made for her, one from me and one from my parents.  

7x7" lever fold card.  I found this fab mermaid image in my stash from hobbyhouse so  I picked up on the colours in the topper and found a purply water themed paper, its all matted onto chocolate box purple mirri card.  I die cut my sea elements from scraps of paper, using green for my fish to pick up on the green in the image. Computer printed sentiments die cut into circles and lots of glitter highlights to finish. 


Showing it fully opened out, i had another smaller mermaid topper and decided to fussy cut and add to the inside with lots more sea creatures. 


I picked out the die cut details in the creatures with paint pens, the net behind the mermaid was die cut from an off cut of the purple mirri card.  I added a panel to the back of the card to write the greeting on. 


card 2.


Its always hard coming up with 2 totally different cards for each niece and also having 5 nieces to keep coming up with different ideas!   I found this fab flying pig paper in one of my paper pads from the works and thought it would be ideal as they had just had a little of piglets arrive on the farm so its always an exciting time for the children.  I teamed the paper up with a copper satin card.
XL DL (4x11.5")  card, so A4 folded in half lengthways.
I matted the paper onto the copper satin card, rounding all the corners as i went.  I then die cut the alphas from the satin card and mounted onto white die cut circles, these i added to the base with foam tape.  Die cut the birthday sentiment from copper & white and added a drop shadow with the white to help it stand out a bit. Glitter highlights to the wings to finish.

This isn't really the layout i would have gone with, with the placement of the alphas but when i came to attaching them i tried not to hide all the pigs faces.  


Trying to show the light hitting the copper satin card as it really it lovely - sadly photos like with the mirror card don't do it justice.


Items Used:
Hobbyhouse mermaid topper
Papers from old paper pads from B&M
Spellbinders circle dies
Tattered lace Alpha dies
Sea themed dies
Sizziz birthday die
Rangers stickles glitter glue- diamond, twinkle

Thank you all for stopping by.  I hope you enjoy your bank holiday monday and have a great week. Emmax


Id love to enter my mermaid card in the following:

Monday, 28 March 2022

Birthday Chicks

Good Morning everyone, I hope you had a good weekend.  

Today im sharing a male birthday card made for my brother who has always kept chickens.  Its those aall&create chicken stamps in action again and a very old paper pad as i continue to try and make a dent in the old stash.


7x7" white cardbase.  I first stamped and watercoloured the chickens and cut them out....I die cut several polaroid frames from white card, adhering 3 on top of each other to build up a thicker frame so its almost like chipboard. I attached the frames to a teal blue paper which i cut slightly larger than the frames, i tore a yellow paper to fit in the frames to give the chicks some ground to stand on. I stamped the words from the stamp set onto the frames and then arranged the chickens gluing them with pinflair glue gel.

I took a sheet of wood panel paper from the set, inked the edges with walnut distress stain and added to the middle of the cardfront.  I had a few small offcuts from previous use of the paper pad that i used to add detail to the top and bottom edges, attaching just behind the wood panel paper. I added a large die cut circle to the middle and then added the polaroid frames.  Stamped greeting cut into a circle.

I had a couple of extra chickens so i added one to the bottom right of the front just for fun. 

Just a close up of the chickens.  I did add my usual glossy accents to their eyes.

Items Used:
aall&create stamps 'chicken dance'
Sizzix polaroid frame die set
Clearly besotted sentiment stamp
Circle dies
My Minds Eye Paper pad 'miss caroline- dilly dally'
watercolour marker pens
Range glossy accents

Thank you all for stopping by once again and all your comments.  I hope its a good week for you.  We should be having scaffolding going up today for a new roof, that will be fun but good to get it done. Hugs Emmax


Id love to enter the following:

***

***

***

***


Monday, 8 November 2021

Embossed Baubles

Good Morning everyone

Going on from my last cards using up left over white pearl card off cuts i die cut lots of baubles and used various embossing folders on them.  Teamed up with off cuts of patterned papers.


DL size white base card - made using the same white pearl cardstock as my baubles, i had little strips of black card which ive glued to the back of the top and  bottom edge of my blue patterned paper for a faux mat layer, and then added this to my card base.  After embossing my baubles i very lightly inked over the top with black soot distress ink to just help the embossing stand out a little bit more.
I gently curved the baubles and added to the card with glue gel to give them a bit of dimension.  From snippets of card i die cut the bows and added with a touch of glitter glue to the centre to finish.

Version 2 is a black DL base card and i used white pearl for my faux matting and a different shaped bauble

Version 3 a nice tartan background


and version 4 is purple & pink


and below using smaller baubles for an A6 card

Made the same way with using little strips of black card for my faux mat look, the string and bow cut using the same bow die set too.  Stamped greeting to finish

and a black version. 

Items Used:
Spellbinders dies - baubles - 2011 & 2012 Heirloom Ornaments
bow die set
Cheerylynn Christmas sentiment die
Various embossing folders
Various patterned papers
Ranger stickles glitter glue
Black cardstock
White pearl cardstock

Thank you all for stopping by once again.  I hope you have a good week.  Hugs Emmaxx


Id love to enter the following with my first card


Thursday, 1 April 2021

Spring Daffodils

Good Morning everyone

Today is a little Spring Daffodil card - my garden is so colourful at the moment with the daffodils & tulips in full flower.


Approx size 5.5x4"  I first cut my card base from orange pearl cardstock and a sizzix die, after folding a piece of A4 card in half i placed the top edge of the die just over the spine and ran through my machine.  I cut a small panel from a pale lilac cardstock and die cut the memory box die from the middle, i added orange mirror card behind this to shine through.
I die cut the daffodil twice from a left over piece of white pearl cardstock, i coloured it with alcohol markers, on the 2nd daff die cut i just cut out the daff trumpets and decoupaged them onto the main image to add some dimension.
Stamped sentiment to finish.


This photo really shows the orange mirror card in the background.

Items Used:
Sizzix 658204
Memory box
Daffodil die
Oval die
Clearly besotted sentiment stamp
Alcohol markers
Orange pearl card
Lilac cardstock

Thank you all for stopping by.  I hope you all enjoy your Easter Weekend. Stay safe. Emmax


Id love to enter the following:


***

***

***


Thursday, 13 June 2019

Happy Fathers Day

Good Morning everyone, thank you so much for all your amazing comments on my seahorse creation. 

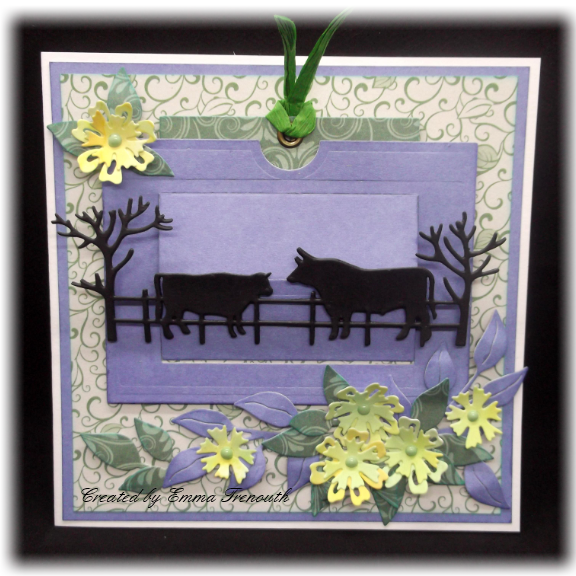
Today Im sharing the card Ive made for my dad for Father's day, I've used the sizzix slider die again and gone with a farming theme.  


This first photo shows the slider panel closed.

6x6 White cardbase.  Ive used beautiful papers in blues & greens from B&M.  I first die cut the sections of the slider mechanism from my chosen papers, these B&M papers are ideal for this as a good weight but also light enough to fold easily.  I stamped my greeting on the panel that is revealed when you pull the slider part back.  I added an eyelet in the hole and added some green paper raffia to make it easier to pull the slider up. 

I cut a panel of the green leaf paper and layered onto a large piece of the blue paper and attached to the card front. I then attached the slider to the card front with foam tape. I attached the bull & cow chipboard after painting it black to the front part of the slider. 

From a scrap of yellowy inked card i die cut some flowers and die cut leaves from the green and blue papers. I then arranged these around my slider panel. I added some pale green enamel drops to the flower centres to finish. 


This photo shows the slider panel open to my (wonky) stamped greeting, i used 2 different sentiment stamps.


This photo shows the card laid down and the slider open so that the cattle are then stood up and sort of looks like they are in a field.  My yellow flowers could be buttercup's, celandine's, or primroses, alot of my dads fields are meadows so full of lots of flora & fauna.


Items Used:
Sizzix tropicool slider die set 662783
Tim Holtz funky foliage 663087
Cow&Bull fence chipboard
B&M Papers 12x12 'Seas the Day' & 'Botanical Bloom'
Justrite & clearly besotted sentiment stamps
Oxide inks twisted citron, lemonade & pistachio

You can see my first card made with the slider set here for more details

Thank you all for stopping by. Emma


Id love to enter the following:


*****


******


******


*****


******


Monday, 6 May 2019

Thank you slider card

Good Morning everyone, i hope you are having a good long weekend.  

So today im sharing a slider card.  I bought a sizzix die set 'tropicool slider 662783' that makes the sliding mechanism, the set comes with toucan birds and tropical theme dies, i thought it would be ideal for the children,  but for this first card i just used papers from my stash as it was for a friend and to try it out and of course just had to add flowers.


A6 cardblank.  Ive used B&M 12x12 papers these are very thick double sided papers so ideal to cut the mechanism from and be strong enough to hold up to it.  I cut the 2 different parts of the slider die from 2 different papers and assembled (see images below for more details)  I then mounted the slider panel onto an A6 white linen cardbase. 

 I cut the foliage die in the set from a black and white paper and flowers using flower dies from my stash from pink paper to pick up on the pink in the marbled paper.  I arranged my flowers around the slider making sure not to be in the way.  I die cut hello from the black paper and added pink enamel drops to the flower centres to finish. 

I added gold ribbon to the panel that is to be pulled.  


This shows the panel pulled open, i stamped thank you onto a pink patterned paper that was glued into place under the mechanism.  To get the sentiment in the right place i held the slider panel pulled open on top and lightly added pencil marks where the sentiment was to be stamped. 


This shows the card laid down flat with the slider part that pops up. 

This photo shows it from the side, when you pull the tab it pulls it  up into this triangle shape and it stays open/up until you manually push the tab back in.  Ideal for hiding a little hidden message or surprise - or maybe hide a gift card in there.  It was easy to put together as the dies do all the hard work adding the score lines etc.

Items Used:
Sizzix - 'tropicool slider' die set '662783'
Flower dies
Stampin up sentiment stamps - curly cute
Papers - B&M 'Trendy' & B&W
Viva paper pens - pink
Gold Ribbon
CraftUk Ltd white linen card

Thank you all for stopping by and all your amazing visits and comments last week. I hope you all enjoy the bank holiday today and have a good week. Emmax


Id Love to enter the following:


*****


*****