Followers

Showing posts with label gift boxes. Show all posts

Wednesday, 18 December 2024

WLS Dec #2 - Winter

Good Morning everyone


Time for more inspiration for We Love Stamping where the theme this month is WINTER or you can always go with the anything goes theme as long as stamping involved.

Ive made a little warming treat for a friend, a little pouch with a couple of hot chocolate sachets in.


 Ive used this little hot cocoa kitty stamp from aall&create who is all cosy in his little jumper. I stamped him onto white, watercoloured with distress inks and cut out.

I used my score board and made a little pouch big enough for the hot chocolate sachets from green paper.  I then die cut 3 tags from off cuts of green and red papers to match the colours in his jumper.  I adhered the tags together, off setting them so you can see all 3 at once.  I die cut some little cups from white card and adhered in a stack of 3 on the smaller tag & added the kitty with glue gel.

I stamped the 'hot cocoa' onto white and matted onto green, white and then the tag.  I punched a hole in the top of the tag.

I punched 2 holes in the top of the pouch and tied on the tag using red & white bakers twine.


Just a close up


This makes a nice little get well pick me up for a friend who likes Chocolate.................can't stand the stuff myself, just the smell of anything like hot chocolate or chocolate cake turns my stomach😒

Items Used:
aall&create stamps #740 'light it up'
Stitched tag dies
joy crafts tea cup die set (very old)
12x12 Christmas paper pads from the works


and the lovely prize you could win this month 

So do hop over to We Love Stamping to join in and see what everyone else has come up with


Thank you for stopping by once again.  I think this will be my last post before Christmas so I would like to wish you all a Merry Christmas and  a Happy & Healthy New Year.  Thank you for all your support and comments this year, I appreciate them all. 

Keep warm.  Big hugs Emmax


Id love to enter the following: 


***


Monday, 27 February 2023

Say cheese

Good Morning everyone

Today is the 2nd card I made for Kitty-Bea's birthday for me to give to her.  I used the fab mouse Katzelkraft stamp i got for Christmas to make a cheese shaped card and afterwards decided to make a matching box for a few sweets for her.


Card size approx 6x4" .   I folded yellow card in half and then cut to size, first a rectangle and then i just used my guillotine to cut the top edge at an angle.   I took a brighter yellow card and cut to the same size as the base and then die cut lots of small circles into it, with a bigger one to the right to add my sentiment too.  I then mounted this panel onto the base with foam tape after inking the edges.

I stamped 3 mice and watercoloured with distress inks 'blueprint sketch' 'peacock feathers', cracked pistachio & picked raspberry.   I then cut them out.  Gently adding some shape to the body i attached one whole mouse to the card front.  The 2nd one i cut up and slotted into the 'holes' on the cheese.  Glossy accents to the mouse nose, eyes & camera. Computer printed sentiments to finish using a very apt font called 'grilled cheese'.
and the box - i found a cake slice box template on my craft artist which i printed out, cut out and then drew around it onto the yellow cardstocks to build up the box the same way as the card.  I put the closing flap on the bottom edge and sealed with red liner tape.

and i made a 2nd card for a friend who loves Katzelkraft stamps as mush as I do, this time i also cut the right hand edge of the card at an angle to give an even more cheese wedge shape and some bling to embellish.  

Items Used:
Katzelkraft stamps 'solo 179' 'La souris photographe'
Circle dies
Speech bubble die
Distress inks peacock feathers, blueprint sketch, cracked pistachio,  picked raspberry
Yellow cardstock


Id love to enter Kitty's card in the following:


***

***

***

***


Thursday, 18 April 2019

Easter Egg Boxes

Morning everyone, i hope you are having a good week, i had great fun on monday with my nieces, they do grow so fast and all seem to have the tall gene.

 Today im sharing little fun carrot style boxes that i made for my nieces for easter, its big enough to hold a cream egg sized egg. 


I downloaded a template from the internet and printed onto white card and cut out to use as my template.  I drew around it onto orange pearl cardstock and cut out, not forgetting to cut in the slots for closing it.  I then die cut Rabbit apertures into 2 sides, i then dry embossed the whole box with an embossing folder.  I inked all the edges with aged mahogany DI. I then added enough yellow tissue paper inside to hide my egg in and close the box.  

To make the carrot tops was trial and error, my first two ideas didn't work too well with cord and then ribbon and then i found this green paper raffia ive had in my stash for eons - knew it'd come in useful one day! I used 2 tones of green. I added 5 strips of raffia through a hole i had punched in the box tabs, i then tied them together with another piece of raffia - i added a touch of tacky pva to hold the knot tight. I then opened out each piece of raffia and carefully tore down to the centre.  I found tearing it gave a softer/fluffier look than cutting it with scissors.


This show all 4 boxes, i used a different rabbit die on each side of the box.  I went with yellow tissue paper in the end so that the girls could clearly see the rabbits. Simple but fun and im sure the girls will have fun opening them.


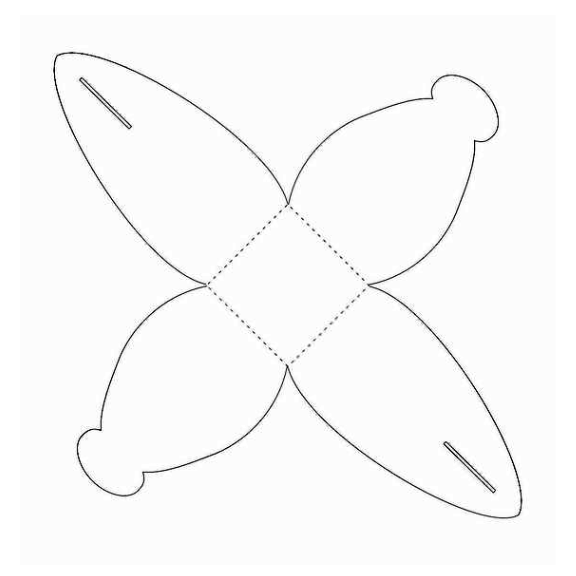
This is the shape of the box, after downloading from the internet i just enlarged it enough to fit my eggs and printed. 

Items Used:
Rabbit cutting dies
Crafters companion dots & diamond embossing folders
Orange pearl card - payper box
Green paper rafia


Thank you all for stopping by, i hope you all have a wonderful Easter weekend and enjoy whatever your plans are. 


Id love to join in at:


Monday, 19 December 2016

Pringle gift boxes


Good Morning all.  So today im sharing these revamped pringle tubes, I've turned them into little gift boxes ideal for adding treats or a little pressie in. 


Still on my using up old paper mission, i used papermania christmas papers, after washing out the tubes and drying well i covered with paper, i die cut a circle of paper to add face up under the lid so you can't see the contents, Tim Holtz Rosette dies for the topper, i made 3 sizes and layered them up with a berry on top, kind of like a tree.  Red ribbon and bow to finish. These were the small pringle tubes. 

Thank you for looking and all your previous comments.  I hope you all have a good week. Emma