Followers

Showing posts with label ivy die. Show all posts

Friday, 4 July 2025

Mother Earth Canvas

Good Morning everyone

Time for a new challenge over at Creative Artiste Mixed Media where its always anything goes as long as you mixed your medias = we need at least 3 different mediums but the more the better and be as creative and arty as you can be

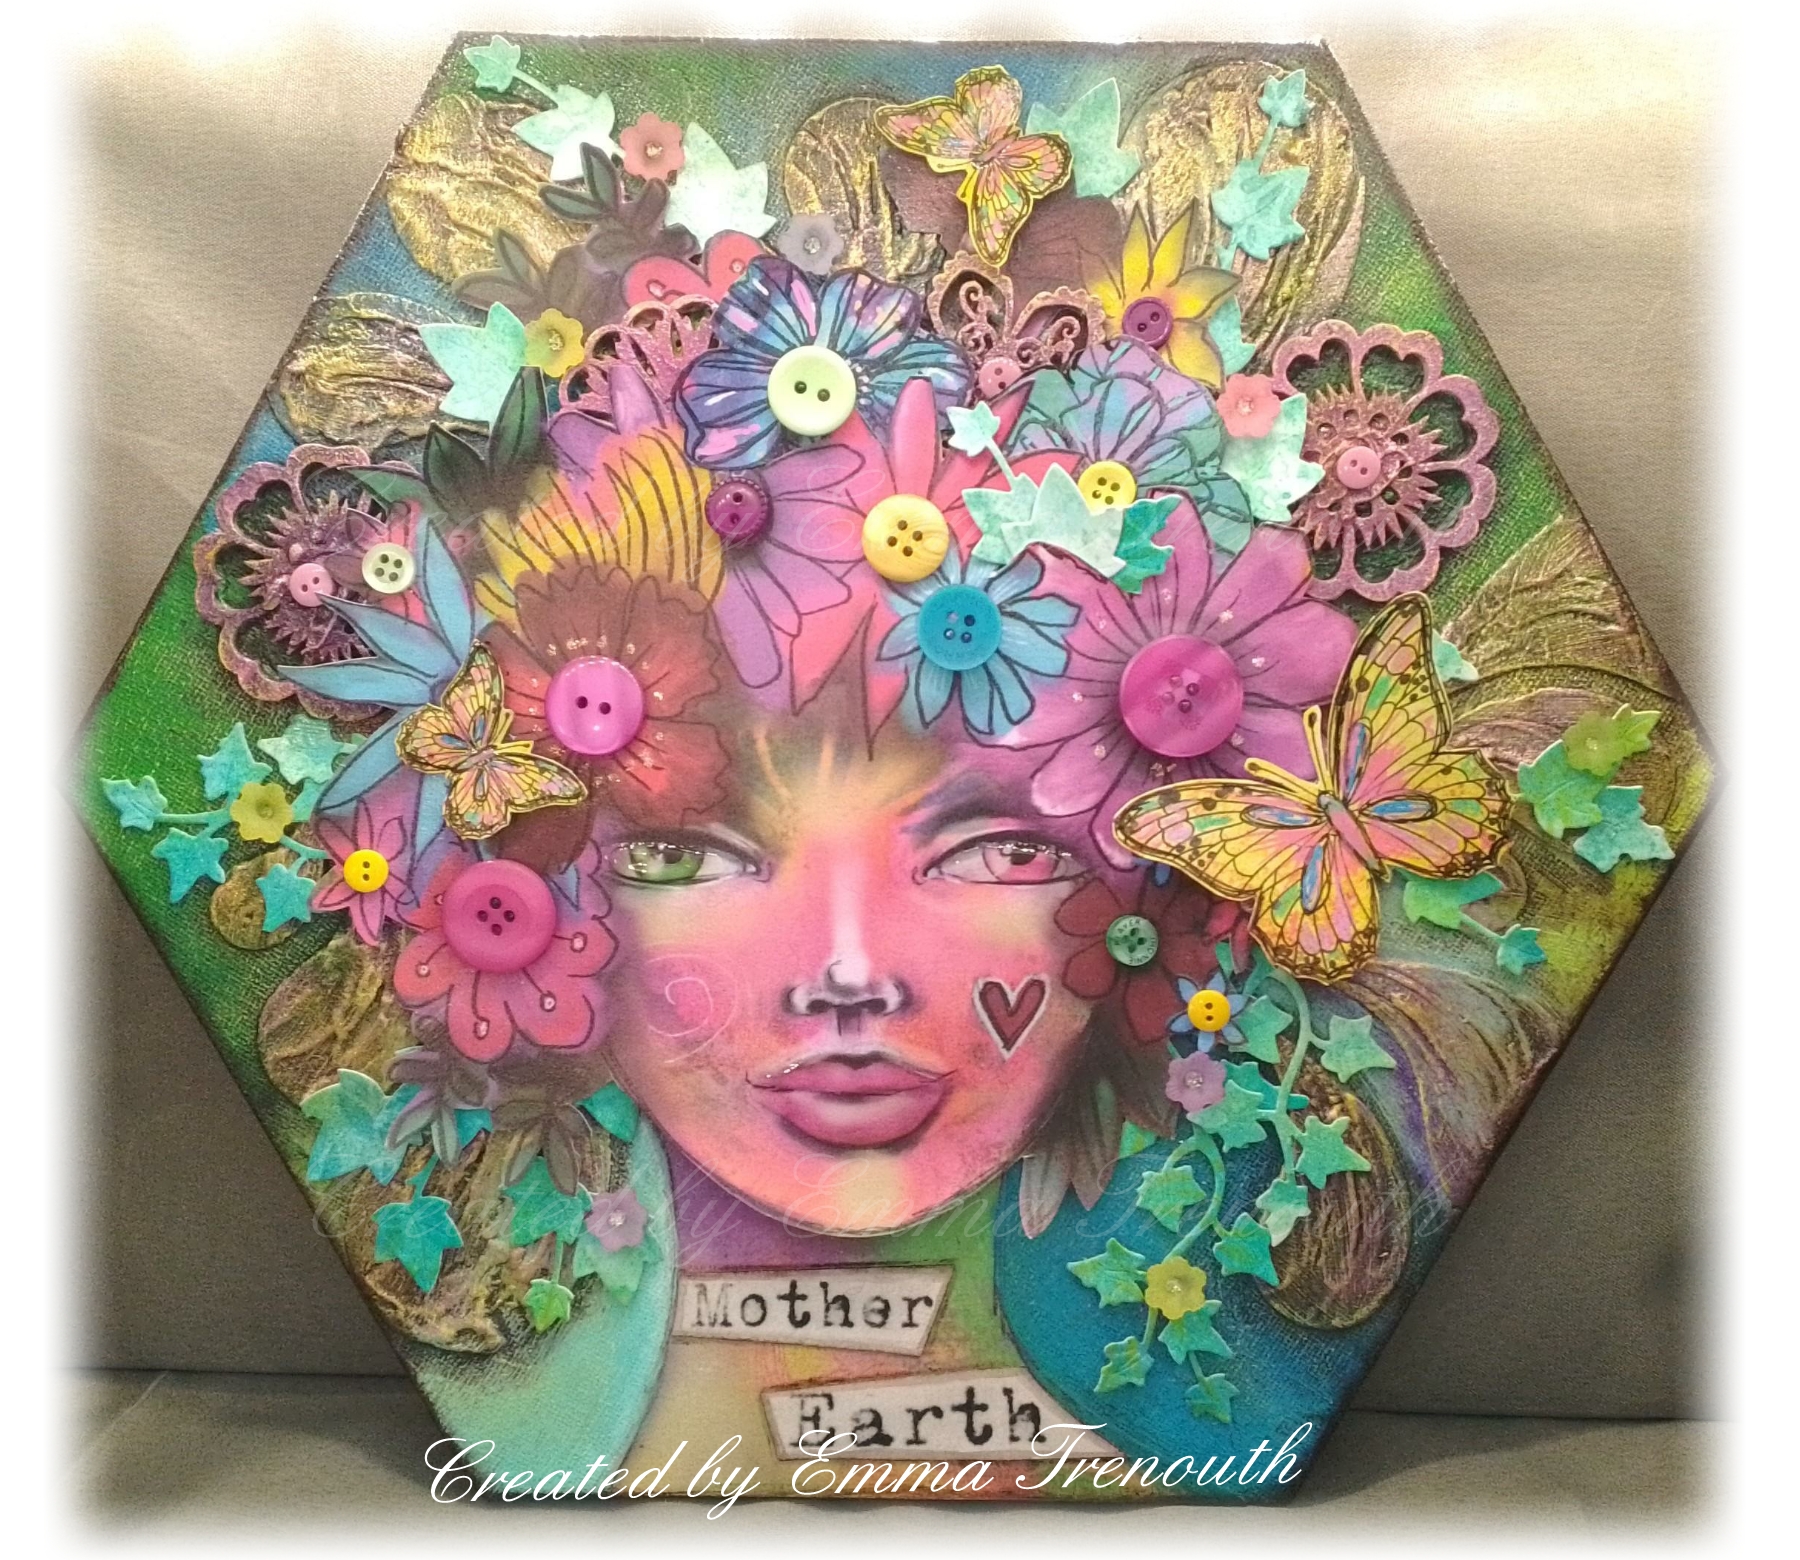
Today I have something a bit different with this mother earth canvas.  My idea was triggered when I saw this beautiful ladies head paper in a pad from Art by Marlene - not something I usually would use but I thought she would be ideal as Mother earth providing and protecting all of nature, she is as colourful as the world she nurtures is with her hair full of flowers and butterflies😀

Getting decent photos has been impossible as its too big for my light box


Hexagon Canvas size 10x12"   See below for how I made the background and built it up.

 This is definitely a very 'in your face' and 'throw everything and every colour at it' canvas😁  Predominately pink and blue


I added buttons to the flowers in her hair and a few scattered flower beads

I added touches of diamond stickles glitter glue to add a bit of sparkle and glossy accents to her eyes.

I first cut out the head from the paper, cutting off alot of the surrounding flowers for now and adhered flat where I wanted it on the canvas.  Around that I stencilled paisley swirls with texture paste, I had the thought that they would look like coming out of her head, before the paste completely dried i took a pallet knife and drew some lines into the paste following the curve to help create the effect of them moving outwards or like strands of hair.

I found these wooded lasercut  flowers so added a few and them covered it all in white gesso.

I then added green and blue paints which contrast with the more pinky purple tones in her....I used green and blues that are similar to those in the images also.

I then added a wash of van dyke brown acrylic letting it settle into the grooves and around the texture paste and wood shapes to help give depth to the finished piece - YES this does look like a mess but stick with it...

Sorry horrid photo but once the brown shadowing was dry then added pink cadence dora paint onto the flowers and highlighting the splashes - this really shimmers when the light catches it. 

I don't seem to have taken any more photos of the steps - was obviously caught up in the finishing of it - I must admit this took way longer than hoped to come together - I started it back in February when the weather was horrid and some nice sunny days were looked forward too!

I then went on to dry brush on gold cadence paint and add in touches of the blue and green where I felt it needed it.  I then cut out a 2nd head, leaving off her neck and decoupaged over the base image with pinflair glue gel.

To finish I added extra flowers & 3 butterflies stamped onto art by marlene papers and more colour added with posca paint pens.  I added ivy which was die cut from brusho Inked card, I wanted it to look like it is growing out of her hair so tucked it in among the flowers.

 I printed the words 'Mother Earth' onto off white card, cut out, inked the edges black and adhered to her neck & sealed with mod podge to finish.

Items Used:
Art by marlene 8x8 paper pad 'out of this world'
Paisley 12x12 stencil
Brittania & Joanna Sheen Ivy dies (very old!)
Uniko stamp set 'country garden' (butterflies)
texture paste
Cadence dora paints
Acrylic paints
Wooden flowers

Please do hop over to Creative Artiste Mixed Media to see what the rest of the DT have created and to join in, we love seeing all your creations in the gallery using at least 3 different mediums.


I hope you have been enjoying the sunshine here in the UK, although I love to see some sunshine its been a bit too hot for me, Monday stuck in hospital all day was like a sauna...don't think that improved the health much!  They have started me on my 3rd different treatment in 3 months this week so fingers crossed its 3rd time lucky.  While my mojo is still on holiday Ive been sat in front of the fans enjoying wimbledon. 

Thank you for popping by once again.  Big hugs Emmax


Thursday, 20 July 2023

Its Summertime

Good Morning everyone.

The Katzelkraft stamp set i used for my Christmas in July cards had a 4th door stamp which was more square than the others so didn't fit my arch shape so here Ive made a summery card with it instead. 

6x6" white card base.  I first stamped the image and watercoloured with distress inks, i added glossy accents to the little window & the lanterns and glitter to the flowers.  Once dry die cut into a wonky stitched square.

I took a piece of white card, inked one side with iced spruce & shaded lilac distress inks which id used to watercolour some of the image and added to one side of a brick embossing folder and ran through the machine.  On putting the card together I think i should have inked the other side of the folder so that the bricks were white and the mortar grey, but i think as ive covered most of it up I can get away with my wall building error😀

I die cut ivy from card previously inked with green brushos & pixie powders so it has a subtle shimmer in the light.  I inked up a scrap of white card with raspberry & persimmon distress inks which i used to watercolour the flowers on the topper, once die i die cut into small flowers .I attached my door topper with glue gel and then arranged the ivy and flowers.  I added glitter glue to the flower centers for a bit of shimmer.

Stamped sentiment to finish.

Just a close up

Items Used:
Katzelkraft stamps 'les portes'
Clearly besotted stamps 'seasonal sentiment' 
Crafters companion 8x8 brick embossing folder
Ivy & flower dies
Distress Inks: Iced spruce, shaded lilac, twisted citron,peeled paint, picked raspberry, ripe persimmon, evergreen bough
Brushos
Cosmic shimmer lime pixie powder

Thank you all for stopping by once again.  Hugs Emma


Id love to enter the following:


Thursday, 13 April 2023

With Sympathy

Good Morning everyone

Sadly my uncle lost his fight with cancer 10 days ago, he absolutely loved getting a handmade card from me and over the last couple of years of his battle i sent him many as happy mail so i felt i really needed to make a card for each of his children (my cousins)  Ive had to make a set of 6, which is the most sympathy cards ive made in one go, 3 for me and 3 for my parents to give so they all had to be totally different too - its certainly stretched my little grey cells and a couple are based on previous designs ive made.

A6 (6x4") white linen cardbase.  I die cut the star circle direct into the card front and lined with a lilac paper insert which shows through the stars.  I die cut 3 feathers from white linen card and gently inked the edges with lilac distress ink just to help them stand out a bit from the white backgroud.  Sentiment stamped in grey onto white card strip, matted onto lilac paper which was an offcut from doing the insert.  I rounded the corners to pick up on the circle focal point

Cheerylynn feather dies, unknown brand star circle die, ? sentiment stamp

***


5x7" Cream leather effect cardbase, sentiment stamped in dark green.  I die cut a foliage panel from the same ivory cardstock and lightly inked with pistachio oxide ink.  Candles die cut from off cuts of ivory pearl cardstock, i coloured the flame with alcohol markers and added to the middle of my panel.  Flower die cut from soft yellow card to finish - was thinking of the primroses in flower at the moment.

Spellbinders 'branching out' die set, justrite 'large fancy sentiments' stamp (CR-03815), unbranded candle die, sizzix flower die

***

6x5" Grey pearl cardstock base, i die cut a cross stitched rectangle from the same grey.  From left over inked and stenciled cardstock i die cut 3 wheat stems and 2 of the smallest cross stitched rectangle die. I stamped the sentiment with grey ink and glued the wheat stems into place. I added foam tape to the back of the panel and adhered the inked rectangles top right and bottom left just for interest and to break up all the grey.  

Impression Obsession wheat die, Xstitched frames, justrite 'large fancy sentiments' stamp CR-03815

***

A6 (4x6") white card base.  I embossed ivory pearl cardstock with a sunray embossed folder and added to the base card.  I die cut my dove from white cardstock and backed the cut out section with gold pearl cardstock.  I added the dove with glue gel.  I then found an ink smudge on the embossing which luckily i managed to hide by adding a little die cut branch - luckily the ink smudge was in the right place to easily cover up!   I felt this card said it all and didn't need a sentiment.

Spellbinders dove die, craft concepts sunray embossing folder

***
5x5" Ivory embossed base card.  Sentiment stamped in grey.  I die cut the ivy circle from card previously coloured with brusho's, i die cut the ivy circle twice more from scrap cardstock and glued them together, this gives a chipboard depth and easier than trying to stick foam pads to the back of each leaf, it also gave a nice inset for my die cut dove to sit in.  I die cut the dove twice from white card, cutting the back wing off one, i adhered them together with glue gel and added some shading with grey alcohol marker. 

Ivy wreath die, dove die and clearly besotted sentiment stamp

***

and finally, photo not the best as its all a soft lilac.  approx size 4x6"  I die cut my base card and smaller layer from lilac cardstock, on the smaller panel i stamped the sentiment in grey and then embossed with a swirl embossing folder.  I die cut the poppy from an off cut of previously inked with brusho & pixie powder cardstock, i added glue gel behind the flower heads and glue the stems flat to the card front.

Penny black poppy die, justrite 'graceful sentiments' CR-02147 stamp, A4 swirl embossing folder

 Thank you all for stopping by once again, i really do appreciate you taking the time.  
Big hugs Emmax

Thursday, 28 January 2021

In the birdhouse

Good Morning everyone

Today is a little mdf project as a new home gift using those fab katzelkraft owl stamps again

Approx size 7x5"    I first added texture paste through a brick stencil to the front and added it with a pallet knife to the roof keeping it rough to give a nice bark like texture.  Once completely dry i covered it all in black gesso. I then dry brushed on acrylic paints picking up the colours in the owls.
The owls were stamped and coloured with inktense pencils and cut out.  
I die cut foliage from scraps of cardstock and got arranging.  Computer printed sentiment.

A close up on the owls - of course i had to add glossy accents to their eyes.  The owl peeking out the hole is glued on from behind


and below is the back which ive decorated as the inside of the bird house

I used a wood effect pattered paper and covered the back, dry brushing on some acrylic to give it an more lived in look. Then just added my foliage, owls and computer printed sentiment.

A close up.

Items Used:
Katzelkraft stamps - les super chouettes
Foliage dies
Mdf house
acrylic paint
Imagination crafts starlight paint 'rich gold'

Thank you all for stopping by.  I hope you have a good end of the week and weekend, stay safe. Hugs Emmax


***
Id love to join in the following

***

***


***


Monday, 19 October 2020

Spooky

Good Morning everyone

Today is a little fun mixed media project inspired by 
 Make a halloween scene  

I started with an MDF frame, dug out lots of stamps and mediums and got playing.  Whereas last week my katzelkraft owl was out in the daytime, today its full on night time.  There is an owl that sits on my parents chimney at night hooting - always sounds spooky in the dead of night when everything else is silent.

Ive had this MDF box frame for years, i had the idea of the owls living in an owl barn and looking out the window to the dark of the grave


Frame approx 8x8" Inside frame size 6x6"  Please see last photo for how i did the frame & background.  I then found a chipboard grave stone in my stash which i covered with black gesso and dry brushed on some silver & gold paint.  I added with glue gel and added a skull and leg bone and a fly.  I die cut my spider & web from black card and brushed on silver & gold paint, i added crackle accents to the spiders body.  I glued the web to the top left behind the front frame.

I had the die cut ivy left from another project - its been coloured with brusho's.  I stamped and coloured my owls with inktense pencils and cut them out.  I went with bright colours as i didn't want my project to be too dark on the wall.  I got a dried hazel twig from the hedge and attached to the frame and then arranged my owls.  Tim Holtz words to finish.

I like using inktense pencils to colour images for home decor as ive found they are much more colour fast than using inks.


Of course i had to add glossy accents to the owls eyes


Peeking inside - these fab plastic flies i found in morrisons a few years ago

I first used a brick stencil on the outside frame with texture paste and on the middle piece i just added texture paste with a pallette knife to give a rough texture, once dry painted all with black gesso.  Once the gesso was dry i painted on patches of purple, yellow, green and blue paints to pick up on the colours i used on my owls.  I then dry brushed on more black to help the bright colours blend in but you can still just see them.  I then dry brushed over the top with silver & gold paint to highlight the textures. 

For my scene i cut a piece of white card for fit inside, i added a circle mask to act as the moon and then sprinkled on brushos in colbalt & prussian blue and purple pixie powder to add some shimmer.  Once completely dry i removed the mask and using a brush added a little colour to the moon to make it less white and stark.

I then stamped the big tree & eyes (sheena) in black and the smaller trees and the one with owl (choc baroque)  I coloured them with walnut & black soot oxide inks and added some shadow in the bottom of the frame and around my eyes.  The eyes i coloured with lime/lemonade oxide ink and a white gel pen.

Items Used:
Katzelkraft stamps - KTZ237 'Les Super Chouettes'
Chocolate baroque stamps 'howling moon'
Sheena Douglass stamps 'Little Red' & 'Scary tree'
Ivy, Spider & web dies
Brick stencil
Golden texture paste
Pebeo acrylic paints
MDF box frame
Derwent inktense pencils
Brushos & Pixie powders
Tim Holtz chit chat stickers

Thank you all for stopping by once again.  I hope you have a good week and we have a bit less rain than last week.  Stay safe. Hugs Emmaxx


Id love to enter the following:

Hopefully if the new blogger feature works the links are now attached to the images - so fingers crossed you can click on the image and it takes you there😀
 
***


***

***
***


Monday, 3 February 2020

Fairy Shaker card


Good Morning everyone.

Thank you for all your amazing comments on my memo block last week.   Today im sharing a shaker card made with the fairy in the jar die.  Do you remember my fairy suncatchers? Well i made this fairy at the same time, i coloured the back of the acetate with alcohol inks in sunset colours and have now made it into a card. 
 I added the words ' Leave a little sparkle whereever you go' which is similar to my cats life motto of 'leave a little fur whereever you go'😊

7x7 scalloped cardbase.  I first die cut my jarred fairy from black card and backed with acetate, i then coloured the acetate with alcohol inks.  I die cut several more of the fairy die from black card and cut out the fairy so i just had the outside jar, i glued these together to make a little stack, i then used this instead of shaker tape and glued to the back of the acetate - as the outline of the die is so thin it would have been hard work trying to stick foam around it.  I then filled it with micro beads and glitter and backed with white card. 

I matted a piece of patterned paper onto black card and then the cardbase.  I added a strip of black dotty paper across the bottom to 'stand' my jar on.  I then die cut lots of those little left over scraps of paper into ivy and little butterflies and arranged them around my jar after inking the edges of the ivy.    

Close up on the fairy. I paper pieced the flower on the jar with scraps of glitter card & I added glitter glue to her wings to add more sparkle  Once again i don't recommend capturing your fairies in jars, this lady is free to come and go as she likes😁  


Items Used:
Intricut (hobbycraft) fairy in a jar die
Ivy dies (brittania & joanna sheen)
Memory box mini butterfly dies
Tim Holtz alcohol inks
Tim Holtz chit chat stickers
Pattern paper
7x7 scalloped card - craftUK ltd
Diamond stickles 


Thank you all for stopping by once again.  I hope you all have a good week whatever you get upto.  Spring is on the way and the nights drawing out a bit. Hugs Emmax


Id love to enter the following challenges:

http://pearlysparkleschallenge.blogspot.com/2020/02/challenge-48-include-some-red.html

*****

http://craftycalendarchallenge.blogspot.com/2020/02/february-challenge-use-die-cutspunches.html

*****

https://thefairyandtheunicornchallenge.blogspot.com/2020/02/february-challenge.html


*****

http://pixiescraftyworkshop.blogspot.com/2020/01/pixies-snippets-playground-challenge-370.html - all the ivy and butterflies are snippets


Monday, 12 March 2018

Daisy Mixed Media Canvas

Good Morning all, i hope you all enjoyed your weekend. 

Today i am sharing this Mixed Media Home Decor Canvas that i made for my mum for Mother's Day. 


Box Canvas 16x6" (40x15cm)  After doing the brick background (see below for details) I die cut lots of daisies from white card, made them up, added yellow stamens & florists wires for their stems.  I then die cut various foliage from brusho and inked cardstocks in different shades of greens and ferns from kraft card.  I then slowly built up the layout.


The top half.  I added a lovely big bee metal charm ive had in my stash for years.

The bottom half, i added more foliage and ivy in the bottom as you naturally find at the bottom of a wall


Just close ups. Once it was all stuck on i sealed everything with a matt sealant to keep it all fresh. 


The wall - first i added texture paste through a stencil and once dry i added black acrylic paint over the whole canvas.  Once dry i put the stencil back over and added red and orange starlight paints to the bricks, i found doing it this way kept the black between the bricks better.  I then added touches of green paint to give a kind of mossy effect once everything is added on top. 

Items Used:
Tattered Lace fern dies
Joanna Sheen & Brittania Ivy dies
Heartfelt Aster die set
Stitched Daisy dies
Tim Holtz foliage die
Brick stencil
Imagination crafts starlight paints
Golden Texture paste
Cracked Pistachio & twisted citron oxide inks
Brusho's


Thank you for stopping by and all your visits and comments last week and congratulations on the arrival of my new niece. I hope you all have a good week. Emma