Followers

Showing posts with label sheena. Show all posts

Monday, 19 October 2020

Spooky

Good Morning everyone

Today is a little fun mixed media project inspired by 
 Make a halloween scene  

I started with an MDF frame, dug out lots of stamps and mediums and got playing.  Whereas last week my katzelkraft owl was out in the daytime, today its full on night time.  There is an owl that sits on my parents chimney at night hooting - always sounds spooky in the dead of night when everything else is silent.

Ive had this MDF box frame for years, i had the idea of the owls living in an owl barn and looking out the window to the dark of the grave


Frame approx 8x8" Inside frame size 6x6"  Please see last photo for how i did the frame & background.  I then found a chipboard grave stone in my stash which i covered with black gesso and dry brushed on some silver & gold paint.  I added with glue gel and added a skull and leg bone and a fly.  I die cut my spider & web from black card and brushed on silver & gold paint, i added crackle accents to the spiders body.  I glued the web to the top left behind the front frame.

I had the die cut ivy left from another project - its been coloured with brusho's.  I stamped and coloured my owls with inktense pencils and cut them out.  I went with bright colours as i didn't want my project to be too dark on the wall.  I got a dried hazel twig from the hedge and attached to the frame and then arranged my owls.  Tim Holtz words to finish.

I like using inktense pencils to colour images for home decor as ive found they are much more colour fast than using inks.


Of course i had to add glossy accents to the owls eyes


Peeking inside - these fab plastic flies i found in morrisons a few years ago

I first used a brick stencil on the outside frame with texture paste and on the middle piece i just added texture paste with a pallette knife to give a rough texture, once dry painted all with black gesso.  Once the gesso was dry i painted on patches of purple, yellow, green and blue paints to pick up on the colours i used on my owls.  I then dry brushed on more black to help the bright colours blend in but you can still just see them.  I then dry brushed over the top with silver & gold paint to highlight the textures. 

For my scene i cut a piece of white card for fit inside, i added a circle mask to act as the moon and then sprinkled on brushos in colbalt & prussian blue and purple pixie powder to add some shimmer.  Once completely dry i removed the mask and using a brush added a little colour to the moon to make it less white and stark.

I then stamped the big tree & eyes (sheena) in black and the smaller trees and the one with owl (choc baroque)  I coloured them with walnut & black soot oxide inks and added some shadow in the bottom of the frame and around my eyes.  The eyes i coloured with lime/lemonade oxide ink and a white gel pen.

Items Used:
Katzelkraft stamps - KTZ237 'Les Super Chouettes'
Chocolate baroque stamps 'howling moon'
Sheena Douglass stamps 'Little Red' & 'Scary tree'
Ivy, Spider & web dies
Brick stencil
Golden texture paste
Pebeo acrylic paints
MDF box frame
Derwent inktense pencils
Brushos & Pixie powders
Tim Holtz chit chat stickers

Thank you all for stopping by once again.  I hope you have a good week and we have a bit less rain than last week.  Stay safe. Hugs Emmaxx


Id love to enter the following:

Hopefully if the new blogger feature works the links are now attached to the images - so fingers crossed you can click on the image and it takes you there😀
 
***

***

***
***


Monday, 11 September 2017

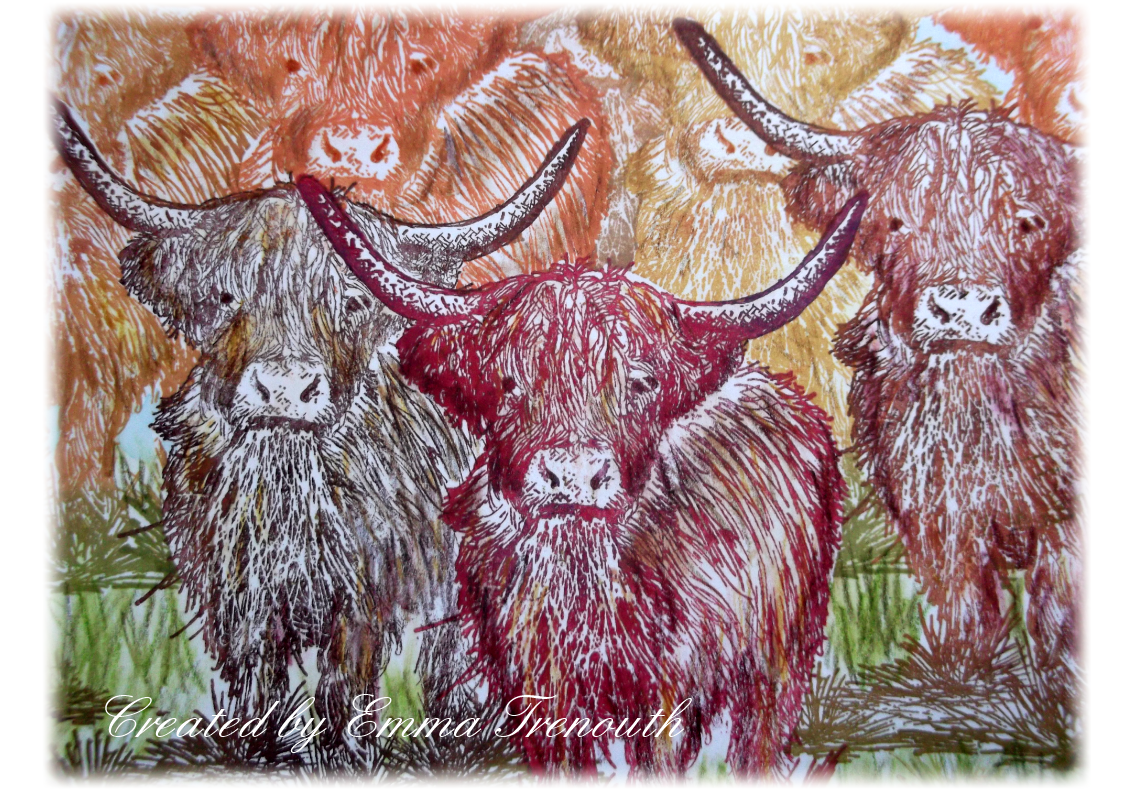
Highland Herd Birthday

Good Morning everyone and welcome to another new week, boy do they fly by!

So today i am sharing the first card i made for my brothers birthday.  Some of you know that as a dairy farmer he likes to work with rare breeds and some of the older breeds, they produce less milk but higher quality ideal for Cornish Clotted Cream.  

Although not rare he does have a couple of highland cows in his herd.  Its always difficult to keep coming up with different ideas for the men in my family but found this lovely highland cow stamp by sheena, lots of masking and we get a herd of highlands!


8x8 card blank, image all matted onto chocolate brown cardstock.  Computer printed sentiment. 

I first stamped the front highland cow, then masked with pebeo drawing gum, then stamped the 2 behind and then masked them and kept going until filled the page.  I used lighter inks on the back cows, i used colorbox chalk inks to stamp them all.  I then carefully removed the drawing gum and added a little definition using inktense pencils.  


Just a close up.  Although its a pretty simple card it was time consuming.

Items used:
Sheena Douglass 'Highland Dinner' stamp
Colorbox chalk inks
Derwent Inktense pencils
Pebeo drawing gum

You might also like:


Thank you for stopping by and all your visits last week.  I hope you all have a good week and find some sunshine. Hugs Emma


Thursday, 27 July 2017

A Flock of Crazy Birds

Good Morning All, i hope you are all having a good week. 


So today i am sharing a batch of crazy birds.  Back when i wasn't really crafting i was playing around with my various mediums, stamps and stencils with my crazy bird stamps.  Sometimes its fun to just let loose and play, learning how mediums work together or not.


I first stamped the birds and doodled some simple scenes and extras like flower, butterflies and masked them all with drawing gum.  Once that was dry i got out the brushos & pixie powders for the backgrounds.  Again once the background was dry i dug out my stencils and masks and used starlight paints to stencil on extra metallic details. Once dry remove all drawing gum.

Stamp and colour the birds with distress inks, just cut out the main body and shape it, using glue gel place them onto the panels, lining up with their legs.  Then use distress ink to add the grass and colour the flowers etc.  Shade around the birds with charcoal pencil to add shadow and depth.  Then mount them into the Polaroid frames. 


Close up, you can just about see the sparkle of the red starlights in the background.  I coloured these birds with cracked pistachio, lucky clover & salty ocean.  


Different colour combination which gives a completely different look.  I used blues and purple brushos and pixie powers for the backgrounds and stenciled in silver. 


I coloured this batch of cards in squeezed lemonade and ripe persimmon.  You can see the purple pixie powder and the silver stenciled flowers.  I added glossy accents to all the eyes.

I had great fun just getting inky and trying out new mediums together, not really with an end plan, but in the end turned these into simple cards, as the toppers are so busy and colourful Ive kept the card bases very plain. 


Black A5 card blanks, computer printed sentiments onto white card which is matted onto the black base, i mounted the Polaroid frames onto black card and mounted on 3D foam onto the base card.  I wanted the sentiments to be as quirky as the images so used a mix of capital and lower alphas. 


Items used:
Tim Holtz Crazy bird stamps
Sizzix Polaroid Frame dies
Brusho Powders
Cosmic Shimmer Pixie Powders
Imagination Crafts starlight paints
Tim Holtz Distress inks
Stencils:
Tim Holtz 'shatter - THS014'
Sheena Douglass 'Wildflowers & sunburst'
The crafters workshop 'mod circles - TCW424'


You may also like


Thank you for stopping by and taking a peek at my crazy mixed media birds, thank you for your comments on my monochrome upload too.  Enjoy the rest of the week. Emma