Followers

Showing posts with label brick stencil. Show all posts

Friday, 3 November 2023

The apothecary

Good Morning everyone

Im honoured today to be guest designer at MMTOTY


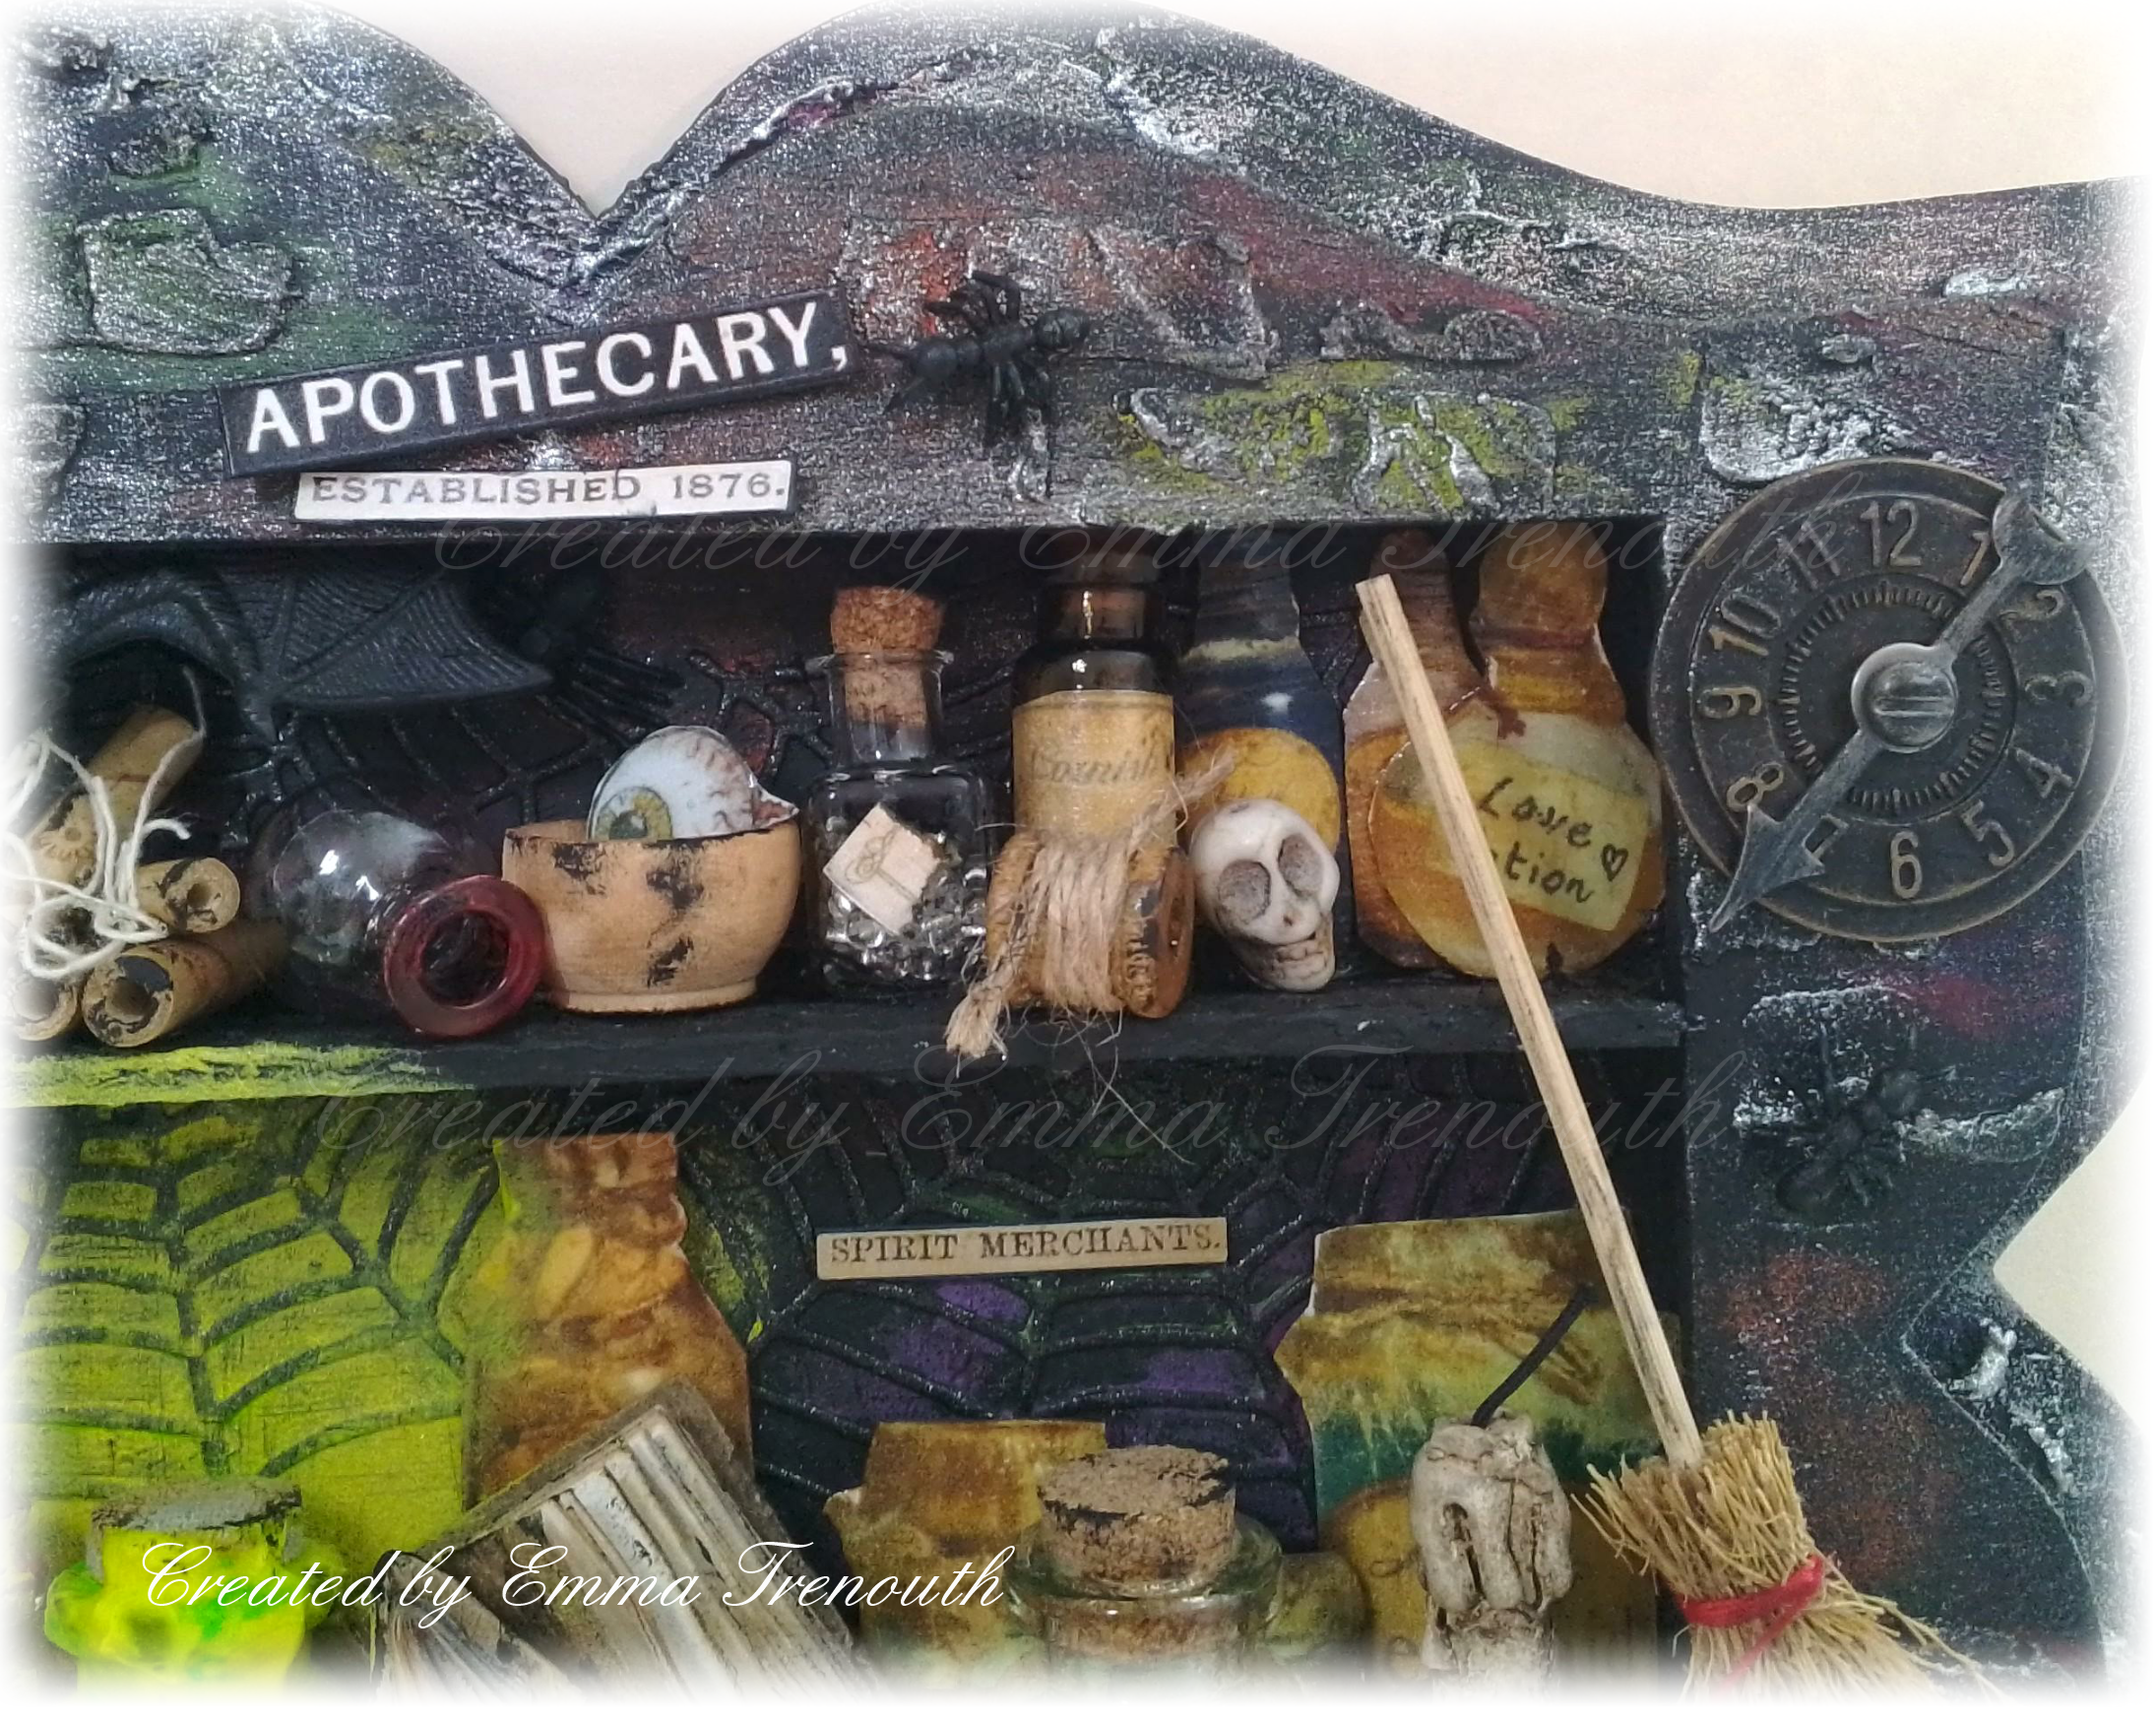
My last halloween make for now is this apothecary shelf mixed media project.


Approx overall size: 10x7"
I made up this MDF box frame and added texture paste through a brick stencil and also dabbed some here and there to give a rough wall effect.  Out of stiff cardboard box card i cut two strips and glued into place to act as shelves.  Once dry i coated it all in black gesso.  Splodged on some acrylic paint in red, orange and green and then dry brushed over the top with more black gesso and then silver and black cadence dora paint which really shimmers.

I then had fun raiding my stash to fill the shelves.

I knew i wanted a potion bottle that looked like it was glowing & luminous.  I used my daler-rowney acrylic neon paints and poured some of the yellow and green neon into the bottle, dabbing some onto the outside and then popping the cork back in so that it looks like it is really bubbling over.  To give the effect of it really being luminous i then dabbed more of the neon paint around the bottle so it looks like its lit up.  

I also knew i wanted some mini spell books so i played about to make my own, using kraft card and rubbing glycerine in until you get a leather like effect and its becomes malleable for the covers and cut up thin paper pages for the inside - these are just glued into place.  I used twine, touches of distress inks and paint to make them look used and well loved. 


From previous projects i had lots of mini bottles printed out from a very very old daisytrail 
digi-kit, they were printed, cut out and covered with glossy mod podge, so i have used lots of these in the back of my shelves along with real mini bottles to make the shelves look fuller with more depth.

Some of my mini glass bottles i added some alcohol ink and swirled around, others have little beads in them.  The little skulls are beads.

I added some little plastic bugs to the frame, along with the clock and keys.

I used some old wood beads as thought side on they looked a bit like scrolls on the shelf.  A printed eyeball covered with crackle accents in a little wooden bowl.  Can you spot the bat? he really is camouflaged - a little rubber bat, i gave him a coat of black gesso and adhered him up inside the frame.  


Tim Holtz bones, candle & candlestick.  A little broom and a bottle of green glittery potion - this i made up with cotton wool, green ink and gold glitter.   I added die cut spider webs to the back.  Tim Holtz chat stickers added to the scene.

I had really great fun building this up and raiding my stash.

Do hop over to MMTOTY where you can join in with anything halloween or Christmas - my brain is now in full on Christmas crafting mode -scary we are not into November, i know we say it every year but this year really is flying by😀

I hope you all have a great weekend. Crafty hugs Emmax


Id love to enter the following:

***


Thursday, 28 January 2021

In the birdhouse

Good Morning everyone

Today is a little mdf project as a new home gift using those fab katzelkraft owl stamps again

Approx size 7x5"    I first added texture paste through a brick stencil to the front and added it with a pallet knife to the roof keeping it rough to give a nice bark like texture.  Once completely dry i covered it all in black gesso. I then dry brushed on acrylic paints picking up the colours in the owls.
The owls were stamped and coloured with inktense pencils and cut out.  
I die cut foliage from scraps of cardstock and got arranging.  Computer printed sentiment.

A close up on the owls - of course i had to add glossy accents to their eyes.  The owl peeking out the hole is glued on from behind


and below is the back which ive decorated as the inside of the bird house

I used a wood effect pattered paper and covered the back, dry brushing on some acrylic to give it an more lived in look. Then just added my foliage, owls and computer printed sentiment.

A close up.

Items Used:
Katzelkraft stamps - les super chouettes
Foliage dies
Mdf house
acrylic paint
Imagination crafts starlight paint 'rich gold'

Thank you all for stopping by.  I hope you have a good end of the week and weekend, stay safe. Hugs Emmax


***
Id love to join in the following

***

***


***


Monday, 19 October 2020

Spooky

Good Morning everyone

Today is a little fun mixed media project inspired by 
 Make a halloween scene  

I started with an MDF frame, dug out lots of stamps and mediums and got playing.  Whereas last week my katzelkraft owl was out in the daytime, today its full on night time.  There is an owl that sits on my parents chimney at night hooting - always sounds spooky in the dead of night when everything else is silent.

Ive had this MDF box frame for years, i had the idea of the owls living in an owl barn and looking out the window to the dark of the grave


Frame approx 8x8" Inside frame size 6x6"  Please see last photo for how i did the frame & background.  I then found a chipboard grave stone in my stash which i covered with black gesso and dry brushed on some silver & gold paint.  I added with glue gel and added a skull and leg bone and a fly.  I die cut my spider & web from black card and brushed on silver & gold paint, i added crackle accents to the spiders body.  I glued the web to the top left behind the front frame.

I had the die cut ivy left from another project - its been coloured with brusho's.  I stamped and coloured my owls with inktense pencils and cut them out.  I went with bright colours as i didn't want my project to be too dark on the wall.  I got a dried hazel twig from the hedge and attached to the frame and then arranged my owls.  Tim Holtz words to finish.

I like using inktense pencils to colour images for home decor as ive found they are much more colour fast than using inks.


Of course i had to add glossy accents to the owls eyes


Peeking inside - these fab plastic flies i found in morrisons a few years ago

I first used a brick stencil on the outside frame with texture paste and on the middle piece i just added texture paste with a pallette knife to give a rough texture, once dry painted all with black gesso.  Once the gesso was dry i painted on patches of purple, yellow, green and blue paints to pick up on the colours i used on my owls.  I then dry brushed on more black to help the bright colours blend in but you can still just see them.  I then dry brushed over the top with silver & gold paint to highlight the textures. 

For my scene i cut a piece of white card for fit inside, i added a circle mask to act as the moon and then sprinkled on brushos in colbalt & prussian blue and purple pixie powder to add some shimmer.  Once completely dry i removed the mask and using a brush added a little colour to the moon to make it less white and stark.

I then stamped the big tree & eyes (sheena) in black and the smaller trees and the one with owl (choc baroque)  I coloured them with walnut & black soot oxide inks and added some shadow in the bottom of the frame and around my eyes.  The eyes i coloured with lime/lemonade oxide ink and a white gel pen.

Items Used:
Katzelkraft stamps - KTZ237 'Les Super Chouettes'
Chocolate baroque stamps 'howling moon'
Sheena Douglass stamps 'Little Red' & 'Scary tree'
Ivy, Spider & web dies
Brick stencil
Golden texture paste
Pebeo acrylic paints
MDF box frame
Derwent inktense pencils
Brushos & Pixie powders
Tim Holtz chit chat stickers

Thank you all for stopping by once again.  I hope you have a good week and we have a bit less rain than last week.  Stay safe. Hugs Emmaxx


Id love to enter the following:

Hopefully if the new blogger feature works the links are now attached to the images - so fingers crossed you can click on the image and it takes you there😀
 
***


***

***
***


Thursday, 25 October 2018

House of Horrors

Good Morning everyone.  

So today im sharing something a bit different with a 3 dimensional project.  Im not really into halloween but am into all things mystical - witches, vampires, Cornish Piskeys so had great fun decorating this house shaped printer tray.

I bought a pack of halloween emphemra from ebay, containing lots of different products including tim holtz and combined with items ive collected over the years in my stash.  I decided to give each room of the house a different theme.  The attic isn't yet finished, im still looking for the perfect items which i have in mind. 


Overall Size: 12x7" (20x30 cm).  I first added touches of sand texture paste for the front edges and through a brick stencil on the outside sides of the house.  Once dry covered it all with black gesso. I then highlighted with dry brushing silver acrylic paint on top to give a kind of moonlight feel. 

I cut a blue and gold foil paper, inked the edges and glued to the back of each room of the house as wallpaper. I then bit by bit built up the rooms with items until i was happy, more details below on each room.  I then die cut spiders & webs from black cardstock, again added silver paint and added these to the front of the house.  


The Copse Bride room - i added a grunge board skull & cross bones to the back of the room, my immortal soul tab on top. A vintage wedded couple image, grave stone, skull, spider and white flowers inked with a touch of red. I added a black inked heart in the background. 


Close up, love the skull, so much detail in it


A close up on the spider web, see the fly? - Morrisons supermarket Halloween isle, i toned it down a bit with black ink but think it looks quite realistic. 


Lots of bottles of potions for the witches to use, ive built them up in the background using digital images printed out and sealed with mod podge.  For my real bottles in some i added a drop of alcohol ink just to stain the glass, in the red one there ive added lots of red alcohol ink and glued the cork lid in - a bottle of blood of course.  Micro beads, and glitter in another bottle.  Bits of twine and handmade tatty labels.  One bottle has tipped over and lost its cork stopper and that pesky fly is about. 


Is it an Angel, A Cherub or a nightmare?! I added wings which are actually a die cut angel wings but were the perfect size for the Tim Holtz doll, i also added black ink to tone down the white.  

The bats are sleeping peacefully while the spooky hand carries away an eyeball to its hidden lair.  Not another fly!  My eye balls are digital images, printed out and covered with glossy accents.  The hand reminds me of 'thing' in the Addams Family.


The Witches Lair -  2 Witches over seeing their latest potion.  The cauldron is chipboard - i painted it with black gesso, adding the gesso thick in places to give it texture.  In the backgound a pale whispy girl - Is it a ghost?!  More spiders and cobwebs.  Label in the front.  I added a metal bat at the top of this room too, being too shiny i again added black gesso to dull it down. 


More potions, i used sequins for my mermaid scales bottle, another spider and a little key...... maybe the key unlocks the attic...... time will tell....


This shows the outside wall of the house.  I added sand texture paste through a brick stencil, the sand texture gives a more realistic look to the bricks i think.  Once dry covered with black gesso and dry brushed on red and orange imagination crafts starlight paints and then just a light touch of silver acrylic paint. 

Items Used:
Tim Holtz idea'logy range
Mini bottles and various metal, chipboard charms & ephemera
spider & web die
Daisytrail 'steampunk emporium' digikit
Serif craft artist
Imagination crafts starlight paints
Brick stencil
Sand texture paste
Black gesso

Monday, 12 March 2018

Daisy Mixed Media Canvas

Good Morning all, i hope you all enjoyed your weekend. 

Today i am sharing this Mixed Media Home Decor Canvas that i made for my mum for Mother's Day. 


Box Canvas 16x6" (40x15cm)  After doing the brick background (see below for details) I die cut lots of daisies from white card, made them up, added yellow stamens & florists wires for their stems.  I then die cut various foliage from brusho and inked cardstocks in different shades of greens and ferns from kraft card.  I then slowly built up the layout.


The top half.  I added a lovely big bee metal charm ive had in my stash for years.

The bottom half, i added more foliage and ivy in the bottom as you naturally find at the bottom of a wall


Just close ups. Once it was all stuck on i sealed everything with a matt sealant to keep it all fresh. 


The wall - first i added texture paste through a stencil and once dry i added black acrylic paint over the whole canvas.  Once dry i put the stencil back over and added red and orange starlight paints to the bricks, i found doing it this way kept the black between the bricks better.  I then added touches of green paint to give a kind of mossy effect once everything is added on top. 

Items Used:
Tattered Lace fern dies
Joanna Sheen & Brittania Ivy dies
Heartfelt Aster die set
Stitched Daisy dies
Tim Holtz foliage die
Brick stencil
Imagination crafts starlight paints
Golden Texture paste
Cracked Pistachio & twisted citron oxide inks
Brusho's


Thank you for stopping by and all your visits and comments last week and congratulations on the arrival of my new niece. I hope you all have a good week. Emma 


Monday, 19 February 2018

Messy Background

Good Morning everyone, and welcome to a new week.

Its time for a new challenge over at Make My Monday  with the theme this time being

MESSY BACKGROUNDS

So go and dig out all those inks, paints, pencils, texture pastes, pastels and and have fun.   As most of you know i love my brusho's and pixie powders but decided to go with something different and dug out my stencils, texture paste and paints.  There is something satisfying starting with white card and completely transforming it.


6x6 white cardblank.  After making my background (details below) i added it to the card front.  Then die cut lots of small white flowers, green foliage and little berry branches in yellow.  I added yellow enamel dots to the flowers.  I die cut a black glossy pot and then built up my flowers.  Black glossy sentiment and white butterflies to finish. 


Close up of the flowers. 
I didn't have a suitable size flower pot so dug through my die collection and came across this die - it comes from a tea party set, i turned the die cut upside down and cut the bottom of it - i then had the perfect size pot.  So don't forget to look at your dies and see if you can easily turn them into something else. 

below is details of my messy background

I first added texture paste through a brick stencil onto white card.  As you will be painting over it you can use any colour texture/modelling paste you have.  I wanted it rough around the edges so added less paste there and then before removing the stencil use the pallet knife to add texture to the bricks.  Set aside to completely dry. 

Once dry i added imagination starlight paints in red and orange, blending together in places.  I only needed to add one layer of paint as its highly pigmented.  The photo doesn't show the amazing shimmer this paint has. 

Once the red dried, I then added touches of green paint to look like mossy and more weathered bricks, then i added black archival ink by dry brushing over all the bricks to again add that weathered old brick look, adding more ink between the bricks.  Adding the black really brings up the texture in the bricks i added with the palette knife.  I then cut into a square.  

Items used:
Imagination Crafts starlight paints, red, orange and green
Cosmic Shimmer texture paste
That Special touch - brick mask
Memory box massa leaf die, meadow bird branch, mini butterflies
Xcut teaparty die set
Small flower dies
Viva yellow paper pen (enamel drops)

 Please do pop over to MMM and join in and see what everyone else came up with for Messy Backgrounds, i think this challenge will be really fun. 

We had some beautiful weather at the weekend so hope to see some more of that sunshine this week so i hope you all have a good week too.  Thank you for popping by. Emma

Wednesday, 22 February 2017

Golden Violets

Good Morning all

wow thank you for all your support on monday.


Today im sharing these little violet cards on a gold starlights background.


A friend sent me a pot of imaginations crafts starlight paint, the shimmer is amazing. 

 I stenciled it through a brick stencil.  My violets are coloured with brushos, glitter glue centre.  Distressed embossing folder, stamped sentiment.  Not great photos as its actually mounted on purple paper.  5x5 cardblanks.  


similar but different, used brick embossing folder on this one too


Trying to show the shimmer of the starlights


Items used:  Violet unknown die,
 Imaginations crafts starlight 'rich gold', 
crafters companion distressed and brick embossing folders
Brushos & stickles
Stitched square dies
Crafts away 'brick' mask

Thank you for popping by, i hope that the forecast storm doesn't hit you too bad.  Emma x