Followers

Showing posts with label Magical. Show all posts

Sunday, 6 April 2025

WLS April fav stamp


Good Morning everyone

The first sunday of April so its time for a new challenge over at We Love Stamping

The theme this month is
FAVOURITE STAMP &/or RIBBON OR LACE
adding ribbon is now optional - boy did i struggle to add it in!!
or you can always go with the anything goes theme as long as its using stamps - physical or digital

Now this is a difficult theme -  choosing a favourite stamp - I have so many that are favourites for different reasons but my first choice was these 'thistlehogs' from Pink Ink Designs as each time I see them they just make me smile and lift my spirits.  
I have a garden full of hedgehogs and who knows a few of these tiny thistlehogs may come out at night with the fairies, these guys are like the moths just flittering around in the dark😁


A5 white card blank.  I first stamped and watercoloured the thistlehogs with distress inks.  I then raided my stash and found this fab autumn skeleton leaf paper. So that the thistlehogs stood out more, I toned it down a bit by dry brushing antique white chalk paint over the top and added a little stencilling with pale teal chalk paints.  I cut it to size and matted onto pearlised teal card and then wrapped with my pale teal lace and peach satin ribbon and then added to the cardfront.
I added a bow from the same peach satin ribbon so that there was no question on the adding ribbon part! lol  Years ago i added ribbon to everything before i got into stamping, my style has changed alot since then.

I curved the bodies of the thistlehogs and added with pinflair glue gel.

I then raided my stash of chat stickers and came up with 
'Sprinkle a little Happiness every where you go'

I had to make it up out of random left over chat stickers - hence it being every where as 2 words not one! I adhered them to white card, outlined with black pen and then arranged on the front.


You can see the dimension better at this angle.
I had stamped the thistlehogs onto the leaf paper as well so that i got all the extra swirly bits around them, these i added colour to with posca paint pens in peach and teal

I added a little diamond stickles to the wings so they sparkle in the light. 

Every time i see one of 'my' real hedgehogs they make me smile, they have been out of hibernation for a couple of weeks now and it seems several have made the winter which is great......I had 6 trying to get at the food bowl in the porch.......I obviously need a bigger bowl for them😁 

Items Used:
Pink Ink designs stamp 'thistlehogs'
Patterned paper 10+ years old
Tim Holtz Chit chat stickers
Stencils
Distress Inks ' evergreen bough, cracked pistachio, dried marigold, wild honey.
Plaid 'folk art' matt paint - #515 'vintage white' #6458 'ocean view'
Posca pastel paint pens
Papermania lace & ribbon
Ranger stickles 'diamond'


Do hop over to We love stamping to join in the fun and have a chance to win a lovely prize

Prize from fairy hugs

Thank you all for stopping by and also your amazing comments on my birds nest project last week.  Spring is in the air as the birds are busy nest building at the moment......including the seagulls on our roof.

I hope you all have a good week whatever you get upto.  Hugs Emmax


Id love to enter the following:


Monday, 21 October 2024

Mystical cats

Good Morning everyone

I was given a fabulous magic cat stamp set by funky fossil for my birthday, so ive used them on a few halloweenish cards.


Approx size 7x5" card base made from white card using stitched nesting dies.  I die cut a smaller label shape from white card and  and inked with green and orange brusho powder and red pixie powder.  Once die i stamped the cat image in black and stamped it a 2nd time onto white, from the white version i cut out the cat head and skull and decoupaged over the base image with blue gell.  I just added a little touch of colour to the cats eyes, leaving the rest white so it stands out against the colourful background.

I stamped one of the sentiments and bottles from the set onto white, added a little colour, cut out and adhered to the card front. Glossy accents added to the cats eyes to finish.

The mica in the red pixie powder really comes to life when the light hits it

*

Version 2 using another image in the set

Card size approx 5x5"   Made the same way as card 1, this time using mango pixie power.  I wanted the effect of the cats head sort out peeking out of a portal or such which is flooded with light so kept the orange and mango to the middle area.  I picked out the detail in the image using white and yellow posca pens


Gone with a blue background here and mango pixie powder

*

and cat image 3


again made the same way.

These are very different images to anything i have in my stash and these funky fossil stamps are such good quality, always giving a perfect image first time. The floral and foliage detail in the cats on the last 2 is lovely and i think suitable for various occasions.  Not sure about the 1st image with the skull - a bit limiting I think, however the skull could be covered by a flower or something.  

Items Used:
Funky Fossil stamp set 'Feline Magic' by Olga Heldwein
Brusho powders
Cosmic shimmer pixie powders
Nesting dies

Thank you all for  stopping by once again. Emma

I love to enter the first card in the following:

*

*


*

*

*


Saturday, 4 November 2023

Thistlehogs among the toadstools

Good Morning everyone

Its like buses, i rarely have the honour of being a guest design and now 2 days in a row😂

Today Im honoured to be a guest designer at The fairy & the Unicorn challenge


  with an anything magical goes.   I decided to dig out my lovely thistlehog stamps and teamed them up with lots of toadstools and autumnal leaves so very seasonable.


I first made my cardbase from white cardstock and nesting dies and then cut a frame for the front and added with foam tape.  From the panel that came inside the frame i stencilled a soft background with oxide inks.  I then stencilled along the bottom with glossy glaze through a mushroom stencil, once dry i adhered the panel into the frame.

I stamped the little thistlehogs and watercoloured with distress inks and cut them out, i added shape to their bodies and adhered with glue gel.  I built up a little scene around them with transparency toadstools and die cut leaves. The little mushroom people came from another pink ink stamp set.  

Tim Holtz chat stickers that read
'those that don't believe in magic will never find it'
'dream' 'imagine' 'believe' 

Stickles glitter glue added to their little wings to finish with a touch of sparkle


Now these little thistlehogs are super tiny and super fast so we don't seem them so much but they are busy every night going about their magical work

I used distress inks - evergreen bough, tumbled glass, peacock feathers, wild honey, dried marigold and ripe persimmon to colour the them and for stencilling in the background

Im loving these PET/transparency/acetate toadstools, they are lovely to use and look so realistic.  All my leaves were cut using various scraps of ink coloured cardstock

I adhered the transparency mushrooms both flat and with glue gel so that that light can shine through some of them.  

Those who follow me know I have a garden full of full size hedgehogs & lots that visit nightly.  Just last week we've had 3 late babies out feeding in the day time so we will hopefully get them fattened up nicely for hibernation.  My old cat is very protective of them when they come out in the daytime.  

Items Used:
Pink Ink designs stamps 'thistlehogs'& 'shitake happens'
Lavinia stencil 'pods'
Paperartsy stencil 'PS179'
Distress inks & oxides
Toadstool transparancy/acetate
Cosmic shimmer glossy glaze 'daydream yellow'
Stitched nesting dies 
leaf dies

Thank you all for stopping by, please do hop over to thefairyandtheunicorn to join in the fun.  I hope you have a good week. Hugs Emmaxx

Id also love to enter this card in the following:


Monday, 28 September 2020

Dragons

Good Morning everyone

Today im sharing a circle card with the Lavinia dragon stamp and an inked, stamped and stencilled background


Approx 8x8" in size.  I first made a circle mask using a large circle die and piece of card, i attached to a piece of white card painted the inside with clean water and sprinkled on brusho's & pixie powders, let them do their magic and dry completely.  Keeping the mask in place i stencilled some stars and spiral detail with oxide inks.  I stamped the lavinia verse with grey archival ink in the middle so it draws the eye into the middle.  I Stamped feathers with grey archival ink. I then removed my mask and using my stamp platform stamped the dragon 3 times with black ink and then die cut into a circle, as i then decided i wanted a bit of dimension the stamped the dragons again on white card and cut out the bulk of the body, curved gently and added over the top with glue gel. Mounted onto a black circle and then a white circle.

To make it stand up i die cut another of the biggest circles from white card, folded it in half and attached to the back.  I then added some stickles with a  purple tone onto the purple stars to add a little more sparkle.


Side on showing it stood up and you can see the dimension on my dragons better too 

A close up of the background, you can really see the vibrancy although not the shimmer from the pixie powders when the light hits them.  Now you might think red and purple is a weird combo and not one i would think of but its actually one of the brusho powders - violet i think or maybe just the purple one but it has both purple and red in that little magic pot. 

Items Used:
Lavinia stamps dragon 'ollar' & verse 'spiral of spells'
Sheena Feather stamps
Stencils - stars & circle spiral
Spellbinders grand circle dies
Brushos - orange, violet
Pixie powder - red
Oxide inks - wilted violet, fozzilised amber
Archival ink - jet black & watering can
Ranger stickles - twinkle
Black card payper box
white card - craftUk ltd

Thank you all for stopping by and all your amazing comments.  I hope you have a good week even though its all still all over the place, thank goodness for my crafting this year to keep me sane!  Stay safe. Hugs Emmaxx


Id love to enter the following:

http://asyoulikeitchallenge.blogspot.com/2020/09/favourite-bright-or-pastel-why.html   Bright colours are for me - the more colours the better - i just look to nature for inspiration

***

***

***


Monday, 12 August 2019

Dancing Fairies

Good Morning everyone.

Today im sharing a card i made for my best mate as we are celebrating a big number this year for our birthdays.  I went with a fairy theme. Alot of building up inks and stamps in the background. 


8x8 White cardblank. I took a piece of white card slightly smaller than the base card.  I first  die cut the star wreath in the top right corner to act as the 'moon'.  I then stenciled stars with marmalade oxide ink, i then removed the stencil and added clear embossing powder and heat set, this then acted as a resist so the stars shone through the darker inks. I then inked up the background with distress inks in oranges and purples, more yellow/orange around my 'moon'.  I then took a circular birthday sentiment stamp and stamped it several times around the background.
I then built up the background with various stencils and stamps with oxide inks.  You can see the whole background better in a photo at the bottom of this post. I then attached silver mirror card behind my starry 'moon' and attached to the cardbase.
From inked up card i die cut lots of foliage and built up some flowers.  I die cut the fairies in black gloss card and then silver to help them stand out a bit. Glitter glue hightlights to finish.

A close up of the fairies

Close up on the ferns and flowers


Close up on the starry 'moon' I then computer printed the 40 today and die cut into a circle to fit in the middle of my moon.

This shows my background before i added all the extras. 

Items Used:
Spellbinders circle dies
Spellbinders Fairy dies
Tattered Lace Fern dies
Joanna Sheen & Britannia Ivy dies
Tim Holtz floral dies
Star wreath die
Various Lavinia Stamps - floral & fairy
Stencils - starrs, little dots
Simon Says Stamp circle sentiment stamp
Various Distress & Oxide inks - spiced marmalade, lemonade, seedless preserve, dusty concorde, shaded lilac, chipped sapphire, black soot, 

Thank you all for stopping by and all your fabulous comments on my cards for Alice.  I hope you all have a good week. I have a few celebrations going on this week with family and friends😁. Emmax


Id love to enter the following:


http://allsortschallenge.blogspot.com/2019/08/week-5323-sun-moon-andor-stars-or.html


*****

http://simplycreatetoo.blogspot.com/2019/08/ch-152-agno-twist-winnerss-from-ch-151.html


*****


Monday, 21 August 2017

Make My Monday 53# - lazy summer days

Good Morning all and welcome to another new week. 

Its the start of a new challenge over at Make My Monday

the theme this fortnight is

Lazy Summer Days

I found this fairy silhouette in my stash which i backed with acetate and then painted the back with starlight paints.  The mica in the paints shines beautifully through the acetate. As ive done alot of beach scenes lately I wanted to think of different ways to spend a lazy summer day, and i think many of us love to lounge in the garden among the flowers and listen to the birds singing.


6x6 black card blank.  White card embossed with flowers.  I built up the starlight paints on the back of the acetate panel, i sponged a little of the sun colours around the outside of it for a sun halo.  Once completely dry i added to the white panel with glue gel so that the light can get behind it and help with the stained glass effect.  I found it better to build up thin layers of the paint.

I added some die cut leave and birds to the outside frame and a die cut dream. White gel pen highlights 


i also added glitter glue to the fairy's wings

Items used:
Imagination Crafts starlight paints 129, 135, 136, 139, 144, 161
Stickles tutti fruitti
Spellbinders mbossibilities EL-005
Memory box 'serene bird'

If you fancy joining in and seeing the rest of the teams creations please do pop over


Thank you for stopping by and all your comments last week.  Wishing you all a good week.  Hugs Emma


Monday, 1 May 2017

Make My Monday #45 - May flowers

Good Morning everyone, welcome to May. 

I hope you all had a lovely weekend. 

Today is the start of a new challenge over at Make My Monday
The theme for this fortnight is MAY FLOWERS, so if you fancy joining in and to see the rest of the design teams work do pop over.  

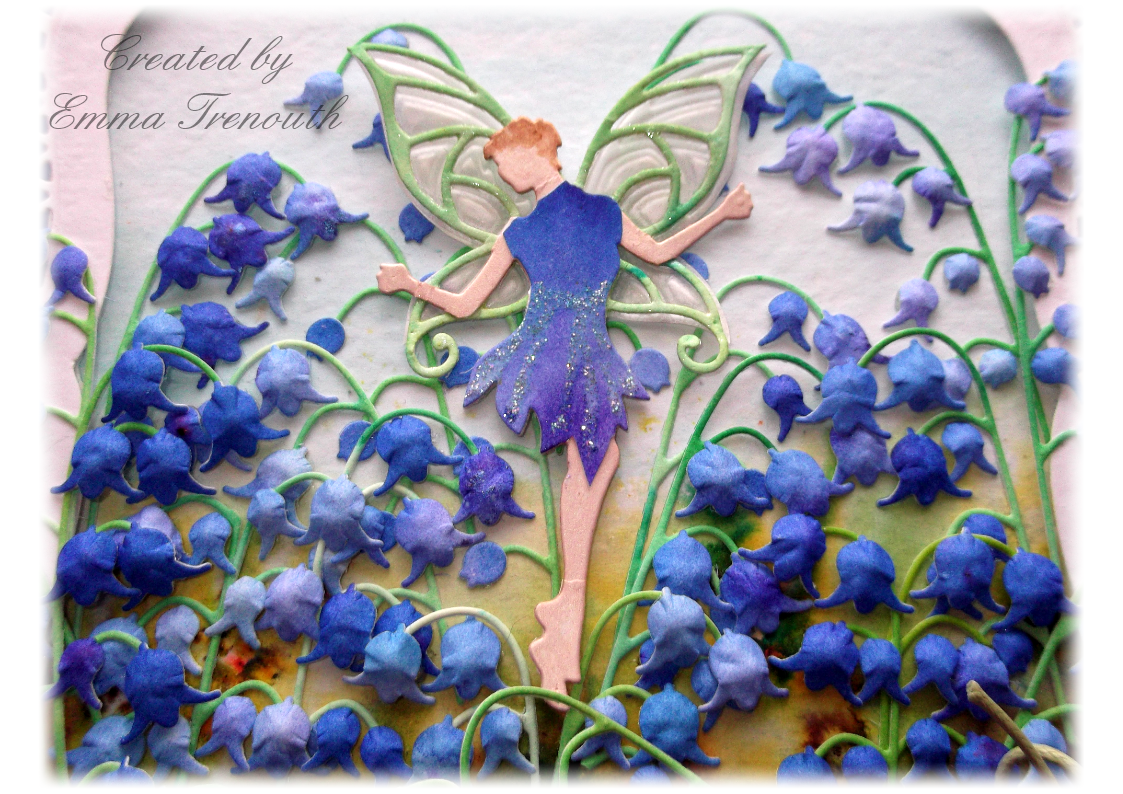
As the bluebells are in full flower here at the moment i decided to go with them as my May Flowers.  As well as bluebells i also have white and pink bells in flower at the moment.


To start with i coloured A4 watercolour card with brushos, one with blues, another with greens and the background panel with a very pale blue sky and grass.  I then die cut lots of stems and flowers and shaped them using a ball tool and foam mat.  I then die cut my fairy from white, green and blue brusho card and paper pieced her so that she matches the colours of the flowers.  

Then using spellbinders grand decorative and plain label's 1, I  die cut the card blank and frames from white and blue cardstock.  I mounted the inner white frame die cut on 2 layers of foam so that i had a nice recess to sit the bluebells into.  Computer printed sentiment die cut into shape, silver eyelets added and ribbons and twine added.  Glitter glue highlights to finish.  8x8" in size. 


Close up, i also added vellum behind the fairy wings, she looks to me like she is dancing among the flowers


Another close up.  To build up the depth of flowers i glued a few on and then let them dry, adding them at different heights and angles makes them look fuller and also laying some on top of others.   


Just to show that it does stand up.  

Items used:
Spellbinders grand labels 1 decorative and plain, 
Spellbinders Fairy Cierra S2-103
Memory box 'Arched stems 98842' & 'Fairy flower drops 98844'
Sizzix 657556
Brushos, stickles 'stardust' 


So if you fancy finding out more or joining in then please click the link


Thank you for stopping by and to all of you who popped by last week with comments.  I hope you all have a wonderful week and enjoy your May day bank holiday. Emma