Followers

Showing posts with label distress oxides. Show all posts

Sunday, 1 December 2024

WLS Dec - Winter

Good Morning everyone

Scarily its the first of December today and the first sunday in the month so time for a new challenge over at We Love Stamping


The theme this month is WINTER, or there is always the anything goes option as long as we see stamping in action

Card size approx 5x7" made from navy blue card. I took white pearl card and stenciled with oxide inks in tumbled glass, shaded lilac & cracked pistachio through lavinia 'pods' stencil.  I then over stamped with grey & blue inks winter words.  I then die cut this into 3 arches of descending sizes - missing out one die inbetween so its wider frames.   The i carefully put all 3 into a snow embossing folder, keeping them lined up so that the embossing matches.

I glued the smallest layer flat in the middle, the next size up on 2mm foam tape and the largest outside with 4mm foam tape (2mm doubled up) - its actually easier to line up starting with the outside one.  Hopefully once in place all the stenciling, stamping and embossing line up.

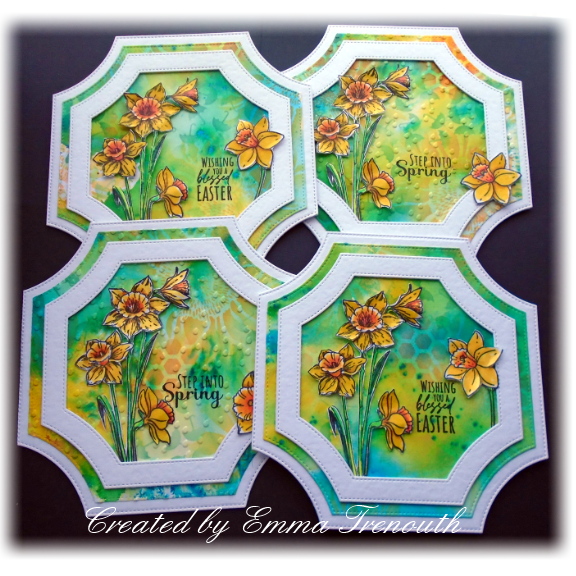
I them stamped the majestic stag stamp onto white card with versaClair medieval blue ink and added a little soft colour by watercolouring with distress inks - lemonade, honey, vintage photo & walnut stain - I liked the contrast of these colours against the cool background.  Cut him out, adhered into place with glue gel.

Sadly doesn't show in the photo but the pearl of the cardstock still shimmers through the oxide inks.  Of course as its a snowly theme i did add just a little bit of stickles glitter glue to some of the embossed snowflakes for a little sparkle.  


You can see the snow embossing a bit better here.  

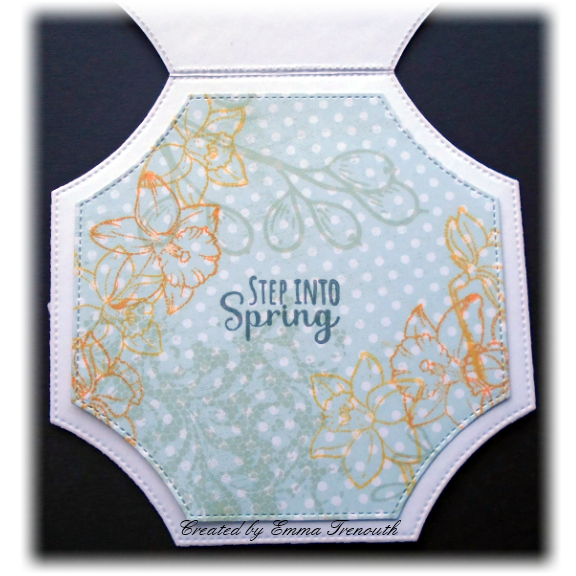
I should have taken a photo of the insert as i used another inkylicious stamp which reads 'Winter waves a magic wand over the world and behold, everything is softer and more beautiful

My parents are lucky to have alot of fallow deer roaming their fields - although mum doesn't see why they need to eat half her garden...every so often im lucky to see one when im over there

After making a big effort this year to make more postal friendly flat Christmas cards, Im very happy to make one with as much foam tape and glue gel s i wanted😁

Items Used:
Inkylicious stamps 'forest stag' 'sofly sofly' 'winter beauty'
aall&create stamps 'seasons'
Lavinia stencil 'pods'
Crafters companion 8x8 snowfall embossing folder
Distress Oxide inks - tumbled glass, cracked pistachio, shaded lilac, lemonade, honey, vintage photo & walnut stain
Versafine clair ink  - medieval blue, morning mist
Archival inks - colbalt, petunia, library green
White pearl & navy card
Rangers stickles 'twinkle'


These lovely stamp sets for the lucky winner


So do hop over to We Love Stamping to see what the rest of the design team have come up with for the Winter theme and to join in.

I gave mum her advent calendar y/day and she loved it as did dad and my brother was impressed so thats a real compliment! 

I hope you all have a good week and start to December.  Emmax


Id love to enter the following:


Monday, 25 November 2024

Have a Merry Christmas

Good Morning everyone

Another Christmas card design.  I made a snowflake stenciled background for my large die cut snowflakes.

Card size approx 6x6.5"  I first die cut my hexagon base from white card and then a smaller hexagon from more of the white card.  On this panel i used a snowflake stencil mask and distress oxide inks in shades of blues, greens & lilacs and then added some splatters.  I Then over stamped with the same inks & grey ink the words winter, Dec & 25 aall&create 'seasons' set, inked the edge in grey and adhered to the card front.

I die cut a large snowflake from white vellum and pale lilac glitter card, off set these and adhered to the card front.  Sentiment die cut from charcoal satin mirror card card.  Sadly the photos don't pick up the shimmer and shine from both the glitter card and mirror cards but in real life they really make the card when the light hits it. 


Version 2 

Made the same way but this time using silver holographic card for the snowflake ad black mirror card for the sentiment.  I made 10 versions of this design and a great one for making a dent in my fancy card scraps drawer where i keep off cuts of glitter, mirror, satin card!  So they are all slightly different.  

I only glued the middle of the snowflakes so the edges are free to give a bit of interest and dimension otherwise its a flat card - always a mission for me!

Items Used:
Studio Light stencil (grunge masks) 'SL-GR-MASKS52'
aall&create stamp 'seaons'
Spellbinders die S4-286 '2010 snowflake pendant' 
Tonic studios sentiment die - old magazine freebie
Hexagon nested dies
Distress Oxide inks - shaded lilac, tumbled glass, peacock feathers, twisted citron, evergreen bough
Versafine Clair ink 'Morning mist'
White vellum
Various glitter, mirror and satin card

I hope you all survived Storm Bert without too much damage, we did lose electric for several hours and luckily didn't need to venture out in it, on the plus side i guess is that its much warmer than all that snow last week!  I hope you all have a good week - scary that its the last week in November! Big hugs to you all. Emmax

Id love to enter the following:


Sunday, 2 June 2024

We love stamping June

Good Morning everyone

Today a new challenge starts over at We love stamping with the theme of fantastic florals or there is the anything goes option.   This month they also celebrate their 15th birthday so lots of amazing prizes on offer .


4x4" card.  I actually had these pearl cream nested die cuts on my desk left over from a previous project and thought they were the ideal for this little floral stamp from aall&create.  I first took 2 of the die cuts, added a hinge to one which i attached to the back of another to make my card base.  I then took another die cut, used a smaller die from the nested set to cut a frame which i attached to the card front with foam tape - from the centre piece I stamped the text from the stamp set with grey ink & then embossed it with a leafy embossing folder and lightly inked with evergreen distress ink and then added to the card front. 

I stamped the flowers with my new fav green ink(versaclair green oasis), watercoloured the heads with raspberry, violet & honey oxide inks and the stems & leaves with evergreen oxide ink, cut them out & arranged on the card front, tucking them in behind the frame. Touch of glitter glue added to the flower centres.

I stamped the sentiment onto matt ivory cardstock with grey ink, cut out and attached to finish.

Just a close up of the flowers - i cut some stems shorter and on a couple chopped of the heads and added back at a different angle to add more variation. I made one taller by cutting the stem in half and hiding behind another flower

and showing it with the main stamp set i used - how different it looks in a different colour.

Items Used:
aall&create stamps #851 'rise & shine'
Woodware Sentiment stamp #FRS749 'strokes & words'
Sizzix embossing folder
Nesting dies
Distress Oxide inks 'evergreen bough, picked raspberry, wilted violet, squeezed lemonade, wild honey'
Versafine Clair ink 'green oasis, morning mist'


So many lovely stamps to be won so do hop over to join in the fun at we love stamping with your fantastic florals or anything goes.  I hope you all have a fabulous week. Emmax


Id love to enter the following


Monday, 15 April 2024

Arty thank you

Good Morning everyone

I bought these fab art equipment stamps a while back in a sale but thought they were perfect to make a couple of little thank you cards for crafty friends who sent some crafty bits for my nieces to create art with.

4x4" I had these shaped die cuts left over on my desk and thought would be perfect for the base so i joined 2 together with a little hinge on the back one for my shaped card blank.  I lightly stencilled black soot oxide ink through a splodge stencil for my background - i wanted to keep it muted so my rainbow of arty stamped items stood out. 

I stamped the images onto white card with black ink, watercoloured with distress oxide inks and cut them out.    I then got arranging them and adhered into place.  I had these fab chipboard stickers with arty saying which are the perfect finishing touch - the little arty flower image is from the same chipboard set. 

Version 2 the quote and heart are both chipboard.  

Items Used:
Creative expression Jane davenport stamps 'CEJDCS023' 'HeArt Supplies'
Stamperia chipboard 'DFLCB24' 'Atelier des Arts'
Distress Oxide inks - candied apple, spiced marmelade, fossilised amber, lucky clover, salty ocean, blueprint sketch, wilted violet, Picked raspberry, black soot.
Woodware mini Splat stencil 
Nested dies
White cardstock

Thank you all for stopping by once again.  I hope you all have a good week. Emmaxx


Id love to enter the following:


Monday, 16 October 2023

Autumn toadstool

Good Morning everyone

Today is a Autumnal birthday card, using the fab pink ink toadstool stamp.  I teamed him up with some PET acetate toadstools and die cut leaves. 

   I used an Ombre ink pad and stamped the fungi onto ivory cardstock and cut them out, i added  little shading but mostly left them uncoloured.  I took a piece of the same ivory cardstock and stencilled lavinia pods with oxide inks and then over stamped with various leaf stamps.  In grey i used aall&create stamps to stamp the recipients birthday '11thOct' & the word 'autumn'   I used 2 of the nesting dies to die cut this and attached to a kraft base card, using foam tape behind the frame, this then gave me somewhere to tuck my leaves and toadstools into.

I then got arranging the stamped fungi with the acetate ones and added some die cut leaves  - these were cut from card inked with brusho's & Pixie powders so have some shimmer to them.  Clearly besotted sentiment stamp stamped onto the ivory, cut into a strip, matted onto kraft card and added to the top left corner to finish. 

By tucking some of the fungi and leaved both behind the frame and in front it gives a nice feeling of depth.  I can't help but smile each time i look at this chap, he is such fun.  

Items Used:
Pink Ink stamps 'Shitake happens'
aall&create stamps 'seasons'
Clearly besotted 'seasonal sentiment' stamps
Lavinia stencil 'pods'
Various leaf dies
Distress Oxide Inks ; fossilised amber, spiced marmalade, cracked pistachio, evergreen bough, 
Kaleidacolor Ombre ink pad 'desert heat'

Thank you for stopping by once again and all your amazing comments on my previous uploads.  I hope you all have a good week. Emmax

Id love to enter the following:


Monday, 13 March 2023

Spring Daffodils

Good Morning everyone

Its not often these days that I buy a craft magazine but after seeing crafters using these lovely daffodil stamps from 'simply cards & papercraft issue 240' i did go and buy the magazine. 

Ive made a start on my Easter cards, teaming the daffodil stamps up with colourful backgrounds and a new die set i was lucky enough to get for Christmas.  I first made a few backgrounds using brushos and pixie powders, once dry I stencilled over the top with oxide inks. 


Card size approx 6x6"  I first die cut my base card from white cardstock.  I then used a smaller die to cut my inky background which i then stamped my sentiment into place with black ink and then dry embossed with a raindrop embossing folder, I then adhered to the base card.  I then die cut a frame from white card and added on top with foam tape.

I stamped the daffodils onto more white card and coloured with alcohol markers, cut them out and arranged in place using pinflair glue gel for the flower heads and normal tacky pva for the stems which i tucked under the frame edge.  I added a single daffodil to the right hand side. 

Just a close up of the background, i used honeycomb, floral & umbrella stencils - i had the idea of April showers bring may flowers in my head with the umbrella stencil and raindrop embossing. 

Version 2, no embossing on this one and a different sentiment from the stamp set

 The magazine came with several papers too so i used some for the inserts and stamped more daffodils from the set with oxide inks.  


***

and this 2nd set came about after having the white negative left over from cutting the frames on the 1st set, so they are smaller cards at just under 5"

Ive gone with a mix of daffodil colours this time,  

I first die cut my base card, then a piece of brusho/pixie powder card and dry embossed with a sun ray embossing folder, sentiment stamped in the middle before embossing.  The piece that was left over from the previous cards I added with foam tape after cutting a smaller die from the middle.  I then stamped the 3 daff image onto more white card, coloured with alcohol markers and cut out and attached to the frame so that they are slightly overlapping the inside edge. 


again i used some of the papers from the magazine for the inserts

Items Used:
Daffodil stamp set ' simply cards & papercraft mag 240'
Clearly besotted sentiment stamps
Crafters companion raindrop EF
Sunray EF
Funkyfossil umbrella stencil
Honeycomb & sunflower stencils
Brusho powders 
Cosmic shimmer pixie powders
Oxide inks
CraftUk ltd 300gsm white card

Thank you all for popping by, i hope its a good week for you. Hugs Emmax


Id love to enter my first card in the following:


***


***

***

***