Followers

Showing posts with label distress inks. Show all posts

Wednesday, 7 May 2025

Squirrel tag

Good Morning everyone

Its not often I make a tag but I decided to join in with the first challenge over at  Tag along & atc


I used these fun squirrels from aall&create and built up a little scene.
Tag size approx A6 (6x4")  I die cut the largest die from cream cardstock and then the next size down from white card I'd sprayed with blue and green inks, the blue one is pearlised, keeping it more blue at the top for the sky and green at the bottom for grass.  Once dry I stenciled a little detail with stormy sky distress ink and stamped some text with forest moss distress ink.

I stamped the branch direct onto the tag, stamping one side and then the opposite.  I stamped the squirrels, leaves & acorns onto white card, watercoloured with inktense pencils and cut out.  I then got arranging it all, adding the squirrels and acorns with pinflair glue gel.  To give the squirrels some ground to stand on, I added a scrap of the inked card to the bottom of the tag with foam pads, inking all the edges with stormy sky distress ink.

I stamped the quotes from the set onto off cuts of cream card, cut out and adhered to the front. 

Raiding the ribbon box I found a satin orange ribbon, gold organza and blue lace which matched the colours perfectly.  I punched a hole in the top of the tag and added an eyelet and then threaded my ribbons.

I have a bottle of range matt accents - had it for over 10yrs, so trying to use it - i usually use glossy accents.  Anyway this matt accents is weird as it does leave a shine once dry but its matt - difficult to explain and even more difficult to photograph😁.  Anyway I added that to the acorns to finish.

Items Used
aall&create stamps #290 'squeaky friends' #851 'rise&shine'
aall&create stencil #167 Organic orbs
Stitched tag dies
Derwent Inktense pencils
TH Distress Inks 'stormy sky, forest moss'
Cosmic shimmer airless misters 
Ranger matt accents


Sunday, 6 April 2025

WLS April fav stamp


Good Morning everyone

The first sunday of April so its time for a new challenge over at We Love Stamping

The theme this month is
FAVOURITE STAMP &/or RIBBON OR LACE
adding ribbon is now optional - boy did i struggle to add it in!!
or you can always go with the anything goes theme as long as its using stamps - physical or digital

Now this is a difficult theme -  choosing a favourite stamp - I have so many that are favourites for different reasons but my first choice was these 'thistlehogs' from Pink Ink Designs as each time I see them they just make me smile and lift my spirits.  
I have a garden full of hedgehogs and who knows a few of these tiny thistlehogs may come out at night with the fairies, these guys are like the moths just flittering around in the dark😁


A5 white card blank.  I first stamped and watercoloured the thistlehogs with distress inks.  I then raided my stash and found this fab autumn skeleton leaf paper. So that the thistlehogs stood out more, I toned it down a bit by dry brushing antique white chalk paint over the top and added a little stencilling with pale teal chalk paints.  I cut it to size and matted onto pearlised teal card and then wrapped with my pale teal lace and peach satin ribbon and then added to the cardfront.
I added a bow from the same peach satin ribbon so that there was no question on the adding ribbon part! lol  Years ago i added ribbon to everything before i got into stamping, my style has changed alot since then.

I curved the bodies of the thistlehogs and added with pinflair glue gel.

I then raided my stash of chat stickers and came up with 
'Sprinkle a little Happiness every where you go'

I had to make it up out of random left over chat stickers - hence it being every where as 2 words not one! I adhered them to white card, outlined with black pen and then arranged on the front.


You can see the dimension better at this angle.
I had stamped the thistlehogs onto the leaf paper as well so that i got all the extra swirly bits around them, these i added colour to with posca paint pens in peach and teal

I added a little diamond stickles to the wings so they sparkle in the light. 

Every time i see one of 'my' real hedgehogs they make me smile, they have been out of hibernation for a couple of weeks now and it seems several have made the winter which is great......I had 6 trying to get at the food bowl in the porch.......I obviously need a bigger bowl for them😁 

Items Used:
Pink Ink designs stamp 'thistlehogs'
Patterned paper 10+ years old
Tim Holtz Chit chat stickers
Stencils
Distress Inks ' evergreen bough, cracked pistachio, dried marigold, wild honey.
Plaid 'folk art' matt paint - #515 'vintage white' #6458 'ocean view'
Posca pastel paint pens
Papermania lace & ribbon
Ranger stickles 'diamond'


Do hop over to We love stamping to join in the fun and have a chance to win a lovely prize

Prize from fairy hugs

Thank you all for stopping by and also your amazing comments on my birds nest project last week.  Spring is in the air as the birds are busy nest building at the moment......including the seagulls on our roof.

I hope you all have a good week whatever you get upto.  Hugs Emmax


Id love to enter the following:


Wednesday, 12 March 2025

Goat birthday

Good Morning everyone

I made this card for my mum to give dad for his birthday.  Its using this goat stamp from aall&create - his horns are magnificent and he actually looks very much like my dads ram(sheep) 'Duncan' 

A6 (4x6") white card base.  I first stamped the image  three times onto white with blue ink and watercoloured 2 of the goats with distress inks and cut out
I found this old paper pad in my stash that matched the colours id coloured the image perfectly.  I added a yellow tone paper to the base and added a little stripe of the red & blue paper across the middle having matted onto white.

 From the uncoloured image i die cut with a rectangle frame die.  I added the frame to the card front with 2mm foam tape and adhered the goat image flat into the middle.  I then decoupaged the coloured goat on top with glue gel so it looks like he is bursting out of the frame.

Sentiment added to finish

Showing it side on


Items Used:
aall&create stamp #619 'Mountain goat'
Very old kanban paper pad (13+ yrs)
Distress inks ' wild honey, vintage photo, aged mahogany, tumbled glass, evergreen bough'
Versafine clair ink 'medieval blue'
MFT frame & nesting dies
birthday die
aall&create stencil #167 'organic orbs'
Altenew stencil 'leaf burst'

Thank you all for stopping by once again. Hugs Emmax


Id love to enter into the following


**

**

**

**


Monday, 15 August 2022

Laughter...

Good Morning everyone

This is the 2nd outing for my new katzelkraft cat stamps.  Ive teamed them up with this fab inkylicious quote 'Laughter....sparkles like a splash of water in the sunlight'  So ive built my little scene around it


A5 white cardbase.  I took a piece of white card smaller than the front and stamped the cat branch, flying cat and quote in place.  I then heat embossed the waterdrops around them using a clear iridescent embossing powder which shimmers green when the light hits it. 

I brushed on distress inks tumbled glass & salty ocean, keeping less colour around the sentiment area. Normally when i ink a background i go for full coverage but as i was building it up i liked the movement this had so stopped inking.  I use 'Pro Arte' stencil brushes - ive had mine years with lots of use and they are still in excellent condition. 

I placed a circle/sun burst stencil over the stamped quote and inked through with lemonade oxide ink.  The oxide ink goes nicely over the distress ink and still stays yellow instead of turning green if id used lemonade distress ink. I then matted the panel onto black card and then the base.

I stamped the cats again onto white card and watercoloured with derwent inktense pencils and cut them out.  I gently added shape to them before decoupaging on the base with glue gel. 

I added touches of glitter around some of  the water drops to finish.


Items Used:
Katzelkraft stamps
Inkylicious laughter stamp
Waterdrop stamps
Sunburst stencil
Distress inks tumbled glass, salty ocean
Distress oxide ink squeezed lemonade
embossing powder
Derwent inktense pencils
WRMK corner chomper

Thank you all for stopping by once again. I hope you all have a great week. Thankfully its a bit cooler this morning.  Emmax

Id love to enter the following:


***

***


Thursday, 12 September 2019

Life is a Canvas


Morning everyone, i hope you are having a good week.

Today im sharing a stamped card, where ive used lots of different stamps to build up my garden scene.


7x7" scalloped cardbase.  I took a square of white card and stamped my flowers in black and then masked them with pebeo drawing gum. I doodled in some ground with a black fine liner pen. I then inked up the background with distress inks. I added in some detail with oxide inks and stencils.  I added some stamping in grey with a dictionary stamp and stamped in some water drops.  I removed excess ink from the water drops with a damp brush and dabbed with tissue & then added some glossy accents.  

I then removed the masking fluid and coloured the flowers with wink of stella pens.  I die cut lots of little butterfly from purple inked card.  I stamped my little lady onto white card and cut her out.  I stamped the sentiment and cut out. I added my little lady with dimension.  Doodled in white gel pen dots for butterfly trails. 

I then mounted the panel onto silver glitter card and then navy cardstock and then the cardfront. 


A close up, you can just make out the sparkle but in real life the wink of stella pens really shimmer and sparkle. 

Items Used:
Carabelle stamps - 'zinouk du jardin'
Water drop stamps
Stampin Up dictionary stamp
Bee crafty sentiment stamp
Various stencils
Memory box mini butterfly die
Wink of Stella pens
Distress oxide & original inks

In answer to a question last week Kirsty i always use a normal paintbrush over a waterbrush when colouring in images, just personal choice as i find have more control over the amount of water im using. 

Im off to meet my new baby niece today so looking forward to that.  I hope you all have a good day whatever your plans. Hugs Emma


*****

Id love to enter the following:


*****

*****


Monday, 17 June 2019

One Layer Card

 Good Morning everyone.  

Today im sharing a very rare one layer card for me.  So again i dug out the inks, stencils and a couple of stamps.


I first folded a piece of CraftUk ltd smooth white card in half for my base.  I stamped the flower stamp to the left side and masked them with pebeo drawing gum.  I then inked up the background with original distress inks in tones of greens, i then splashed with water and dabbed dry with tissue.  I then stenciled over the top with Oxide inks in the same greens. I splashed some ink over the white section just to tie it all together.  I then removed the masking gum to reveal the white untouched flowers.  I coloured these with Clear wink of stella pen so they glitter in the light.

I then stamped my 2 lavinia hares, i used my stamp platform and over stamped them a few times to get them a nice solid black.  I then doodled in some ground for the flower & hares with a black fine liner pen.  I then lightly stamped in grey a dictionary stamp for the ground.   


A close up. When i took the photo i hadn't decided on a sentiment but then a friend had a little accident so sent it to her to give her a smile hopefully.  


Hopefully you can just make out the shimmery glitter of the clear wink of stella pen i added to the flowers. 
Items Used:
Honeydoo flower stamp
Lavinia Hare stamps
Stampin up Dictionary stamp
Altenew Stencil
Distress Inks Evergreen bough, twisted citron, peacock feathers
Distress oxide inks Evergreen bough, twisted citron, peacock feathers
CraftUk ltd smooth white card
Clear wink of stella pen

Thank you all for stopping by once again.  I hope you all have a brilliant week, maybe we will see some sunshine😊.  Emmax


Id love to enter the following challenges:


******


******


Thursday, 15 November 2018

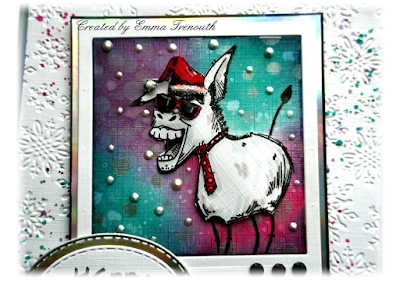
Oh LIttle Donkey


Good Morning everyone.  I hope you are having a good week.

Today im sharing some quirky fun Christmas cards.  I've used the Donkey stamp from the Katzelkraft farm animals stamp set.  I left him mostly white so he stands out against the colourful backgrounds. 


6x5.5" Cardbase. I first die cut the Polaroid frame from white card, on the centre panel that pops out i stamped the donkey and then using distress inks blended the inks onto the panel.  I then stenciled silver paint through a dots stencil and then white peal drops for snow.  
I stamped the donkey again and cut out the main body and added on top with glue gel, lining up with his legs and tail.  I stamped, coloured and cut out a Christmas hat, sunglasses and bow tie from the Tim Holtz crazy birds accessories stamp set. I added light shading to the donkey with grey markers.
I mounted the Polaroid frame onto silver holographic mirri card.  I embossed a panel of white card with a snowflake embossing folder, added some stamped ink splashes in the same colours i used on the donkey background.  Mounted the panel onto holographic card and added to the card front.

Computer printed sentiment, die cut into an oval and again mounted onto a holographic silver oval. Glitter dots to embellish and finish.

Close up, you can see the silver stenciled dots better here when the light hits them.  I used twisted citron, ripe persimmon & evergreen bough distress inks.


The same but a different colour combo. This one is twisted citron, evergreen bough & seedless preserve.


This one is picked raspberry, peacock feathers and dusty concord distress inks. I just blended them onto the craftUk ltd linen card with stencil brushes.


Just a close up,  i added glossy accents to the sunglasses and glitter to the fluffy parts on the Christmas hats. 


and looking back i see i haven't uploaded the birthday card i made for my brothers birthday back in September which actually inspired this set of cards


I first made a background using brusho's, pixie powders & salt, i stamped the donkey and as above die cut a Polaroid frame and added the donkey on top, i kept him white so he stood out against the bright background. Stamped the sentiment, mounted onto black card.  I added a panel of the same brusho background at a wonky angle onto white card, black card and then the base case.  Black enamel drops to finish.  My family loved it hence the batch of Christmas cards. My brother has 2 donkeys, an old one Bengy that the children love riding and last year he took on a young one Oscar who is settling down. 


A close up of the background, you can see the 'cells' the chunky salt leaves in the brushos - for more details on the technique you can find it here (salt background)


Items Used:
Katzelkraft Farm Animal stamp set
Sizzix polaroid die set
Crafters Companion snowflake embossing folder
Tim Holtz crazy bird accessory stamp set
Stampin up Gorgeous grunge stamp set
Tim Holtz Distress inks
Viva pearl drops
Silver acrylic paint
Dot stencil

Thank you for stopping by and all your visits last week, i always appreciate them.  I hope you all have a good weekend. Hugs Emma

Id like to enter the following challenges:

thatscraftychallenges -winter-wonderland  - my donkey is surrounded by falling snow