Followers

Showing posts with label Spellbinders labels 1. Show all posts

Thursday, 26 January 2023

Embossed acetate

Good Morning everyone

In my January craft sort out i came across these dry embossed alcohol inked acetate panels that were already attached to black card frame - I made these panels years ago and they just got hidden away so now was the time to use them.  I also came across these lovely mechanical butterfly die cuts that a crafty friend had sent me and the 2 just seemed the perfect match.


I first die cut acetate into spellbinders label1 shape and put through a sunray embossing folder, i then added alcohol inks in pinks & purples and let them do their magic.  I die cut a label1 frame from black card and adhered the acetate to the back of it, added foam tape around the frame edge, then a white die cut to the back and then glued flat onto a larger black die cut.  By adding the white layer behind the acetate it helps the ink colours to really pop.

I die cut my card base using a larger spellbinders label 1 from white card.  I added the butterfly die cut with some aurora borealis gems on his body.  Some white pen dots to each corner & a tim Holtz chat sticker to finish.  This card might have taken 4 years to come together but i was pleased with the outcome and its always satisfying to finish a half done project.


This really shows the vibrancy of the alcohol inks and i love how the light plays on the acetate with the different heights of the embossing

and a 2nd version which id used more sunshine colours - i guess at the time i thought sunray embossing folder so sunshine alcohol ink colours😀


Items Used:
Spellbinders labels1 & grand labels1
Sunray embossing folder
Butterfly die cuts 
Tim Holtz alcohol inks
Tim Holtz chat stickers
Acetate
White & Black cardstock
Posca white pen

Thank you for stopping by.  Emmax


Id love to enter the following:

***

***


Monday, 26 April 2021

Kraft Poppies

Good Morning everyone

This kraft card had beautiful printed poppies on it so i decided to colour them in.  It was an old paper pad from B&M called vintage baroque


Card approx 6.5x6.5"..  I coloured the poppies with Derwent inktense pencils and used a grey alcohol marker for the background.  I die cut with my spellbinders grand labels 1.  I then used a smaller scalloped labels 1 and die cut 2 panels from the middle of this piece.  I die cut a larger fancy labels 1, and then attached the outside of my poppy panel with foam tape, then the middle size i added back in glued flat and the very middle piece i added on foam tape again, making sure the pattern lines up each time  - i did this just to add some interest to my poppy panel.   I stamped the sentiment on a smaller kraft square and added with foam tape to the middle. 

Butterflies die cut from kraft card with a gem centre to finish. I then die cut the largest grand label1 from kraft card, folded this is half to act as my cardbase and then attached  the poppy panel.

Showing it side on and how it stands up.  You can also make out my layers in the poppies better here.


Items Used:
Kraft paper pad - B&M 'vintage baroque'
Kraft card
Spellbinders grand labels1, scalloped labels 1
Circle die
MFT birthday circle die
Sizzix butterfly dies
Clearly besotted sentiment stamp
Derwent inktense pencils
Kuratake wink of stella pens

Thank you all for stopping by once again.  I hope you are all holding in there. Hugs Emmaxx


Id love to enter the following:


***


Monday, 2 November 2020

Shaker Christmas cards

Morning everyone.

Today is a set of Christmas shaker cards.  This year Ive made an effort to use up old paper pads, so this one is from bobunny and a christmas woodland theme in blues and browns, i teamed it with white pearl card and silver mirror card.


Approx 6x6" in size.  I first die cut spellbinders grand label one from white pearl card and folded in half for my base card.  I layered with a piece of paper cut with a smaller label 1, i cut this in half and glued to the front and back of my card.  I then die cut the snowflake circle die from white pearl card and used a circle die to cut around the outside so it becomes a circular frame, i then attached a die cut acetate circle to the back & die cut a circle frame the same size out of funky foam which i glued to the back for my shaker element - just easier to stick than foam tape to a circle leaving no gaps.  

I die cut the girl panel from white pearl card and silver mirror card and offset so that some of the silver shows at the top, a circle from the paper pad and a larger white circle.  I glued the girl onto the paper panel  and added micro beads, silver sequins and glitter for my shaker bits and attached my snowflake frame over the top.  I then mounted onto the larger circle and my cardfront. 

Stamped greeting die cut into a fishtail banner, snowflakes die cut from silver mirror card and a dazzle gem for the centres to finish. 


Just adding that little bit of silver behind the girl helps her stand out from the background, she reminds me of my little nieces out catching snowflakes as they are so rare to see here in Cornwall


A close up of my shaker


Different papers same design


This one shows how the card base stands up easily.

and with the negative middle piece that falls out from the snowflake circle frame i made some very simple gift tags for my presents
I stamped a sentiment on the circle in black and some snowflakes in grey ink and mounted onto a larger circle die cut from patterned papers.  Set an eyelet and added some ribbon and glitter glue highlights to finish.


Items Used:
Bobunny Sleigh ride paper pad
Girl snowflake frame die - brand unknown
Spellbinders grand lables 1 & circle dies
Memory box snowflake dies
MFT fishtail banner die
Clearly besotted sentiment stamp
Creative expressions dazzler gems
White pearl cardstock
Silver mirror card

Thank you all for stopping by, i hope you have a good rest of the week as we prepare for another lockdown.  Weather isn't too good so more crafting for me.  Stay safe. Hugs Emmax


Id love to enter:

***

***


Monday, 1 May 2017

Make My Monday #45 - May flowers

Good Morning everyone, welcome to May. 

I hope you all had a lovely weekend. 

Today is the start of a new challenge over at Make My Monday
The theme for this fortnight is MAY FLOWERS, so if you fancy joining in and to see the rest of the design teams work do pop over.  

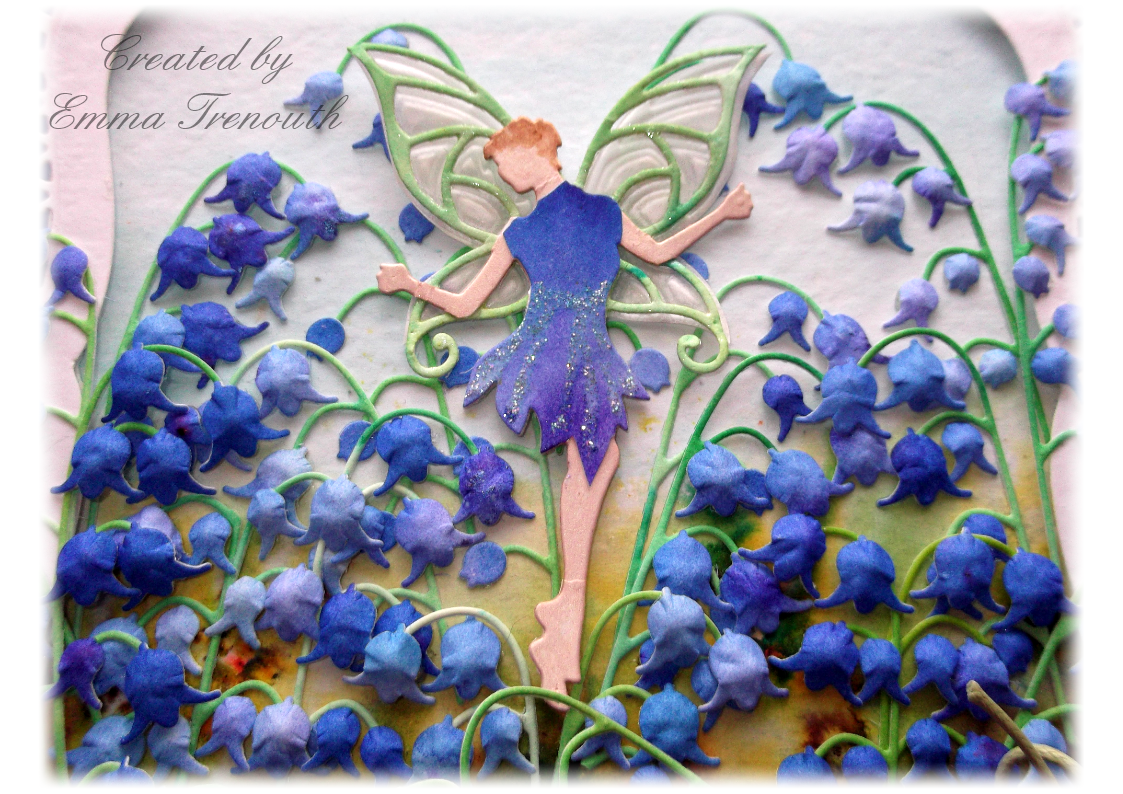
As the bluebells are in full flower here at the moment i decided to go with them as my May Flowers.  As well as bluebells i also have white and pink bells in flower at the moment.


To start with i coloured A4 watercolour card with brushos, one with blues, another with greens and the background panel with a very pale blue sky and grass.  I then die cut lots of stems and flowers and shaped them using a ball tool and foam mat.  I then die cut my fairy from white, green and blue brusho card and paper pieced her so that she matches the colours of the flowers.  

Then using spellbinders grand decorative and plain label's 1, I  die cut the card blank and frames from white and blue cardstock.  I mounted the inner white frame die cut on 2 layers of foam so that i had a nice recess to sit the bluebells into.  Computer printed sentiment die cut into shape, silver eyelets added and ribbons and twine added.  Glitter glue highlights to finish.  8x8" in size. 


Close up, i also added vellum behind the fairy wings, she looks to me like she is dancing among the flowers


Another close up.  To build up the depth of flowers i glued a few on and then let them dry, adding them at different heights and angles makes them look fuller and also laying some on top of others.   


Just to show that it does stand up.  

Items used:
Spellbinders grand labels 1 decorative and plain, 
Spellbinders Fairy Cierra S2-103
Memory box 'Arched stems 98842' & 'Fairy flower drops 98844'
Sizzix 657556
Brushos, stickles 'stardust' 


So if you fancy finding out more or joining in then please click the link


Thank you for stopping by and to all of you who popped by last week with comments.  I hope you all have a wonderful week and enjoy your May day bank holiday. Emma