Followers

Showing posts with label daffodils. Show all posts

Monday, 13 March 2023

Spring Daffodils

Good Morning everyone

Its not often these days that I buy a craft magazine but after seeing crafters using these lovely daffodil stamps from 'simply cards & papercraft issue 240' i did go and buy the magazine. 
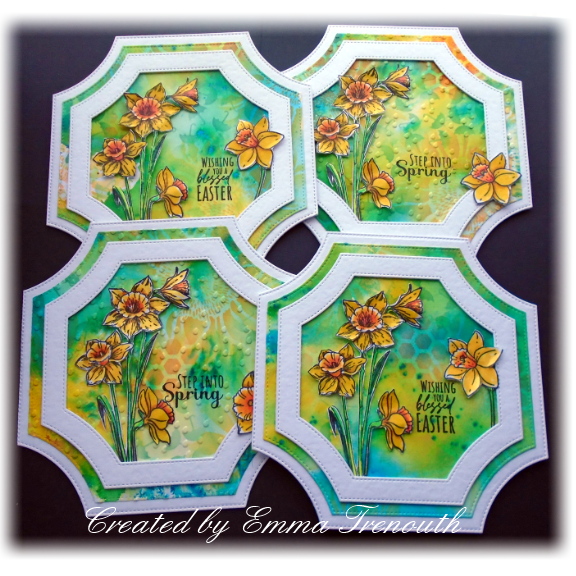
Ive made a start on my Easter cards, teaming the daffodil stamps up with colourful backgrounds and a new die set i was lucky enough to get for Christmas.  I first made a few backgrounds using brushos and pixie powders, once dry I stencilled over the top with oxide inks. 


Card size approx 6x6"  I first die cut my base card from white cardstock.  I then used a smaller die to cut my inky background which i then stamped my sentiment into place with black ink and then dry embossed with a raindrop embossing folder, I then adhered to the base card.  I then die cut a frame from white card and added on top with foam tape.

I stamped the daffodils onto more white card and coloured with alcohol markers, cut them out and arranged in place using pinflair glue gel for the flower heads and normal tacky pva for the stems which i tucked under the frame edge.  I added a single daffodil to the right hand side. 

Just a close up of the background, i used honeycomb, floral & umbrella stencils - i had the idea of April showers bring may flowers in my head with the umbrella stencil and raindrop embossing. 

Version 2, no embossing on this one and a different sentiment from the stamp set

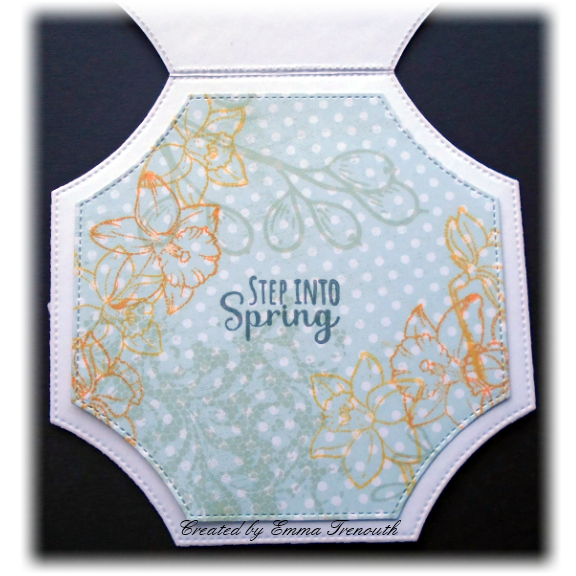
 The magazine came with several papers too so i used some for the inserts and stamped more daffodils from the set with oxide inks.  


***

and this 2nd set came about after having the white negative left over from cutting the frames on the 1st set, so they are smaller cards at just under 5"

Ive gone with a mix of daffodil colours this time,  

I first die cut my base card, then a piece of brusho/pixie powder card and dry embossed with a sun ray embossing folder, sentiment stamped in the middle before embossing.  The piece that was left over from the previous cards I added with foam tape after cutting a smaller die from the middle.  I then stamped the 3 daff image onto more white card, coloured with alcohol markers and cut out and attached to the frame so that they are slightly overlapping the inside edge. 


again i used some of the papers from the magazine for the inserts

Items Used:
Daffodil stamp set ' simply cards & papercraft mag 240'
Clearly besotted sentiment stamps
Crafters companion raindrop EF
Sunray EF
Funkyfossil umbrella stencil
Honeycomb & sunflower stencils
Brusho powders 
Cosmic shimmer pixie powders
Oxide inks
CraftUk ltd 300gsm white card

Thank you all for popping by, i hope its a good week for you. Hugs Emmax


Id love to enter my first card in the following:


***


***

***

***


Thursday, 7 April 2022

Daffodils

Good Morning everyone

Today im sharing my spring daffodil cards i made using backgrounds i made on the gelli plate and a lovely verse stamp from clearly besotted which says 'the first blooms of spring always make my heart sing' which is so true to me.  I think spring is my fav time of year, we are surrounded by nature waking up with the trees in bud and flowers beginning to bloom and the lambs in the fields and birds nesting. 

White linen card base approx size 5x7" cut using crealies arch dies.  I also die cut a frame arch frame and added foam tape around it and mounted on my cardbase.  I then die cut my gelli print background and adhered into the frame.  I die cut the daffodil die from scrap white card and coloured with alcohol markers, adding a little detail with white posca pen.  I glue the daffodils in place with glue gel.  Stamped sentiment cut into a strip and yellow enamel dots to finish.

For the gelli plate backgrounds i used an oval plate and acrylic paints  in shades of green with a stencil which i thought had the look of a patchwork of fields in the background.  I added a touch of orange paint through a script stencil in places just for interest and to pick up on the orange in the daffodils.


Version 2 using the same stencils

and version 3 is a bit more detailed.  I built up the layers on the mono print with my oval gelli plate using 2 different circle burst stencils and paints in hues of yellow, orange & green.  

I made my base card with white linen card and spellbinders grand labels 4 dies, i die cut a smaller frame and then my background with a smaller label 4 die to slot into the frame.  I added my die cut daffodils to the middle and embellished with small yellow buttons.  Stamped verse to finish.


Just a close up and you can see the layers more in my gelli print

Just to show how i made my card base for this shaped card, i die cut grand label 4 die the same size as the card front, folded it in half and attached to form an easel effect, just trimming the back bottom edge flat to help it stand up.

Version 2 - this gelli print has a real patchwork look to it.  Im beginning to get the hang of lining up the print to the gelli plate for each layer now to give a cleaner edge, i still never know what effect the end result will be so its always a surprise and very random.

Items Used:
Lavinia oval gelli plate
Daffodil die
Crealies arch dies
Spellbinders grand labels4 die
Clearly besotted stamps 'seasonal sentiments' 
Various stencils
Acylic paints
Alcohol markers
white posca pen
Altenew yellow enamel dots
yellow buttons

Thank you all for stopping by once again.  Hugs Emmaxxx


Id love to enter the following with my first card:

***

***

***


***


Thursday, 1 April 2021

Spring Daffodils

Good Morning everyone

Today is a little Spring Daffodil card - my garden is so colourful at the moment with the daffodils & tulips in full flower.


Approx size 5.5x4"  I first cut my card base from orange pearl cardstock and a sizzix die, after folding a piece of A4 card in half i placed the top edge of the die just over the spine and ran through my machine.  I cut a small panel from a pale lilac cardstock and die cut the memory box die from the middle, i added orange mirror card behind this to shine through.
I die cut the daffodil twice from a left over piece of white pearl cardstock, i coloured it with alcohol markers, on the 2nd daff die cut i just cut out the daff trumpets and decoupaged them onto the main image to add some dimension.
Stamped sentiment to finish.


This photo really shows the orange mirror card in the background.

Items Used:
Sizzix 658204
Memory box
Daffodil die
Oval die
Clearly besotted sentiment stamp
Alcohol markers
Orange pearl card
Lilac cardstock

Thank you all for stopping by.  I hope you all enjoy your Easter Weekend. Stay safe. Emmax


Id love to enter the following:


***

***

***


Sunday, 22 March 2020

Happy Mother's Day


Good Morning Everyone.

Yeah I'm back after 6 weeks without internet after a lightening strike, a long 6 weeks too.

So lets kick start with the card i made for my mum for Mothering Sunday, I went with daffodils as they are one of her fav flowers and made an acetate card blank for a change.


Card size approx 5x6", i first die cut my frame from white card and then worked out what size cardblank i wanted, so cut, scored and folded a piece of acetate to size.  I attached the frame with 2mm foam tape. 
I die cut the daffodils 3 times from white card and coloured with alcohol markers, the first one i kept whole, the second one i cut out the flower heads and the 3rd one i cut the flower centres, after colouring them i used glue gel & decoupaged them to build up dimension. Adding a little green glitter glue for the stamens and a little bling. Then attached them to the card front to look as if they are growing out of the frame.

After going through my vast patterned paper stash for my insert i decided on this lovely vibrant blue to give the feeling of a spring sky to set my daffodils off.  It has a lovely subtle floral pattern.

Computer printed sentiment die cut into an oval to finish.


A close up of my daffs, its not often i colour in with alcohol markers but wanted a really bright cheerful colour.


Showing it side on for the dimension, i added the inner piece that cut out from my white frame to the inside to write my message on.  To hide any glue from showing through my acetate I ensured it was hidden behind attachments, so putting the patterned paper inside hides the glue from the front and i added the glue for the insert behind my frame. Hope that makes sense, got to get back into this typing up mode😀

Items Used:
Daffodil die
Rectangle frame die
Stitched oval die
B&M 12x12 patterned paper 'truly refreshing'
Hunkydory acetate
Lime stickles glitter glue
Alcohol markers
CraftsUK Ltd smooth white card

Thank you for all stopping by, i have lots of new projects to share with you as the bonus to no internet was more crafting time.  Although my mojo needs a little break now to recover from my marathon😎. I shall get around to catching up as i can.  I hope you are all doing on in the madness, hugs to you all. Emmax

***

Id love to enter the following challenges:

http://unicornchallenge.blogspot.com/2020/03/challenge-52-flower-power.html

*****
http://daisychainchallenge.blogspot.com/2020/03/challenge-39-use-dies.html

***


Thursday, 28 March 2019

Welcome Spring

Good Morning all, well aren't we having a beautiful week with the sunshine, looks like spring is finally here. 

Todays card i sent to a good friend as i know she loves daffodils and spring as much as i do.  This daffodil stamp is actually one of the very first i bought many years ago.


Finished card is approx 7x7".  On a panel of yellow pattern paper die cut into a hexagon, i stamped the daffodils.  I stamped the daffodils twice onto white card and unusually for me I coloured them with alcohol markers. I cut them out and decoupaged onto the main image with glue gel.  I then lightly inked with a dots stencil around the edge with marmalade oxide ink. 

From ivory card i cut a hexagon frame for my daffodil and with foam tape mounted onto some ochre green card, this i then cut to shape and mounted onto Ivory cardbase which i then cut to the hexagon shape. I glued the daffodil panel into the centre. 

I die cut the sentiment banners from teh same ivory cardstock, i lightly inked with green the part that i wanted to attach to the ivory frame so it stood out more.  Green glitter gems to finish.


Just a close up on my daffodils. I did add little glitter highlights to the tip of their trumpets. 

Items Used:
Chocolate Baroque daffodil stamp
Stitched hexagon dies
Welcome Spring dies
Designer Paper - Basic Grey 'Highline'
Ivory & ochre cardstock - payper box
Alcohol markers
Oxide inks - spiced marmalade, twisted citron

Thank you all for stopping by, i hope you all enjoy the rest of the weekend and then the weekend.  Hugs Emmax


*****

Id love to enter the following: