Followers

Showing posts with label mouse. Show all posts

Sunday, 7 September 2025

WLS Sept#1 - Cute

Good Morning everyone

Time for a new challenge over at We Love Stamping where the theme this month is 

CUTE
So right out of my comfort zone , if cute is not for you, you can always go with the anything goes option as long as you use stamping

Looking through my stamps I don't have many that are cute, but found this cute mouse image that a friend had stamped and sent to me which is called Ballerina Mouse by Pink Ink designs.  I thought it would be ok for my niece Charlottes birthday.


6x6" card which I made from acetate.  After colouring the mouse with alcohol markers i went searching for a paper and found this one with rainbow tones which also picked out the pinks, purples and blues in the colouring.  I folded it and adhered inside the acetate card so that is shows through. 

I die cut a frame from teal and white card and added to the front with foam tape, i die cut circles from the same colours and adhered flat in the middle, to this I added the mouse on a 'wobbler' so she dances around.  I then computer printed the sentiments die cut into fishtail banners and added to the front with glue gel.

2 pink glossy hearts added to the sentiments and glitter glue added to the wings to finish.

(After finishing and looking at it a while I realised that if I had thought it through I would have cut the backing paper so the circles were more even on each side.... which I could have done as it was a 12x12 paper but Im sure my niece won't even notice that)

The wobbler gives lots of dimension


Whenever I make an acetate card and added a paper insert, i will always add the frames and such to the front first as i then add the glue behind these to hold the insert in place, therefore no glue shows through the acetate.

Charlotte decided she wanted a recorder for her birthday so we all needed ear plugs! lol 

Items Used:
Pink ink stamp 'ballerina mouse'
Spellbinders and MFT circle dies
Fancy square nesting dies
MFT fishtail banner dies
Alcohol makers
Make & Create Patterned paper (the works)
hunkydory acetate
CraftUk ltd white linen card
Jellybean teal pearl card
Wobbler
Heart gel stickers  


We have this fabulous prize of house mouse stamps this month kindly supplied by oakwood so hop over to We Love Stamping to join in and be in with a chance of winning.  Get as creative as you can with your stamping and have fun.

Thank you all for stopping by once again. Crafty hugs Emmax


Monday, 16 December 2024

Sophie is 13

Good Morning everyone

My oldest niece Sophie has just turned 13 and these are the two cards i made for her

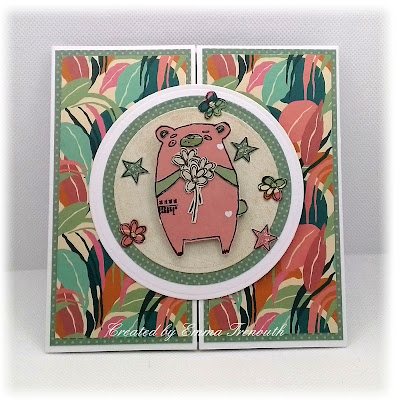
6x6" gate fold card.  I found this fab paper in a pad from the works, Sophie loves green & pink so ideal for her, i matted it onto a dotty green paper and then the card front.  I found a pink paper to match the tones and stamped the bear and cut out, i stamped her arms, nose & tail onto sage green paper, cut out and pieced onto the pink bear.  I stamped the flowers onto oatmeal paper, cut out & added to look like she is holding them.

I die cut a large white circle, smaller one from the sage green paper and a soft oatmeal colour, adhered together and glued in the centre of the card front, making sure to just add the glue on one side of the circle so the gatefold still opens.  I then added the bear on a wobbler.  I stamped a few stars and flowers from the stamp set, cut out and added around the bear.  Glitter glue added to the flower centres and stars for some sparkle - this 13 year old girl loves her sparkle 😁

The inside.  I used the same paper as the front on the inside of the gate panels.  For the middle i used a plain oatmeal paper so that the mice would stand out well.  I die cut the birthday sentiment from white and matted onto the pink i used for the bear and added a little star.

The 2 mice were stamped onto sage green paper and the belly, ears & tails onto the pink.  I added a little heart to one mouse and a little birdie on the nose of the 2nd one. 

The back of the card with a place to write the greeting where i matted circles from the same papers and stamped the sentiment.

Items Used:
aall&create stamp set #466 Quirky friends
12x12 paper pads from the works 'lovely flowers, Botanic & pastel basics'
Clearly besotted sentiment set
Birthday circle die
Ranger stickles 'diamond'


and card 2
another book fold - i was on a roll with these.  Ive used another aall&create stamp set too 

The 2nd card I made for her is another pop out book fold.  I made my card base from navy blue cardstock and layered on pastel papers.  I stamped the images, watercoloured with distress inks and cut out.  I layered up 2 fence panels, the barn and the pig in mud on the front.  I stamped sentiment from a paperartsy set, cut out and adhered to the front.

On the inside i added more of the pastel papers and the other 2 pigs from the stamp set


Items Used:
aall&create stamp set #287 'Dirty games'
Paperartsy JOFY stamp set 'JOFY 11'
12x12 paper pad from the works 'pastel basics'
Distress Inks - vintage photo, picked raspberry, wild honey, chipped sapphire, walnut stain 

She loved both cards so thats good.  Its get harder to keep coming up with ideas, especially as I make 2 for all their birthdays, one from my parents too.

Id love to enter the first card in the following:


https://aaabirthday.blogspot.com/2024/12/game-68-lovely-layers.html  - 2nd entry - layered up papers and die cuts


Monday, 27 February 2023

Say cheese

Good Morning everyone

Today is the 2nd card I made for Kitty-Bea's birthday for me to give to her.  I used the fab mouse Katzelkraft stamp i got for Christmas to make a cheese shaped card and afterwards decided to make a matching box for a few sweets for her.


Card size approx 6x4" .   I folded yellow card in half and then cut to size, first a rectangle and then i just used my guillotine to cut the top edge at an angle.   I took a brighter yellow card and cut to the same size as the base and then die cut lots of small circles into it, with a bigger one to the right to add my sentiment too.  I then mounted this panel onto the base with foam tape after inking the edges.

I stamped 3 mice and watercoloured with distress inks 'blueprint sketch' 'peacock feathers', cracked pistachio & picked raspberry.   I then cut them out.  Gently adding some shape to the body i attached one whole mouse to the card front.  The 2nd one i cut up and slotted into the 'holes' on the cheese.  Glossy accents to the mouse nose, eyes & camera. Computer printed sentiments to finish using a very apt font called 'grilled cheese'.
and the box - i found a cake slice box template on my craft artist which i printed out, cut out and then drew around it onto the yellow cardstocks to build up the box the same way as the card.  I put the closing flap on the bottom edge and sealed with red liner tape.

and i made a 2nd card for a friend who loves Katzelkraft stamps as mush as I do, this time i also cut the right hand edge of the card at an angle to give an even more cheese wedge shape and some bling to embellish.  

Items Used:
Katzelkraft stamps 'solo 179' 'La souris photographe'
Circle dies
Speech bubble die
Distress inks peacock feathers, blueprint sketch, cracked pistachio,  picked raspberry
Yellow cardstock


Id love to enter Kitty's card in the following:


***

***

***

***