Followers

Showing posts with label spellbinders dies. Show all posts

Sunday, 6 July 2025

July WLS #1 - sun, sea & sand

Good Morning everyone

Gosh the months are flying by, its time for a new challenge We Love Stamping with the theme this month chosen by me is

SUN, SEA &/OR SAND
So plenty of options there but if thats not for you we always have the anything goes option as long as you use stamping

I dug out a very old chocolate baroque stamp set with these fab seagulls which is very apt as as the seagulls which nest on my roof spend most of their time sat on the washing line posts in the garden.  In the heat the chicks have fallen off the roof so inhabiting the back garden so its a no go zone for now unless you like being dive bombed😁


6x4.5" card.  I first stamped the seagull image onto white card and then the poem beside it using dark blue ink.  I die cut into a fancy rectangle, this is a very old spellbinders die but i thought the edge had a bit of a rope effect look to it.  I then watercoloured the scene with distress inks.  Once dry i stencilled on the sun with lemonade distress oxide ink, keeping it soft around the poem.  I stamped the seagulls a 2nd time, watercoloured and cut out the posts and seagulls and decoupaged onto the base image with pinflair glue gel for a little dimension.  Added a few white gel pen highlights.

Then adhered to a kraft card base card, I went with kraft card as once again felt it picked up on the theme. 

The poem reads
I must down to the seas again, for the call of the running tide is a wild call and a clear call that may not be dented; and all I ask is a windy day with the white clouds flying, and the flung spray and the blown spune, and the sea-gulls crying.

Items Used:
Chocolate Baroque stamp set 'seashell collage'
Spellbinders die set S5-217 'Valiant honor'
Sheena Douglass 8x8 stencil 'sunrays'
Distress Inks  tumbled glass, salty ocean, chipped sapphire, vintage photo, wild honey, aged mahogany
Distress Oxide 'squeezed lemonade'
Kraft card


This month we have these beautiful set from Lisa Horton as the prize so do hop over to We Love Stamping to join in and be in with a chance of winning


Thank you all for stopping by once again. I hope you all have a good week whatever you get upto.  Emma


Id love to enter the following:


Friday, 21 March 2025

Kirsty's 40th Birthday

Good Morning everyone

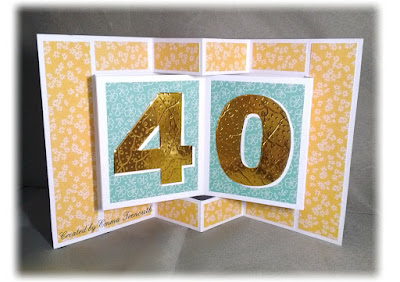
Today Im sharing 2 cards I made for my Sister-in-laws 40th birthday.  This sis-in-law is hard to craft for as she doesn't really have any hobbies, interests or fav colours and with my mojo still being very sporadic these were hard going😀

6.5.5" card.  I made the fold with 2 sheets of white card.  I picked 3 patterned papers with a yellow and teal theme and on the front matted the floral paper onto the green one and added to the front.  I die cut the birthday sentiment from a yellow gold mirror card and white card, off set and adhered to a larger circle die cut from the teal paper.  

Flower die cut from yellow paper I used on the inside and a large glittery gemstone added to finish.

On the inside, i covered all the outside panels with this lovely yellowy orange floral paper and the pop out sections with the teal paper.  

Not having large number dies, I printed out a large 40 from my computer onto card, cut it out and used as a template to then cut the 40 from the gold mirror card and white card.

Here you can see i used the same paper as on the front for the side panels of the pop out book sections.

After adding the numbers, I decided they didn't look great - being hand cut, but also all the plain mirror was a bit too stark.  If i had thought about it before sticking them in I would have run them through an embossing folder.  I finally decided to use a small embossing ball tool and doodle a little swirl and dot pattern over the mirror card which made a big difference.  I also ran a large ball tool around all the edges which softened them and made them not look so wonky and 'hand cut'

and the back of the card - I added a white die cut circle to write the greeting in after using the same papers i used to decorate the front.  


and onto the 2nd card I made for her

A5 white card base which i die cut using my nesting dies. I cut a piece of black and white patterned paper with the next size down and adhered.  I die cut 2 champagne glasses from a silver rainbow glitter card, I adhered with glue gel to the front and added a white die cut 4 & 0 to the glasses.

I added little strips of the glitter card across the top and bottom and a white die cut sentiment to finish.  Very simple but mojo was in hiding!

Trying to show how beautiful the glitter card is in real life, it is silver but when the light hits it at certain angles you get a rainbow of colours.  No idea where it came from as i was given it years ago - so about time i used it! lol  Unfortunately it sheds glitter which i do not like - I don't use glitter for that reason - its like sand and gets everywhere.

Items Used:
Spellbinder dies - aster flower
Memory box dies - champagne glass, numerals
Elizabeth crafts birthday sentiment die
? nesting dies, circle birthday sentiment die ?
Patterned papers - various pads from the works

Thank you all for stopping by once again. Emma


Id love to enter card 1 into:


Monday, 9 July 2018

Fantasy - Fairy shaker card

Good Morning all, i hope you had a good weekend and are still enjoying the sunshine.  Well the cats and i are still competing over the fan😀,  

So its time for a new challenge over at Make My Monday  the theme this fortnight is:

FANTASY
fairies, dragons, elves, unicorns, mermaids etc


Ive gone with fairies dancing in a flower garden shaker stepper card.  Fantasy is a good theme, you can go cute and twee or dark and mystic so something for everyone.


I first die cut my stepper card from white linen card and folded along the score lines.  I then die cut the matting panels from backing paper id made with orange and green brushos & pixie powders.  

I then die cut the happy birthday twice, once from white card and then black card and offset them, i added a circle of acetate to the back.  As i only had a thin section to add the foam too i die cut 6 circle frames of card and glued together, i then glued that to the back of the happy birthday to create my shaker pocket, added my micro beads and glitter and added a circle of card orangey coloured with brushos to the back.  I then added this shaker element to the top of my card.

I then die cut my fairies from black card, i added vellum behind the wings which i lightly coloured with blue pen.  I die cut a second fairy and just cut out the body section and decoupaged on top of the base layer to add dimension.

I then die cut the floral swirl corner die from red and purple brusho/pixie powder card and arranged around the fairies so it looks like they are dancing among the flowers.  Yellow gems to finish. 


Just showing the card face on


Close up of the shaker, i put orange behind as a kind of 'sun' 


Items used:
Presscut stepper card die
MFT Birthday circle sentiment die
Spellbinders fairy dies - Ariana S2-102 & Cierra S2-103
Spellbinders de-lites - floral corner 2 die S2-151
Brusho powders
Cosmic shimmer pixie powders
Vellum
Micro beads

So if you fancy joining in or seeing what others come up with for fantasty please do hop over to mmmchallengeblog     

I hope you all have a good week and are keeping cool.  Hugs Emma


I wish to enter the following challenges


Monday, 18 September 2017

Make My Monday #55 - Autumn Colours

Good Morning Everyone, i hope you had a good weekend.

So once again its time for a new challenge at Make My Monday

The theme this fortnight is

AUTUMN COLOURS


This theme tied in perfectly for the second card i made for my brothers birthday.  He loves his nature so an ideal theme. 


6x5.5" Russet cardblank, i also used the russet for matting as it perfectly picked out the colour in the tree patterned paper i went with.  After gluing the paper to the card base i die cut a frame and added on 3d foam.  I die cut lots of little leaves in autumn colours and arranged them around a stamped greeting.  


Close up and showing 3 little chipboard birdies i added to finish. 

Items used:
Carta Bella 'A perfect Autumn' paper pad
Memory box Cross Stitch rectangle dies
Mama Elephant frame die
Spellbinders 'little leafs' die set
Stampin up 'sassy salutations'
Calico Crafts woodchip birds

So if you fancy joining in and seeing what the rest of the design team came up with and lovely crafters entries do pop over

Thank you for stopping by and i hope you all have a wonderful week. Emma 


Monday, 9 January 2017

LittleEm's Thank you cards.

 Good Morning everyone on this grey day.

So today Im sharing a batch of 'littleem's' cards, using the piece left after making 5x5 cards, apertures and curved borders (again!)


These are all approx 3.5x6" in size.  I first cut a curved edge on the front of the card, then an aperture, covered the inside with patterned paper to show through the aperture and edge.  You can have great fun with the die you use for the aperture and the patterned paper. 


Simple stamped greeting. 


And below a get well version


Umbrella die, stamped get well and floral paper, i also edged the umbrella with glitter glue on this one. 

this design is an update on the one in the link below if you fancy a peek


and another use of the leaf die below


Thank you for looking and all your amazing comments so far. Emma