Followers

Showing posts with label butterflies. Show all posts

Friday, 1 August 2025

Creative Creases Aug

Good Morning everyone

This is my 2nd post this morning, if the scheduling goes to plan

I am honoured once again to be Guest DT over at Creative Creases where anything goes with a fancy fold.  

I decided to try one of the many fancy folds on my 'to try' list and make a hexagon pop up card.  After reading a few step by steps online I ended up using the one from beccys place as it was clear and easy to follow

Ive used 2 stamp sets, one leafy one from aall&create and a lovely quote from inkalicious and one ink pad which is an ombre one.

I first cut and folded the card from white linen cardstock.  Onto another piece of white I multiple stamped the leafy background stamp with an ombre ink which has lovely shades of green from lime through to a greeny blue. I then cut the panels out to fit the 6 sides of the base.  I die cut the rest of the leafy background sheet with a leafy sprig die.  Onto a white die cut circle I stamped the quote and then framed it with the die cut leaves

3 acetate butterflies to finish

Such a lovely quote... there is something very peaceful and calming about being surrounded by nothing but nature.  I love the effect of die cutting the leaves from the leafy background stamp, makes an interesting finish to them which is also softer than a solid colour would be.

On the back of the card I lined up a smaller white die cut circle with the one on the front and then added a smaller circle die cut from a pale paper for a place to write the greeting.  I also lined the inside panels with a green paper to give a more finished look.


Just showing it side on

and it folds completely flat for posting which is great.

Items Used
aall&create stamp #556 'leaves'
Inkilicious stamp 'forest quote'
CheeryLynn Foliage die
acetate butterflies (ebay find)
Kaleidacolor Ombre ink pad 'caribbean sea'
craftUk ltd 300gsm white linen card


So do hop over to Creative Creases challenge to see what everyone came up with and to join in - anything goes with a fancy fold. 


  I hope you all have a great weekend.  Big hugs Emmax


Id love to enter the following:


Sunday, 1 June 2025

June WLS #1 - close to nature

Good Morning everyone

Time for a new challenge over at We Love Stamping with the theme this month 

CLOSE TO NATURE
or we have the anything goes option as long as you use stamping

Its not often I buy a craft magazine these days but did recently for lots of hospital visits.  It came with this set of beautiful floral and foliage stamps which Ive used to make my background design

Card size approx 8x8"  - Made by die cutting 2 of the largest fancy circle dies from white card and scoring about an inch down on one and adhered to the back of the unscored one which gives a hinge.  This also means you get the whole of the shape as the card front and its not missing a section where the spine would be.

 I die cut a piece of smooth white card to size and then stamped the images with different colours of versafine clair inks all over it.  I then die cut it into frames using the nesting dies, I skipped one layer so that they were wider frames.  I die cut a piece of pinky purple mirror card and adhered the largest outside frame with 2mm foam tape, then the next size frame with 1mm foam tape, then the next layer I adhered flat and then the smallest middle layer I adhered with 2mm foam tape again - making sure to line up the pattern. 

I die cut the sentiment from pearl teal card and adhered to a white die cut panel and added to the front.  I then die cut 2 layered butterflies with the pinky mirror & teal pearl card and added to finish. 

Showing it stood up side on, to help it stand nicely I cut a small sliver off the bottom of the back panel.  You can see the layers better here, the mirror card does just show through and catches the light.  I quite often layer cards like this just for interest and fun - it works equally well using patterned paper.


As usual taking photos of mirror card a nightmare, it is a beautiful purply pink.  Using the teal ink and card helps break up the colour.....normally im allergic to pink😁


The inside of my card.  I die cut cut paper in co-ordinating colours to the front, on the blue one I stamped some of the images to tie it in with the front. 

Items Used:
Stamps from 'simply cards & papercraft' magazine issue 268
Creative Expressions Sue Wilson sentiment die
Creative Craft Products 'large stretch label' (circle dies)
Butterfly dies
Versafine Clair inks 'warm breeze' 'purple delight' 'monarch' & 'glamorous'
Craft Consortium mirror card 'lilac'
Jellybean teal pearlised card
CraftUk ltd smooth white A4 card


We have this beautiful stamp as the prize this month supplied by Buddly Crafts - a fabulous online craft store, well worth a visit.


so do hop over to

to join in and see what the rest of the DT came up with for our CLOSE TO NATURE theme

Thank you all for stopping by once again. Ive had a quiet week, snoozing and crafting - just what the doctor ordered so feeling much more human now😁  Emmax


Id love to enter the following:


Friday, 2 May 2025

Butterfly suncatcher

Good Morning everyone

Its the first Friday of the month, so time for a new challenge over at Creative Artist Mixed Media challenge where the theme is always anything goes as long as you mix your medias

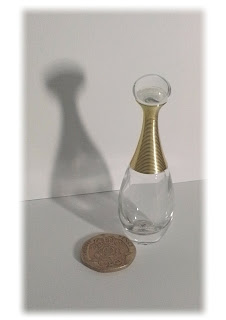
Ive had these empty mini perfume bottles for years, with the idea of using them for a project so the time had come to have a go......Ive made a butterfly suncatcher out of printed acetate & alcohol inks and used the mini perfume bottle for its body.


Approx size 6x6" (15x15cm)  I used a lovely printed acetate by stamperia which is really thick & strong.  I made a butterfly template from paper, drew around it with alcohol marker onto the acetate and cut out....removing any access pen marks with blending solution.

I then coloured the back of the acetate with Ranger tim holtz alcohol inks using a rainbow of colours.   Once dry I used a alcohol marker blender pen to remove some of the colour from some of the patterned areas which I then coloured with contrasting colour alcohol marker....this helps the pattern stand out a bit more and makes it more interesting to look at than block colour.

I added chuncky gold glitter paste around the outside edge of the wings - this really is glittery when the light hits it.

I filled the perfume bottle up with mini gold tube beads, wrapped with a little gold craft wire, adding a loop to the back to hang it up from.  I then adhered the bottle to the wings with some pinflair glue gel which I know lasts well in a hot sunny window so won't fall apart as the little glass bottle is quite heavy in weight.  To finish I added lime green cabochon gems to the top and bottom wings


You can see the colours better here.  What with the glitter paste, gems and gold beads the light really dances around and sparkles.

Not the best photo but this is showing it in a window with the light coming through.  With the weight of the bottle it hangs forwards a bit which actually looks like a butterfly in flight

Showing the first stage of colour with the alcohol inks

and the little bottle

Items Used:
Stamperia 'clear print' acetate 'sleeping beauty' range SBA410
Ranger Tim Holtz alcohol inks
Promarkers
Cosmic shimmer Ultra sparkle texture paste 'sahara gold'
gold tube beads
Gold soft craft wire
Mini glass bottle


Hop over to Creative Artiste Mixed Media to join in with your anything mixed media projects - cards, atc's, Journals all welcome as well as assemblage pieces - as long as you use at least 3 different medias.

Thank you all for stopping by once again.  I hope you have a wonderful weekend. Emmax


Id love to enter the following:

**


**
https://paper-rocks-scissors.blogspot.com/2025/05/may-4-challenge.html - I used scissors to cut out the butterfly from acetate


Saturday, 25 May 2024

40th Never ending fold card

Good Morning everyone

My sister-in-law is celebrating her 40th birthday this month.  I decided to make a never ending card for her (also known as the infinity fold)   

I dug through my 6x6 paper pads and came across this old one in shades of blue, green & yellow so just her colours.(echo park 'for the record 2') I used  black for the base card which makes the colours pop.

After making my 6x6" card, i cut panels from this gorgeous floral paper to fit the front sections.  Stamped the sentiments onto white, cut out and adhered flat - i edged the sentiments with diamond stickles glitter glue and added a little to the flower centres for some sparkle.

it opens up to this section.  I took this numeral black and white paper and coloured the numbers 4&0 with teal and yellow alcohol markers and cut to fit, i adhered them in a jumbled fashion rather than lining up as it worked better and added a bit of the coloured numerals all over rather than on just a couple of panels.  I stamped another of the sentiments on white, matted onto yellow paper and adhered flat.  I die cut 40 from white card, mounted onto black circle and more of the yellow paper die cut into an inverted circle die and added to the top panel.  I edged the black circle with glitter again to draw the eye into the 40.

this is the 3rd section, i used this doily paper from the pad. 

4th section - bit of pattern overload!  I do find it a bit of a mission using papers all from the same pad but I was determined too!  I also struggle to have to stick everything on flat - do like my dimension usually.
  I used a small floral paper from the pad on the panels and stamped butterflies onto solid papers from the pad, cut out and adhered flat - i added white pen & glitter highlights to the butterflies.  I also cut out some of the doilies from the off cuts of paper i used for section 3 and added randomly - this helped break up the background a bit and tie it in with section 3.

and this just shows how the butterfly panels open up to the front of the card again.  Its great to be able to use so many papers from a pad on one card - very busy & colourful. This will be a real celebration of a birthday as when she was first diagnosed with cancer they didn't think she would make her 40th so its extra special.

Items Used:
Echo Park paper pad 'for the record 2' by lori whitlock
technique tuesday sentiment stamp set 'Hi there'
uniko stamps - 'english country garden butterflies'
black cardstock
ranger stickles 'diamond'

Thank you for stopping by.  I hope you are enjoying this bank holiday weekend if in the UK. Emma

Id love to enter the following:


Tuesday, 30 April 2024

Vellum butterflies

Good Morning everyone

After making my last card i had some left over pieces and off cuts so decided to use them up on 2 little cards.

4x5" cream card base.  I layered a peace paper onto the base.  I then tore a piece of the printed vellum, layered onto a piece of torn cream card by gluing the ends of the vellum behind the cream card so no adhesive on show, then matted onto a different printed paper and then added to the left hand side. 

I die cut the 3 lacy layers of the butterflies from the printed vellum and the base layers from more cream card and added to the card with just a dab of pinflair glue gel under their bodies so the wings are free.  By adding the cream card behind the patterned vellum it helps keep the colours clean and crisp. 

Stamped sentiment in grey to finish.


Card 2
4x4" cream card base.  I added 2 of the papers to the base, the peach one on an angle so you can see a bit more of the lovely pattern on the black one.  I tore one edge of a piece of vellum and pale peach paper and added to the left edge with another piece of grey paper - using up all the off cuts

I had die cut the hello sunshine die from the middle of the black paper i used for my first layer on the card - a good way to make it go further and no one would know as its completely hidden! I then matted this onto a larger circle die cut from more of the cream card and added to the front with glue gel.  Butterfly die cut from vellum matted onto cream to finish. 

Items Used:
Kanban paper pad & velum 'Apricot dreams' (very very old!)
Studio light 'just lou' dies - Butterflies
Hello sunshine die (memory box?)
woodware sentiment stamp 'Curly greetings' FRS850
Cream cardstock

Thank you all for popping by my little crafty space in blogland.  I hope you all have a good week. Emmax


Id love to enter the 1st card in the following

*

*

*


Thursday, 11 January 2024

Sophie is 12

Good Morning Everyone

My oldest niece Sophie was 12 in December.  She has always enjoyed a cup of tea & she loves baking cakes so i found these fab tea party themed digitals from ZinskiArt on Etsy which i teamed up with a black and white paper pad from the works and made a never ending card (also known as an infinity card). 

6x6" card.  I made up the base card from black cardstock and matted on various papers to each 'section' of the the card.  I printed the images off and cut them out and then got arranging them.  This is the front of the card - i added touches of diamond glitter glue and glossy accents.  Computer printed sentiment cut out, edged with black marker and adhered into place.

The first section opens as a gate fold from the front, this is peeking through

The 2nd section has this fabulous white rabbit among the crockery and cakes.  The fold/opening this time is horizontal across the middle

this  next section again opens like a gate fold, all decorated with images from the digi kit which i printed onto 'craft master - pure print' 140gsm paper from highlight crafts - first time ive used this and the quality of the print out is brilliant, nice and crisp.

and the final section which again opens horizontal across the middle

Opening back to the front of the card again...Id forgotten how much fun these are to make & the girls had hours of fun with it! lol

Images from ElenaZinskiArt on etsy called 'tea party'

Items Used:
6x6 paper pad from the works
Black cardstock
Ranger stickles 'diamond'
Ranger glossy accents


Id love to enter this card in the following:


***

and card 2 i made for Sophie uses a Gorjuss girl stamped image a friend sent me, she is huge so the card size is 8x10"   She was the perfect sise for these aall&create butterfly wing stamp which i stamped onto acetate so Sophie can detach the butterfly girl and hang in the window as a sun catcher.  

Sophie's favourite colour for now is green so Ive gone with a mainly green & blue colour choice, with orange as a contrast.


Using A3 cardstock i made up my base card and die cut a frame, the middle piece from the frame i dry embossed with a cloud embossing folder.  On the frame I used blue and green distress inks and stamped sophies date of birth and the month using aall&create stamps.  I stencilled on some foliage with the same inks. 

I stamped the butterfly wings onto acetate, coloured on the back with alcohol markers and cut them out.  I water coloured the gorjuss girl with distress inks, cut out and attached the wings behind her.  I added a small piece of acetate to the back of her head, punch a hole and set an eyelet so that she can be easily hung in the window.  I then attached her the card front with ribbon and twine, leaving the rest of her unstuck she swings with movement. 


I die cut the sentiment from a scrap of orange satin card and adhered to the bottom and then die cut lots of mini butterflies from blue, green & gold mirror card and added them flying around.

Showing her at the window with the light coming through the wings

Items Used
aall&create stamps #322 'floral wings' & #455 'seasons'
Gorjuss girl stamp
crafters companion 8x8 cloud embossing folder
memory box dies 'mini butterflies'
Sizzix birthday sentiment die
Lavinia stencil
acetate
Alcohol markers

Thank you for popping by once again.  I hope you are keeping warm in the cold snap.  Big hugs Emmaxxx