Followers

Showing posts with label Double stitched rectangles. Show all posts

Sunday, 6 September 2026

WLS #1 Sept - Trees & Leaves

Good Morning everyone

Its the first Sunday of September so time for a new challenge at We Love Stamping where the theme picked by me is 

TREES &/OR LEAVES
So apt for the season but don't just think Autumn, we can have lovely bright spring or summer trees/leaves or a wintery wreath full of different foliage's so lots of choices.

For my card I decided to go for both and used a leaf background stamp inked with all the colours of autumn leaves as they change, my ombre ink pads were perfect for this and finished with a brown mirri card die cut tree trunk.
5x6.5" Card cut from cream linen card.

Onto cream linen card i stamped the leaf stamp inking up with 3 different ombre ink pads and die cut into long rectangles.  
As the stamped die cut rectangles were slightly too short for the die i wanted to use for my topper panel i cut them apart where i decided i wanted my tree to go as this would hide the join - originally i planed to adhere back in a continued line but as they slipped on my topper before i glued them in place and i thought ooooh i wonder if i off set them....happy accident but i liked it so adhered them offset slightly - i think it adds interest to want is quite a simple design and adds to the movement of the leaves in the seasons - they go from greens into orange/reds into browns and then drop to the floor. Photo below shows this better.

I die cut the tree trunk from dark chocolate brown mirror card and adhered into place, covering the join in the leaf panels.  I adhered the topper panel onto the card front.  Stamped the quote with dark brown ink onto more cream linen card and added across the bottom of the card front with glue gel so its slightly raised.  Enamel dots added to finish to give the feel of falling leaves.


You can see the shine on the mirror card better at this angle, it just adds another texture and finish.  It was only after adding the enamel dots to my sentiment strip when i realised they were UK traffic lights😂

Quote reads
'Nothing is more peaceful than the whispers of the wind through the trees'


My topper showing how i added the stamped panels.  I could of course just have cut all the panels with a trimmer to fit the stamped panel size but as i was making a fairly CAS design I wanted to use my stitched edged dies to add interest so I made the stamped image fit the dies with some hidden cuts.

Items Used:
aall&create stamp #556 'leaves'
Inkylicious quote stamp 'forest quote'
Kaleidacolor ink pads 'carribean sky, cappuccino delight & desert heat'
Enamel and glitter dots
Memory box birch tree die
MFT stitched panel dies 
CraftUk ltd cream linen card


We have 2 prizes this month, a $30 store voucher from Taylored Expressions and Penny Black stamp set and stencil from Buddly Crafts so hop over to We Love Stamping to join in 


Id love to join in the following:


Wednesday, 11 May 2022

Its raining cats and dogs

Good Morning everyone

When i saw that the challenge this month at countryviewchallenges was cats and dogs I just had to join in, although i only have cats now, I love dogs just as much and make the most of my time with my families dogs....i do miss having one but as i can't walk much wouldn't be fair on a dog.  Although having said that 2 of my cats do join me on my short daily stroll, they walk with me until the path comes out on the road and then they wait for me to come back round and we all walk home together.

Anyway onto my card, i have lots of cat and dogs stamps and was working through ideas in my head, i had also been discussing the lack of rain with the family as its a worry for the farm crops etc (hurray we have rain this morning)...after that i just had that odd saying in my head 'its raining cats and dogs' Is that a worldwide saying or just here in the UK? 

I made a cardbase from acetate and cut to 7.5x5.5", i then stamped the crazy mini cats & dogs stamps over the front of the acetate with black stazon ink stamping some upside down and side on to look like they are falling through the air.  I die cut 2 sizes of rectangle frames, the larger one i added with foam tape.  The smaller one i glued onto my sentiment which had been computer printed onto vellum.  I then added the glue to the back of just the frame and adhered to the middle of the card - adding the glue to just the back of the frame meant no glue showing through the vellum.

I stamped the fab katzelkraft cat onto white card and watercoloured with distress inks, i went with a orange tone to contrast and stand out against the background. I then cut him out and adhered to the front with glue gel.

  I added a white paper insert and a fab patterned paper that has a rainbow of colours running diagonally that to me had the feel of rain and rainbows so i cut that to fit the insert leaving a white edge around the outside....normally when i make my acetate cards i just used a full colour insert but it felt a bit lost this time so adding the white helped lift it and tie in with the white frames.

To balance my cat  and add a little bling, I added 3 teardrop gems which also look like rain drops, they were clear ones which i coloured orange with an alcohol marker.


Just a close up, i decided on the vellum for the sentiment so that the cats and dogs still showed up and of course i had to add glossy accents to Mr Toms eyes & nose

Items Used:
Katzelkraft cat stamp 'mini 74'
Tim Holtz stamps 'mini crazy cats & dogs'
Stitched rectangle frames
Distress inks ' lemonade, honey, vintage photo, pistachio, lilac'
Hunkydory acetate
12x12 Patterned paper 'ombre effects' B&M
Printable vellum

Thank you all for stopping by once again. The roof is progressing, finally started getting the new tiles on.   Hugs Emmaxxx


Id love to enter the following


***

***
http://allsortschallenge.blogspot.com/2022/05/week-675-favourite-stamps-andor-dies.html - this katzelkraft cat stamp is one of my favourites that i go back to year after year as its ideal for male or female cards and young or old so very versatile

***

***

***


Thursday, 20 January 2022

Thistlehogs

Good Morning everyone.

More thank you cards today.  I was naughty in the black friday sales and a few pink ink stamps fell into my basket.  These thistlehogs stamps flew into my basket as you how i love my hedgehogs.  Totally flat cards which is rare for me.

5x7" cardbase.  I stamped the images onto white card and die cut into stitched rectangles.   I then simply watercoloured them with distress inks and added a yellow wash around them and stencilled diamonds - that was trying out my new stencil!  Stamped sentiment and a touch of glitter glue on the wings to finish.  Matted onto turquoise blue card and then base.


Version 2.  Id love to see a few of these in my garden flittering among the flowers


I also bought this fungi stamp.  Made the same way and with the same colours, i just added the sentiment to the side as couldn't fit it on the topper nicely.
 

Items Used:
Pink Ink Stamps - thistlehogs & shitake happens
Stampin up sentiment curly cute
Double stitched rectangle dies
Aall&create stencil - diamonds
Distress inks - Squeezed Lemonade, cracked pistachio, evergreen, ripe persimmon, shaded lilac
Ranger diamond stickles

Thank you all for stopping by once again..  I hope you all enjoy the rest of the week and have a good weekend.  


Id love to enter the following with my first card:


Thursday, 4 March 2021

Playing with Gelli

Good Morning everyone

For Christmas i was given a Gelli plate which hadn't really been on my to try list but ive been having a little play with it and acrylic paints - still alot of practising to do but ive made a few prints that ive used on these cards, after making the cards i thought i should have taken a photo of the prints first so ive taken photos of the rest of them - see end of post.


5x7" card.  I made this one for my sis in law who's had to have an operation.  This print was neon acrylics in pink and orange, a die cut leaf, punchinella and a stamp. I stamped over the top with this lovely woodware stamp in black, die cut to size with a stitched rectangle die & then die cut a stitched rectangle from the middle at an angle, mounted onto black card, adding the middle panel with foam tape - just to add more interest to the design.
For the background i used a swirl embossing folder, the little coloured strips were off cuts and not wanting to waste them i added them behind my topper panel.  Stamped sentiment to finish.. 

Version 2 - this print was green pearl paint with a touch of yellow paint and a clarity stamp stencil for just a basic print.  The flower heads i stamped onto a scrap of orange paper and paper pieced. 

Version 3 i used one stencil and turned it 3 times with a different colour - pink, orange, yellow neon and green pearl acrylic paints

Version 4 another woodware stamp, print used neon orange, yellow and pink paint. 5x7 white card, i stamped the greeting direct onto the base, matted the topper onto black card and then the base card. 

Items Used:
Woodware stamps  wild meadow, lino cut teasels
Sentiment stamps
Double stitched rectangle dies
A4 Swirl embossing folder

Id love to enter the first card into the following:


***
and onto some of my other prints - some im happy with, others will be a base to work on or cut into, im beginning to get a feel for it and not to add too much paint and Ive found the quality of paint makes a big difference.  Lots more practice to be had......  

Using feather & circle rubber stamps, punchinella. Neon pink, orange & pearl purple acrylic paints

clarity leaf & leafy swirl stencils, die cut pointsettias(bottom left), diamond stencil, tim holtz media stamps.  Daler rowney Neon pink, orange, yellow & green paint, deco-art copper metallic paint

lattice and leafy stencils, red, yellow & neon orange paint

This photo shows 3 prints from one, so the first one is the one i was working on, the 2nd one clearing the plate and the 3rd one was the piece i cleaned the brayer & stencils onto. Circle stencil & red & yellow paints

Pebeo yellow and green with a hint of daler rowney orange neon paint. Triangle & lavinia pebble stencils. 


Monday, 12 February 2018

Cat & Bird Card Box Sets

Good Morning all, i hope you had a good weekend.

Today im sharing 2 box sets ive made as gifts.  

The first one is using 2 different cats stamps from Zinski art and the second set is using the Crazy bird stamps.


I decorated the lid of my box with the cat stamps.

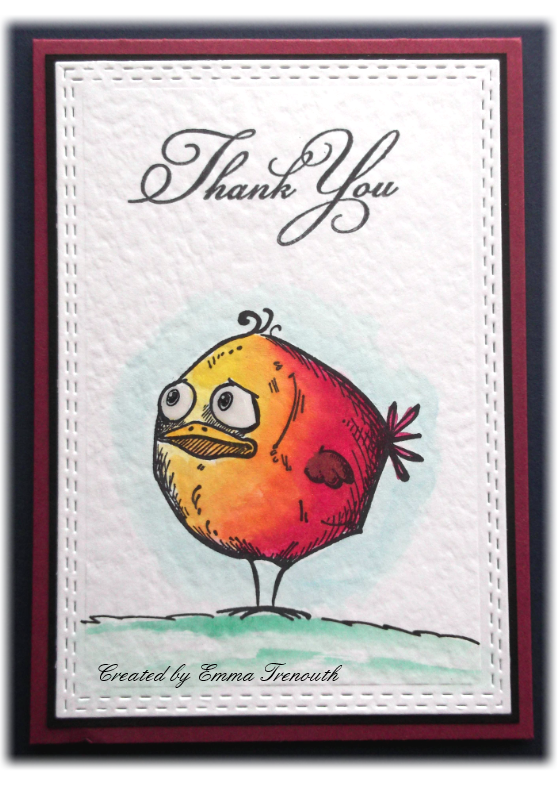
I first stamped the cat, doodled in a ground and coloured with wink of stella pens.  I lightly watercoloured blue background and green to the grass.  Die cut into a doublestitched rectangle.  Stamped greeting. Then matted onto black card and coloured card to match the topper colour.  

Im on a mission this year to use up some of the hundreds of coloured card ive amassed over the years!  

As above, the 2nd zinski art cat  stamp, again coloured the same way and matted onto purple card to match the wink of stella pens.


And below shows all cards i made for the set


This shows all 8 of the A6 (4x6) cards i made for the set.  The sentiment stamps came free with a magazine, but i like how they are all different fonts.  This set is for a friend who has a couple of cats and no birthday cards in the set as she always asks me separately to make those. 


and below on to the birdie set


Basically the same as the cat set just using the Tim Holtz crazy birds, as their is 6 different birds and i made 8 cards i used a couple of the birds twice.  This set does have a couple of birthday cards in it. 

Again i coloured them with wink of stella pens, shame the photos don't pick up the amazing sparkle they have. 


I kept the cards completely flat for ease of posting. 

Items used
Paperartsy Zinski art Mini stamps
Tim Holtz crazy bird stamps
Sentiment stamps
Wink of stella pens
Distress inks tumbled glass, cracked pistachio & lucky clover
Double stitched rectangle dies
Coloured card by payper box
Glossy accents

Thank you for stopping by and all your comments last week, also thank you to all of you that are following me by email.  If you are off for half term this week i hope you enjoy it, i shall be spending time with my lovely nieces.  Enjoy your week. Emma


Monday, 10 July 2017

Make My Monday # 50 - travel

Good Morning to you all, i hope you all had a good weekend.

So its time for the next challenge at Make My Monday


The theme this fortnight is

Vacations & Travel  (or Holidays to you & I)

After 2 weeks without crafting it felt good to find my mojo and be home long enough to create this card.  I don't have much in my stash aimed at holidays and travelling but found this lovely elephant in my Indian dreams digi kit, so for my holiday we have hopped over to beautiful India. 

I have actually ridden an elephant, many many years ago here in Cornwall, its an exciting way to ride from a to b, a bit slower than horse😄 


A5 white linen cardblank.  I printed off the elephant 4 times and cut it out and decoupaged.  Printed off a matching backing paper and matted onto turquoise card to pick up the blue in the elephant.  Turquoise dotty ribbon, double bow, elephant charm and sentiment to finish.  


Close up, i also added glitter glue and glossy accents to highlight the beautiful elephant. 

Items used:
Daisytrail 'Indian Dreams' digi kit
Serif Craftartist 2
Double stitched rectangles
LOTV sentiment stamp

So if you fancy joining in and see what the rest of the DT came up with, please do pop over.


Thank you for popping by and all your comments last week.  Wishing you all a wonderful week. Emma 


Monday, 3 July 2017

Splat people! Children's birthday card

Good Morning All and welcome to a new week, i hope you enjoyed some sunshine at the weekend.  

Today i am sharing a fun children's card i made.


5x7" black card base.  I cut lots of splats out of brusho coloured card, ideal for those left over bits!  I then layered several onto the background.  For the topper, I matted a white rectangle onto black card and stuck to the card for foam pads.  I used 3 different splats, added googly eyes, black pen legs and doodled on a mouth and eyebrows.  Black die cut sentiment to finish. 


A close up of my little splatpeople


and below a little A6 card using the left over splats. 


My 5yr old niece asked me to be her penpal, their teacher is trying to get them all to have a penpal to practice their reading and writing, a great idea i think, as Sophie also loves crafting i thought i would send a little card with my letter for her.  I will have to make sure my scrawl is neat and tidy for her😊


Items used:
Spellbinders de-lites 'sentiments two & sentiments five'
Splat dies
Double stitched rectangles
Colorcraft Brusho's


You might also like


Thank you for stopping by, i hope my splatpeople made you smile.  Wishing you all a good week. Emma 

Thursday, 15 June 2017

Scribble Roses

Good Morning all, i hope you are having a good week. 

So today im sharing the second lot of cards i made with the scribble rose dies. 


5x7" Cards, i embossed the largest double stitched die into the card front, then die cut 2 more layers with the double stitched rectangles and stamped the sentiment on the smaller one.  I inked up white card with distress inks and die cut lots of the scribble roses and stictched leaves and then layered up together.  Ripe persimmon ink for the flowers
Cracked pistachio and lucky clover ink for the leaves


Picked raspberry DI for the flowers 


Squeezed Lemonade DI, i also made a little gift card to go with the birthday card.  


To make the gift card i die cut another stitched rectangle, scored in one end to form a small pocket and then folded the rest in half. 


Items used: 
Stampin up - 'sassy salutations' sentiment stamps
Tim Holtz distress inks - squeezed lemonade, ripe persimmon, picked raspberry, cracked pistachio, lucky clover
Double stitched rectangle dies

You might also like


thank you for stopping by, and all your recent comments. Emma