Followers

Showing posts with label box card. Show all posts

Wednesday, 2 August 2023

Charlotte is 4

Good Morning everyone.

My youngest niece Charlotte is 4 this month, which is scary.  
She starts school in September.  Ive been spending alot more time with her in the last 12 months which has been lovely as with the covid lockdowns we didn't see her much in the first 2 years. She has a close connection & natural instinct with animals and nature so for her 2 birthday cards ive gone with an animal theme.

A twist n pop card.  Approx size 6.5x5.5"  I made the twist n pop out of white card and then found some lovely papers in my stash to decorate inside and out.  A lovely craft friend sent me the stamped giraffes & pandas a while back so im not sure which brand they are.  I coloured them with alcohol markers and cut them out. 

I added the giraffes to the front with a stamped sentiment die cut into a speech bubble.


On the inside pop out i added die cut ovals to 3 panels and then the pandas. I computer printed the sentiment and die cut into ovals and attached.  I added a plain white oval to write the greeting on. 

Just  a close up. Knowing Charlottes sense of humour she will love these characters.

Id love to enter this card in the following:


***

and card 2 is a little box full of butterflies

I found this lovely 12x12 paper full of printed butterflies, then the idea of them all flying out of a box.  I first fussy cut the butterflies, there were 2 sheets in the pad so i cut out both sheets so that i could have the same butterfly front and back.  I then cut half inch strips of thin acetate, i took 2 of the same butterfly and sandwiched the acetate inbetween, i then scored and folded the acetate and added the next 2 butterflies and so on, i added 15 butterflies in total.  I added lots of stickles glitter glues to the butterflies for some sparkle.

I added an eyelet to the top of the acetate strip and ribbon so that charlotte can hang it up and enjoy.

I then worked out what size box i wanted for it and made up out of cream cardstock, decorate with more pretty papers, added another butterfly on the top and computer printed sentiments to finish.  When you take the lid off the box the butterflies start to pop out with the spring in the acetate.

The box is 3x3x2" in size and the butterflies are 28" long


Just showing them hung up.  Yes the 2nd butterfly is upside down - after that hiccup i made sure all the rest were glued on correctly - Im sure Charlotte won't mind😁  Make&create paper pad from the works 'beau jardin' for the butterflies and little box.


Thank you all for stopping by.  Sorry ive not been round much lately, so much going on in my family recently and both of my brothers families and our parents are all moving home this summer so its a bit manic to say the least.  However it will be lovely once all finished as one brother and his family will be much closer to me so i will see those nieces more often.  Take care. Emmax


Monday, 3 January 2022

Sophie is 10

Good Morning everyone.

Wishing you all a Happy & Healthy 2022

I hope you all had a lovely festive period.  The only new year resolution i always make is a crafty one that im usually good at sticking with, i think this year i am going to continue my stash busting, i made a good dent last year in the thousands of sheets of coloured cardstock that i collected before i started making my own backgrounds so i will continue with that.

My niece Sophie was 10 just before Christmas, these are the 2 cards i made her, as always for family birthdays i make the one my parents give as well so they need to be totally different.

Sophie was fascinated with the box card i made for Alice's Birthday in August that i thought i would make a version for Sophie.  Those 10 years have flown by for sure.  I dug out my katzelkraft flamingo stamp


I made up the box card from this lovely blue cardstock and used sea themed papers from a paper pad from the works last year.  I stamped the flamingo 10 times as it was Sophie's 10th birthday, watercoloured with distress inks and cut them out.  So that i got a balanced placement of them in the box i used repositionable tape to just hold them in place and once happy i then glued permanently into place.

I added touches of stickles glitter glue to add some sparkle and a computer printed sentiment die cut into an oval.  There is space on the back of the box for writing the greeting. 

Just showing it side on


and a close up of the flamingos 

Items used:
Katzelkraft flamingo stamp
The works 12x12 paper pad 'feeling fresh'
Blue cardstock
Distress inks - picked raspberry, ripe persimmon, lemonade, pistachio
Ranger stickles glitter glue

Id love to enter my flamingos in the following:


card 2 i made for Sophie is a handbag card as she's 10 going on 21!  She loves her fashion.  I dug out a very old (10+yrs) kanban paper pad in pink and grey and teamed it with black card.  I founded a silver wired ribbon that was ideal for the handle and a large gem button that i cut off a new cardigan was ideal for the handbag closure. 

I used my grand spellbinders labels 1 to cut a base card from black cardstock.  I also cut a flap using curved edge dies and pockets using smaller labels 1.  I  die cut smaller panels from various papers from the paper pad.  To the back of the bag flap i glued in silver wired ribbon to act as the handle.   I added bling buttons backed with large & 2 tiny flowers cut from one of the papers.  Sentiment computer printed onto a pink pearl card that i die cut into tags with spellbinders labels 4, the 2nd tag hiding underneath says 10 today.

Showing it side on stood up, the wired ribbon stands up nicely

Items Used:
Spellbinders Labels 1 & grand labels1, labels 4, curved border dies
Kanban paper pad
Black & Pink pearl cardstock
Wired ribbon
Bling button and gems


Id love to enter my bag card in the following:


Thursday, 26 August 2021

Charlotte is 2

Good Morning everyone.  My youngest niece will be 2 this weekend

Ive made a cube card for her, i had a paper in a 12x12 paper pad with all these lovely woodland animals and decided i wanted to use all of them.  She can then turn the cube around for a different view each day.


I first made my cube from 2 sheets of A4 brown cardstock, each side is 5x6.5" so big enough for my images.  I then layered on a pretty leaf paper is similar tones. I die cut a large oval from brown cardstock and embossed with a leafy swirl embossing folder.  I cut out all the images and added them to the ovals with glue gel.  On the 4th side i computer printed my sentiment onto white and cut into an oval and used a smaller bird image. 
I due cut lots of leaves from paper scraps in co-ordinating colours and got arranging, adding a hessian rose to finish.

I added glossy accents to the eyes and a touch of glitter glue here and there.

Mrs Hedgehog 
Little Owl
Miss Foxy

Showing the cube/box from above, it folds flat to fit in an envelope. 


Items Used:
The animals - 12x12 'Crafts you create' Paper pad from B&M 'Beautiful Nature'
A5 paper pad from poundland 'changing seasons'
Various paper snippets
Brown cardstock
XL oval dies
Ranger Diamond glitter glue
Glossy accents
Hessian roses

Thank you all for stopping by once again.  I think i shall have to start Christmas cards soon, the evenings and mornings are drawing in aren't they and the trees starting to change. Hugs Emmax


Id love to enter the following:


Monday, 2 August 2021

Box of frogs

Good Morning everyone, i hope you all had a good weekend.

This box card came about as i was wondering what to do with little strips of acetate, its actually my first ever box card.   Its ideal for my niece Alice's 6th birthday tomorrow.


I found a template on pinterest to make the base of my box card from A4 dark blue pearl card, i cut and matted papers from a gorgeous paper pad from the works onto all the sides.  I used a floral on the base and then a swimming pool paper for the rest.  I kind of had the thought the frogs left the garden and having fun in the pool to cool off in the summer heat😁  We often find frogs hopping around my mums garden, she has a little pond that they love.

The frogs are from an old daisytrail digi kit which i printed at various sizes onto 300gsm white card and cut them out.  I coated them in mod podge to stiffen them a bit to make them stand up better to alot of handling! I decided which ones i wanted to leap out the box and glued the acetate strips to the back of them and then glued the other end into the box.  I arranged all the rest on the flaps.  Computer printed sentiment to finish. 


I added touches of glitter glue to the frogs for a little bit of bling

and just showing how it all folds flat to fit in an envelope.


and card 2 for my parents to give Alice.  Alice has always had a fascination with feathers since she was a toddler and as you can imagine collected a vast amount living on a farm and all wildlife in the surrounding countryside😁  I decided to use these feathers ive had in my stash for eons.  It gets harder to come up with different ideas for them all 5 nieces.

6x6 White cardbase.  I matted a blue and green feather paper onto the front.   Computer printed sentiment die cut into a circle, layered with foam tape onto a larger white circle.  I die cut another circle which i glued the blue & green feathers onto with glue gel, i then added my sentiment topper on top.  

Items Used:
Frog digis - daisytrail Louise Mulgrew 'Wild love'
Paper pads - frog box 'fresh feeling' from the works
paper pad - feathers 'beautiful nature' from B&M
Feathers
White & Blue pearl card 
Wonky stitched circle dies
Oval dies
acetate strips


Thank you all for stopping by.  I hope you all have a good week.  Hugs Emmaxxx


Id love to enter the following with my frog box card:

***

***

***

***


Monday, 4 January 2021

A Cube Birthday

Happy New Year Everyone
Lots hope things soon start to improve.  I hope you enjoyed Christmas as much as was possible.   I was thoroughly spoilt with craft goodies - especially stamps so lots to keep me entertained for a while.

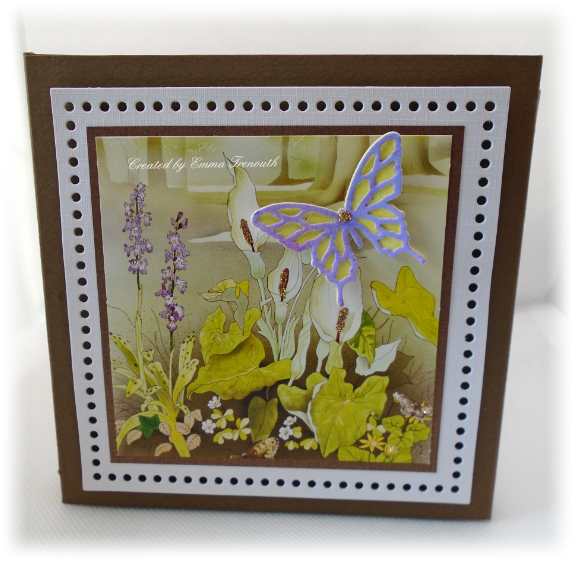
Today is a card for my mums best friends birthday in December.  She loves her flowers/garden so i dug out these beautiful toppers from my stash and not being able to decide which ones to use i decided to make a cube card for 4 seasons. It folds flat for posting.

I made my cube out of 300gsm chocolate pearlised card, each side is 5.5x5.5" in size so it took 2 pieces of A4 card.  After cutting each piece to 5.5" i then scored along the length at 5.5" and joined the 2 pieces together lengthwise to form a cube. 

I matted my toppers onto chocolate pearl card and a die cut white card square, added foam tape to the back and attached to the sides.  I went with the chocolate cardstock to pick up the colours in the toppers which are soft.  

Die cut sentiment.  Butterflies die cut from lilac and lemon cardstock - again picking up the colours in the toppers.  Glitter glue highlights to finish.


Having the different images on each side it can be turned around for a different view each time

Showing it from above - i added a chocolate pearl paper insert inside to write the greeting - using the same paper as the box means it doesn't ruin the overall 'look' 

the insert opens upwards so easy to access

and finally showing it flat for posting.  The recipient loved it so thats good and its always good using up very old stash!

Items Used:
Toppers -  Creative Crafting World 'Malcolm Greensmith'
Tattered lace eyelet square dies
Birthday sentiment die
Sizzix butterfly die
Pearlised Chocolate card - payper box
White card - craftUK ltd
Stickles glitter glue - diamond & gold

Thank you all for stopping by.  I hope you have a good week and all keep safe and well. Hugs Emmax


Monday, 1 April 2019

Mother's Day Card

Good Morning one and all.  I hope you had a good weekend.  We had a family get together yesterday which was lovely, my nieces are growing so fast.

Today im sharing the card i made for my mum for Mothering Sunday.  As my regular followers know we love nature and mums veranda over looks the paddock where you can sit and watch the rabbits, pheasants and other wildlife.  Although we don't get many hares in this part of the world, when i saw these amazing lino cut style hares from hobbycraft they fell into my basket.

I wanted a way to get all three hares onto a card and all the extra foliage stamps.  I came up with this tall lean box card.  Full details at the end of the post for it.  I did a topper panel for 2 sides so that it can be rotated to display the other side.  


After making the base card (see below)   I die cut 2 large ovals from white card. On one i first inked through a crazy paving style stencil in an ombre effect in greens and blues with oxide inks.  I love the smooth look the oxides give through a stencil. Starting at the bottom twisted citron, cracked pistachio, peacock feathers & touch of salty ocean at the top.  I then stamped my 2 hares with black archival ink.  I then built a scene around them with the various other stamps in the large set again with black archival ink. 
They are sitting in the meadow under the trees where the tree blossom is falling upon them. Mounted onto a larger black oval die cut. 


A close up on the topper.  For my flower i inked white card with the peacock and salty ocean oxide inks, and then stenciled a pattern over it with the same inks.  This i then die cut into a dimensional flower.  A couple of leaves added behind.  Large black gem to finish and a few glitter highlights on my topper panel.


For the 4 side panels, i cut strips of white and black card to fit each side of the box.  I then used the same oxide inks used throughout to make little scenes using various stamps from the set.  I lightly inked around the edge of the panel, mounted it onto the black and then the side of the box.  I did 2 sides with the green/blue combo and 2 sides with the orange/red combo.


and onto the other side of my box..

I did my topper the same way as the blue one, just using a different stencil with squeezed lemonade,fossilized amber, spiced marmalade & candied apple oxide inks.  This time i started with the lightest shade in the middle, working out to the darkest.  This stencil leaves a circle in the middle so it looked like the setting sun to me, so i went with the warm orange & reds of sunset.  Again i stamped the hare and extras with black archival ink. Flower made the same way.  

I attached each oval opposite each other on the base.  I attached one side and then turned over and flattened the base so i could easily line up on the opposite side.


Just a close up, i added red glitter glue highlights on this side.  


Another side panel, using different stamps.  There are so many stamps in this set so plenty of different ways to build up a scene.  You can see the Hare stamps as clean and beautifully in the oxides as it did the black archival.  Ive left the middle of the panel pale so that i can write my greeting.   Ive also kept the card sentiment free on purpose so that mum can display it for longer if she so wishes, so its kind of a little gift and card in one. 

***

And heres how i made the box base


This shows from the top the box.  I took a sheet of white A4 cardstock, have it landscape, i scored 4 score lines at 2.5" mark, this gives you 4 panels and you have a bit left over for the tab.  Fold all 4 score lines and and form your cube shape and glue the tab to the other side.  Simple really.  Can easily be made any size of height.  I kept the full A4 height so that i had plenty of room.  The benefit is that this card is completely free standing and folds up to fit in an envelope. 


This just shows that it folds flat for posting and it easily pops open again.  p.s She loved it, as did my dad😀

Items Used:
Hobby Art Stamps - CS208D Lino Cut Hares
Spellbinders Grand Oval Dies
Flower & Foliage dies
Tim Holtz Distress Oxide Inks
Plastic Stencils
Payper box black card
CraftUk Ltd Smooth white card
Ranger stickles glitter glue


Thank you all for stopping by once again.  I hope you all have a lovely week whatever your plans are.  Emmax


Id love the enter the following: