Followers

Showing posts with label spellbinders grand labels 1. Show all posts

Sunday, 4 May 2025

Four legged friends - WLS May

Good Morning everyone

Time for a new challenge over at We Love Stamping
where the theme this month is

'Four legged friends'

So plenty of options here but we also always have the anything goes as long as you use stamping

My youngest brother had a rabbit as a child which was suppose to be dwarf..was bigger than the cats, he would often escape his run and go for a day out in the field....he had a lovely character

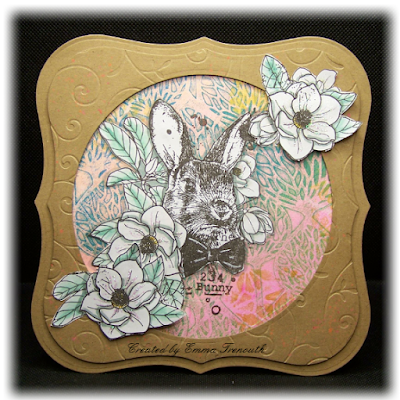
Card size approx 7x7" Die cut using spellbinders grand labels 1 die sets.

I decided to use this fab bunny stamp from aall&create and stamped him with versafine Clair ink 'warm breeze' which is this lovely turquoise colour onto cream cardstock.  I watercoloured the flowers and leaves with distress inks.  I die cut into shape and matted onto a fancy layer die cut from pearlised turquoise card and added flat to the card front.

I stamped just the main flower a 2nd time, watercoloured, cut out and decoupages onto the main image with glue gel for a little dimension and interest. 

Orange glitter gems added to finish with a bit of bling.

Showing it side on and the decoupaged flower


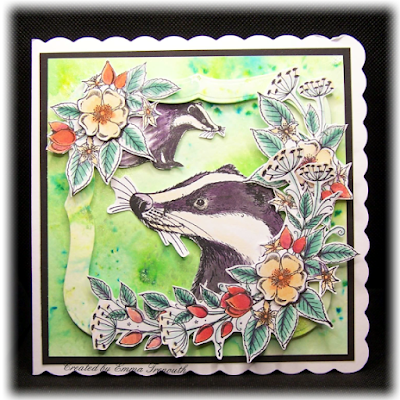
and a 2nd version, this time I did pink flowers and gems.

Items Used:
aall&create stamp set #529 'In the wild'
Spellbinders dies - grand labels 1 plain & fancy sets
Versafine Clair ink 'warm breeze'
Distress Inks - dried marigold, wild honey, vintage photo, peeled paint, forest moss, picked raspberry, shaded lilac, seedless preserve
Papermania gems
Craftuk Ltd A3 cream cardstock
Pearl turquoise card


We have these gorgeous stamps by Lavinia as the prize this month for 2 lucky winners so
 hop over to We love stamping to join in and see what the rest of the DT have come up with for our 'four legged friends' theme


Thank you all for stopping by once again.  I hope you all have a good week. Emmax


Id love to enter the following:


Thursday, 26 January 2023

Embossed acetate

Good Morning everyone

In my January craft sort out i came across these dry embossed alcohol inked acetate panels that were already attached to black card frame - I made these panels years ago and they just got hidden away so now was the time to use them.  I also came across these lovely mechanical butterfly die cuts that a crafty friend had sent me and the 2 just seemed the perfect match.


I first die cut acetate into spellbinders label1 shape and put through a sunray embossing folder, i then added alcohol inks in pinks & purples and let them do their magic.  I die cut a label1 frame from black card and adhered the acetate to the back of it, added foam tape around the frame edge, then a white die cut to the back and then glued flat onto a larger black die cut.  By adding the white layer behind the acetate it helps the ink colours to really pop.

I die cut my card base using a larger spellbinders label 1 from white card.  I added the butterfly die cut with some aurora borealis gems on his body.  Some white pen dots to each corner & a tim Holtz chat sticker to finish.  This card might have taken 4 years to come together but i was pleased with the outcome and its always satisfying to finish a half done project.


This really shows the vibrancy of the alcohol inks and i love how the light plays on the acetate with the different heights of the embossing

and a 2nd version which id used more sunshine colours - i guess at the time i thought sunray embossing folder so sunshine alcohol ink colours😀


Items Used:
Spellbinders labels1 & grand labels1
Sunray embossing folder
Butterfly die cuts 
Tim Holtz alcohol inks
Tim Holtz chat stickers
Acetate
White & Black cardstock
Posca white pen

Thank you for stopping by.  Emmax


Id love to enter the following:

***

***


Thursday, 27 October 2022

Hope this brightens your day...

Good Morning everyone

I wanted to make a card for my uncle whos having grueling treatment.  Id decided i wanted to do an exploding insert so started with deciding on a paper for that, I picked one with wild flowers with the idea of a meadow for my aall&create fox stamp.

6x5.5" white card base.  I first folded and added my insert (see pic below).  I then stamped the fox onto white cardstock twice, one i die cut with spellbinders labels 1 die and lightly inked the edges with salty ocean and evergreen distress inks.  On the 2nd fox stamped image i watercoloured the fox with wild honey & vintage photo distress inks and the flowers i added a colour with shaded lilac, i cut out the fox and the 2 smaller flowers and decoupaged onto my main image.  I matted this onto spellbinders fancy label 1 die cut from rose gold satin card. 

 I used off cuts from the paper i used for my insert and added down the left and right edge of the card front and mounted my topper with foam tape.  Computer printed sentiment mounted onto rose gold satin card and then the base with glue gel.  Glossy accents added to the foxes glasses to finish. 

and showing the insert.  I computer printed my sentiment and die cut into an oval and added a plain oval to the bottom to write my greeting on.  

Items Used:
aall&create stamps 'in the wild'
12x12 paper pad from the works 'botanical garden'
Spellbinders grand labels 1 & fancy grand labels 1
Stitched oval dies
Distress inks
Crafters companion rose gold satin card
CraftsUk ltd white cardstock
Ranger glossy accents

Thank you for stopping by once again.

Id love to enter the following:


Thursday, 23 June 2022

The rabbit and the fox

Good Morning everyone

For todays card, Ive used 2 of the images from the aall&create set called 'In the wild'  The fox and rabbit are enjoying all the summer foliage & flora in the fields....mind you the speed the rabbits are eating my parents garden there might be so many flowers, the deer too like eating all the new shoots and went along and trimmed the tops off all the leeks😁

8x8" kraft base card, i also die cut a frame from kraft card using my very old spellbinders grand labels 1, this i mounted onto the card front with foam tape.  I made a background on white card with green brusho's and green pixie powder which i also splashed onto the kraft card so it shimmers when the light hits it. 

I die cut my background to fit in my frame and stamped the rabbit and fox in place, going off the edges, i stamped them again onto white card. I glued the background into the frame.  On the white versions i left the fox & rabbit white and watercoloured the flowers and foliage with distress inks, cut them all out and built up on the base image with the flowers overlapping the edges.

To break up the kraft card and pick up on the white of the characters i used a posca white paint pen to add dots around the frame.

Glossy accents added to the eyes and noses.  Katzelkraft sentiments stamped onto white, cut out and arranged to finish.

Close up on Mr Fox, i love his spectacles

and close up on Mr Rabbit with his fab bow tie

Items Used:
Aall&create stamps 'in the wild'
Katzelkraft Sentiment stamps
Spellbinders grand labels 1 dies
Brusho's
Cosmic shimmer pixie powder
Distress Inks
White posca pen
Kraft card
Ranger glossy accents

Thank you all for stopping by.  Hugs Emmax


Id love to enter the following:


***

***

***


Monday, 14 February 2022

Rabbit in flowers

Good Morning everyone

Another card using one of my recent gelli plate backgrounds and the rabbit stamp from the aall&create in the wild stamp set


approx 8x8" size.  I made my base card using kraft card and spellbinders grand labels1 dies, i die cut a smaller one and die cut the middle using a grand circle die to make a frame and used a swirly embossing folder on it - using the debossed side.  I stamped the rabbit onto the gelli print with dark brown ink and stamped it again onto white paper.  I added the gelli print to the card base and added my kraft frame over the top with foam tape.

I added a hint of colour to the leaves & flowers on the white stamped versions and cut them out.  I glued a full version to the image stamped on my gelli plate and then cut out extra flowers to extend my image which i adhered with glue gel so that they over hang the frame.  I then added a bit of a shadow with grey alcohol markers.  To finish i added clear wink of stella pen to my flowers so them shimmer in the light. 

Just  a close up, i have touches of gold in my gelli print background that also shimmers in the light. 

Items Used:
aall&create stamps - 'in the wild' #529
Spellbinders dies grand circles & grand labels 1
6" round gelli plate
Lavinia stencil - 'pods'
Floral stencil
Acrylic paints
Kuretake wink of stella pen - 'clear'
Alcohol markers

Thank you all for stopping by.  I hope its a good week for you all. Hugs Emmaxx


Id love to enter the following:

***

***

***

***


Monday, 7 February 2022

Floral card

Good Morning everyone

As my mojo finally came back i had a good gelli plate session, its many months since i last dug it out, so have plenty of backgrounds to play with now.  One of them ive used here as a background to some aall&create stamps that were a Christmas present.

I did a gelli print using various stencils and paints using a 6" round gelli plate, im now getting better at overlaying so that it lines up each time.

I used spellbinders grand labels 1 and white and black card to make my card base and frame. I die cut my background to fit and added the frame over the top with foam tape after id stamped the 2 florals stamps.  I then added the frame over the top and attched to another spellbinders labels 1 die cut to make the back of the card.

I stamped the flowers again on white card and watercoloured, picking up on some of the soft orange and pink in the gelli background.  Cut them out and decoupaged onto the base with glue gel.  Touches of glitter glue added to the flower centres.


Here you can see some of the detail in the gelli print better, i also used some metallic gold that really shines when the light catches it. 

Items Used:
6" round gelli plate
aall&create stamps - In the wild #529
Spelllbinders grand labels 1
Lavinia stencil 'pods'
Floral stencil
Paperartsy & Daler-Rowney acrylic paints
Watercolour markers
Ranger stickles - diamond

Thank you all for stopping by.  Im hoping for a quiet uneventful week.  I hope its a good week for you all.  Hugs Emmaxxx


Id love to enter the following:


Monday, 31 January 2022

Birthday Badger

Good Morning everyone

This badger was another black Friday pink ink stamp set that fell into my basket.  I made this card for my mums birthday 


7x7" scalloped card blank.  I first made a brusho & pixie powder background in green to represent fields, cut to size, matted onto black and then my base card.  I die cut a spellbinders label 1 from the same coloured background and mounted onto foam tape and added to the base.  
I stamped the 2 badgers and the floral corner several times, watercoloured with distress inks and cut them out, from 2 of the flower corners i cut them into smaller pieces so that i could both extend the main floral corner at the bottom right and add a small piece to the top left to give the effect that you are looking through a hedge into a field. I decoupaged & built them up with 3d glue gel for dimension.  I added my badgers into place and a few touches of glitter glue on the flower centres to finish.

You can just make out some of the shimmer in the background for the pixie powder - when the light hits it the mica really comes to life

Just showing the dimension of the layers

Items Used:
Pink Ink stamp 'Brock'
Spellbinders grand labels 1 dies
Brushos 'lime, leaf green'
Cosmic Shimmer pixie sparkles 'zesty lime'
Distress inks - evergreen bough, dried marigold, fired brick, ripe persimmon, black soot, dusty concorde
7x7 Scalloped card blank - CraftyUK ltd
White cardstock - CraftyUK ltd
Black cardstock

Thank you all for stopping by once again.  Hugs Emmaxx

Id love to enter the following:


Monday, 3 January 2022

Sophie is 10

Good Morning everyone.

Wishing you all a Happy & Healthy 2022

I hope you all had a lovely festive period.  The only new year resolution i always make is a crafty one that im usually good at sticking with, i think this year i am going to continue my stash busting, i made a good dent last year in the thousands of sheets of coloured cardstock that i collected before i started making my own backgrounds so i will continue with that.

My niece Sophie was 10 just before Christmas, these are the 2 cards i made her, as always for family birthdays i make the one my parents give as well so they need to be totally different.

Sophie was fascinated with the box card i made for Alice's Birthday in August that i thought i would make a version for Sophie.  Those 10 years have flown by for sure.  I dug out my katzelkraft flamingo stamp


I made up the box card from this lovely blue cardstock and used sea themed papers from a paper pad from the works last year.  I stamped the flamingo 10 times as it was Sophie's 10th birthday, watercoloured with distress inks and cut them out.  So that i got a balanced placement of them in the box i used repositionable tape to just hold them in place and once happy i then glued permanently into place.

I added touches of stickles glitter glue to add some sparkle and a computer printed sentiment die cut into an oval.  There is space on the back of the box for writing the greeting. 

Just showing it side on


and a close up of the flamingos 

Items used:
Katzelkraft flamingo stamp
The works 12x12 paper pad 'feeling fresh'
Blue cardstock
Distress inks - picked raspberry, ripe persimmon, lemonade, pistachio
Ranger stickles glitter glue

Id love to enter my flamingos in the following:


card 2 i made for Sophie is a handbag card as she's 10 going on 21!  She loves her fashion.  I dug out a very old (10+yrs) kanban paper pad in pink and grey and teamed it with black card.  I founded a silver wired ribbon that was ideal for the handle and a large gem button that i cut off a new cardigan was ideal for the handbag closure. 

I used my grand spellbinders labels 1 to cut a base card from black cardstock.  I also cut a flap using curved edge dies and pockets using smaller labels 1.  I  die cut smaller panels from various papers from the paper pad.  To the back of the bag flap i glued in silver wired ribbon to act as the handle.   I added bling buttons backed with large & 2 tiny flowers cut from one of the papers.  Sentiment computer printed onto a pink pearl card that i die cut into tags with spellbinders labels 4, the 2nd tag hiding underneath says 10 today.

Showing it side on stood up, the wired ribbon stands up nicely

Items Used:
Spellbinders Labels 1 & grand labels1, labels 4, curved border dies
Kanban paper pad
Black & Pink pearl cardstock
Wired ribbon
Bling button and gems


Id love to enter my bag card in the following: