Followers

Showing posts with label memory box. Show all posts

Friday, 21 March 2025

Kirsty's 40th Birthday

Good Morning everyone

Today Im sharing 2 cards I made for my Sister-in-laws 40th birthday.  This sis-in-law is hard to craft for as she doesn't really have any hobbies, interests or fav colours and with my mojo still being very sporadic these were hard going😀

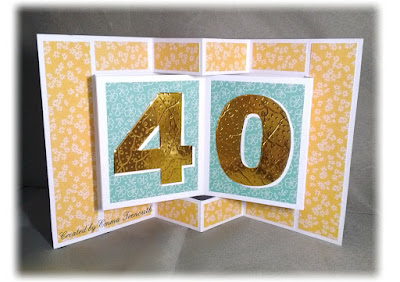
6.5.5" card.  I made the fold with 2 sheets of white card.  I picked 3 patterned papers with a yellow and teal theme and on the front matted the floral paper onto the green one and added to the front.  I die cut the birthday sentiment from a yellow gold mirror card and white card, off set and adhered to a larger circle die cut from the teal paper.  

Flower die cut from yellow paper I used on the inside and a large glittery gemstone added to finish.

On the inside, i covered all the outside panels with this lovely yellowy orange floral paper and the pop out sections with the teal paper.  

Not having large number dies, I printed out a large 40 from my computer onto card, cut it out and used as a template to then cut the 40 from the gold mirror card and white card.

Here you can see i used the same paper as on the front for the side panels of the pop out book sections.

After adding the numbers, I decided they didn't look great - being hand cut, but also all the plain mirror was a bit too stark.  If i had thought about it before sticking them in I would have run them through an embossing folder.  I finally decided to use a small embossing ball tool and doodle a little swirl and dot pattern over the mirror card which made a big difference.  I also ran a large ball tool around all the edges which softened them and made them not look so wonky and 'hand cut'

and the back of the card - I added a white die cut circle to write the greeting in after using the same papers i used to decorate the front.  


and onto the 2nd card I made for her

A5 white card base which i die cut using my nesting dies. I cut a piece of black and white patterned paper with the next size down and adhered.  I die cut 2 champagne glasses from a silver rainbow glitter card, I adhered with glue gel to the front and added a white die cut 4 & 0 to the glasses.

I added little strips of the glitter card across the top and bottom and a white die cut sentiment to finish.  Very simple but mojo was in hiding!

Trying to show how beautiful the glitter card is in real life, it is silver but when the light hits it at certain angles you get a rainbow of colours.  No idea where it came from as i was given it years ago - so about time i used it! lol  Unfortunately it sheds glitter which i do not like - I don't use glitter for that reason - its like sand and gets everywhere.

Items Used:
Spellbinder dies - aster flower
Memory box dies - champagne glass, numerals
Elizabeth crafts birthday sentiment die
? nesting dies, circle birthday sentiment die ?
Patterned papers - various pads from the works

Thank you all for stopping by once again. Emma


Id love to enter card 1 into:


Monday, 9 December 2024

Pop out book Christmas cards

Good Morning everyone

Those of you in the UK, I hope you survived the storm ok, we were ok here other than lost the electric for a couple of hours but a few trees down on the farm and part of one of the barn roofs gone and my other brother who lives closer to Devon is still without electric...it did wake up a few hedgehogs who came out for a snack.

Today im sharing a batch of Christmas cards using the fancy fold called 'pop out book'  Ive used these gorgeous papers from 12x12 paper pads from the works.

I think this is the last of my Christmas cards for this year.

Card size 6x5.5"  I  made the outside of the card from red card and the inside from white, the red then shows through inside and picks up on the red in the paper. For the front I simply matted the paper onto white and then the red base. Sentiment die cut from white and mat and layered. 

After making the pop up element i matted with a lovely soft blue snow paper oh the outside edges and a darker blue paper for the 'book' papers.  I added strips of the paper i used on the front to the sides of the book pop out and the outer edge.

I die cut old deer dies from white card, tore the edge of white card for some snow and built the little scene on the book pop out.  I added a little touch of red stickles to the bigger deers nose and some star dust stickles to the snow for a little festive sparkle to finish.   

Just showing the pop out side on, this card also stands open nicely on its own to display which is always a bonus with some fancy folds. 

Version 2.  I used dark teal card for the front and matted the front paper onto silver satin card and added a hanging star die cut from white and the silver satin which really shines when the light hits it. 

Version 3 - the front is matted onto a dark teal glitter card which is super sparkly

Version 4 - I made the base from navy blue card not black as it looks in the photo, used silver glitter card for the front mat layer.  This time i built a little tree scene die cut from white and silver glitter card


On the back of each card i put a place to write the greeting, this is a computer generated sentiment 

I used this Pop out book card (queenbcreations) step by step just adjusted the size to fit a 6x6 card

Items Used:
Tonic studio Christmas sentiment die
MFT dies 'deer love'
Memory box tree die
Frantic stamper Star on a string die 
Ranger stickles 'star dust, christmas red'
12x12 paper pads from the works which they haven't put names on but are this years '24 pads 


Thank you all for stopping by. Emmax

Id love to enter the first card in the following:


Thursday, 9 September 2021

Tower block card

Good Morning all

Today is a tower block card made for my brothers 40th birthday, i was wondering what to make when i was inspired by a friend over on craftworld after she shared her version of the tower block card by Sam Calcott 'made to surprise' you can find the utube here

This was going to be my trial run to work out where the score lines and cuts would be but then life got in the way and i ran out of time so i decorated this one for my brother.  Ive gone with a autumn nature theme with a few owls - apt for a farmer who loves nature. 

Following Sams tutorial i made the 6x6" size from yellow ochre 350gsm cardstock.  I cut all the panels from the same paper pad and inked the edges with brown ink and then attached them to the base. I then die cut lots of little leaves, inked the edges and attached them to the panels adding a little shape to them.   
I die cut the sentiment and numerals from dark brown cardstock, the number 40 i added to yellow die cut circles and attached.  
I found some cute little owl buttons in my stash which i thought would be ideal with the woodland theme, so after cutting off the shank i attached with glue gel.  
I made a box to fit as it folds flat which is ideal.  
Showing side 2

side 3

and side 4.

In the end i added a little tag on twine to the inside to write the message on, using the twine meant it was easy to lift out to read....that was a last minute change of which i didn't take a photo.

Items Used:
Carta Bella paper pad 'A perfect Autumn'
Ochre & Brown cardstock
Various leaf dies
Circle dies
Memory box numeral dies
Birthday die
Owl buttons

Thank you all for stopping by.  I hope you enjoy the rest of the week and weekend. Hugs Emmax


Id  love to enter the following:
 

Monday, 2 November 2020

Shaker Christmas cards

Morning everyone.

Today is a set of Christmas shaker cards.  This year Ive made an effort to use up old paper pads, so this one is from bobunny and a christmas woodland theme in blues and browns, i teamed it with white pearl card and silver mirror card.


Approx 6x6" in size.  I first die cut spellbinders grand label one from white pearl card and folded in half for my base card.  I layered with a piece of paper cut with a smaller label 1, i cut this in half and glued to the front and back of my card.  I then die cut the snowflake circle die from white pearl card and used a circle die to cut around the outside so it becomes a circular frame, i then attached a die cut acetate circle to the back & die cut a circle frame the same size out of funky foam which i glued to the back for my shaker element - just easier to stick than foam tape to a circle leaving no gaps.  

I die cut the girl panel from white pearl card and silver mirror card and offset so that some of the silver shows at the top, a circle from the paper pad and a larger white circle.  I glued the girl onto the paper panel  and added micro beads, silver sequins and glitter for my shaker bits and attached my snowflake frame over the top.  I then mounted onto the larger circle and my cardfront. 

Stamped greeting die cut into a fishtail banner, snowflakes die cut from silver mirror card and a dazzle gem for the centres to finish. 


Just adding that little bit of silver behind the girl helps her stand out from the background, she reminds me of my little nieces out catching snowflakes as they are so rare to see here in Cornwall


A close up of my shaker


Different papers same design


This one shows how the card base stands up easily.

and with the negative middle piece that falls out from the snowflake circle frame i made some very simple gift tags for my presents
I stamped a sentiment on the circle in black and some snowflakes in grey ink and mounted onto a larger circle die cut from patterned papers.  Set an eyelet and added some ribbon and glitter glue highlights to finish.


Items Used:
Bobunny Sleigh ride paper pad
Girl snowflake frame die - brand unknown
Spellbinders grand lables 1 & circle dies
Memory box snowflake dies
MFT fishtail banner die
Clearly besotted sentiment stamp
Creative expressions dazzler gems
White pearl cardstock
Silver mirror card

Thank you all for stopping by, i hope you have a good rest of the week as we prepare for another lockdown.  Weather isn't too good so more crafting for me.  Stay safe. Hugs Emmax


Id love to enter:

***

***


Monday, 28 January 2019

Birthday Bee's


Good Morning everyone.  I hope you all had a good weekend.  I can't believe we are into the last week of January, where has that gone too?

Today is a busy/noisy morning as last week my next door neighbour had a bad fire so builders in today checking the wall that joins us, replacing the melted security lights & BT fixing the melted phone lines, luckily for me we still had phone lines/internet its been the ones on the other side without phone.  Not a great start to the year but at least no one was hurt, other than leaving my cat terrified, we were out in the dark rain of the night trying to find her. She finally turned up about 16hrs later.

Ive also made the decision to give up being on a design team for the moment, what with all the hospital visits and treatments, the deadlines were getting a bit much, although i absolutely loved my time and met some wonderful crafters. So for a while im going to go back to totally crafting for relaxation/therapy as and when i feel like it and hopefully tackle some of those projects going around my head😀


Anyway onto todays project.  Made for a very good friends birthday earlier this month. It got bigger and bigger as it went along.


Well where to start with this.  I used inside/outside stitched hexagon dies. I first picked a pattern paper with hexagons on it, picking up on the colours in the paper i went with gold mirror card, a pale green, lemon card and watercoloured pink paper for the flowers. 

I cut gold mirror card, green card and white card with the hexagon dies to frame the middle, in the middle i placed a piece of pattern paper.  I die cut the birthday sentiment from green & gold card and off set, i took the middle circle from the gold one and dry embossed it with a honeycomb EF.  This i placed into the centre of the card with foam tape. 

Once i had built up all the outside frames i mounted them with foam tape onto a white base card and then cut around the outside edge so that i ended up with a hexagon shaped card approx 8x9" in size - yep pretty big! 

I die cut 3 bees from yellow card and the pale green card, i cut the body off the yellow one and added on top of the green one. I gently gave the body a curved shape before arranging on the cardfront. 

From pattern paper that is a watercolour effect in pinks i die cut and built up the flowers using several die cut layers.  A big gem added to the centre to finish.  Die cut leaves added behind the flowers. 


Close up on the centre


Close up on one of the bees and flowers.  I had also added faux stitching around the outside edges with a pink pen.  I had alot of fun creating this card and going back to my old flower power cards. Im pleased to report the recipient loved it too. 


Items Used:
Docrafts 'neon geometric' paper pad
Poundland 'watercolour' paper pad
MFT birthday circle sentiment die
Flower die
Bee die
Stitched hexagon die set
Memory box foliage die - 'massa'
Honeycomb Embossing folder - sizzix maybe?
CraftUk Ltd white card
Gold Mirror card
Pale green card, Lemon pearl card

Thank you for stopping by.  I hope that you all have a good week and hopefully we don't get too much of the snow forecast. Hugs Emma