Followers

Showing posts with label farm theme. Show all posts

Monday, 21 June 2021

Birthday Sheep Stepper card

Good Morning everyone

I was asked to make a card for a female who loves sheep and knitting, after alot of thinking this is what i came up with.


I die cut the presscut stepper card from white cardstock and folded all the score lines.  I die cut the panels from a pale green card and then used a purl embossing folder on them to get the knitting theme in and inked the edges with lucky clover distress ink.  I attached them to the base.  I stamped and watercoloured the sheep with oxide inks - i wanted them to be colourful.  I cut them out and attached to the base with glue gel.  Computer printed sentiment die cut into a speech bubble.  I added little buttons to embellish - again picking up on the knitting theme. 


A close up of the flock.  Of course i added glossy accents to their eyes.

Items Used:
Katzelkraft farm animal stamps
Presscut stepper die
Crafters companion purl embossing folder
Distress Oxide inks - raspberry, persimmon, citron, denim, lemonade

Thank you all for stopping by once again.  I hope you all have a good week. Emmax


Id love to enter the following:

***

***

***


Thursday, 12 November 2020

Flowers in her hair

Good Morning everyone.

Ive been waiting patiently to share this card, my lovely friend has just had her birthday so i can finally post it.  Its massive at 9x8" as the pink ink highland cow stamp is very large.  I think it would look great in a box frame so left a birthday sentiment off the front to give the recipient the choice if she so wishes.


8x9" cardbase.  After working our what card size i needed i made it from A3 white cardstock.  I cut a panel of white to fit and used brushos to make grass & sky and then over stamped around the edge with the thistle stamp in grey ink.  On a separate piece of white card i stamped the highland with expresso & sepia archival inks, overstamping using my stamp platform several times to get the image nice a crisp.  I added a light colour wash with distress inks and then cut her out.

I cut a panel of white card to fit my card front and die cut a XL oval in the middle and then splashed on some blue & green inks to pick up on the background colours and soften all the white.  I then stamped lots of flowers on a contrasting coloured paper and cut them out.  I gently curved the cow head and attached to the middle of my oval with plenty of glue gel and then arranged my flowers and added gems to the flower centres.  Stamped sentiment in expresso ink & cut out to finish.


Just a close up on my 'coo'

Items Used:
Pink Ink stamp set 'cows it going'
Flower stamp & die set - the works
XL stitched oval dies
Brusho's - turquoise, lime & emerald
Archival inks - expresso, sepia
Distress inks - lemonade, vintage photo, marmalade,  salty ocean, twisted citron, 
Pink/Purple ombre patterned paper
A3 white CraftUK ltd


Thank you all for stopping by, i appreciate and read every comment you leave and love the encouragement.  Stay safe.  Hugs Emmax


Id love to enter the following:


Saturday, 4 April 2020

Moooooo!

Good Morning everyone, i hope you can have a good weekend.

For Christmas i was given a new set of zinski art paperartsy stamps, this fab fun cow stamp, of course with all the cards i make for farmers they will come in very useful but first off is a little piece of artwork for the wall.  I used stamps and stencils to make a background to look like they are in a Cornish Field with branches overhanging😀


This first photo shows it in its frame, i went with a faux wood frame to pick up on the nature feel.  Although my brother works with rare breeds he doesn't have any cows as colourful as this mini herd😁


Approx size 11x5".  It is much brighter than the photos!.  Anyway, i first cut a piece of white card the size of the frame and using distress inks in greens built up the background by dabbing the ink on my mat, sprizting with water and dipping my card into it, drying inbetween layers to build it up. I then splashed on some water and dabbed with tissue to remove some colour in places  and then added some ink splats by dipping my paintbrush in watered down ink and tapping it over the background just to add more interest and depth. 
  Once completely dry i did some stencilling with a cow print stencil and distress ink, i also used a dictionary stamp through the stencil to add interest.  I then stamped on foliage with oxide inks.

I then stamped my cows on white card, coloured with oxide inks and then added shadow to them with blue grey alcohol markers and fussy cut them out. I added glossy accents to their eyes and touches of glitter glue.  I gently curved the bodies and glued into place with glue gel for dimension.  I then took a black fineliner pen and doodled in the grass to ground them.  I added more shadow to the ground with grey alcohol markers, using the alcohol markers on top of the water colour means it doesn't get too 'muddy' 

To finish i stamped the quote and cut it out.

A close up, this shows the true green colour a bit better.  

Another close up

Items Used:
Paperartsy zinski art stamps ZA42
Hobbyart linoprint hare stamp set
stampin up dictionary stamp
Lavinia foliage stamps
Cow print stencil
leaf burst stencil
Distress inks & oxide inks
Blue grey alcohol markers
Glossy accents
Diamond ranger glitter glue
Smooth white craftUK ltd cardstock

Thank you all for stopping by once again.  Thank goodness for crafting at the moment for a distraction - stay safe everyone.  Hugs Emma


*********


Thursday, 13 June 2019

Happy Fathers Day

Good Morning everyone, thank you so much for all your amazing comments on my seahorse creation. 

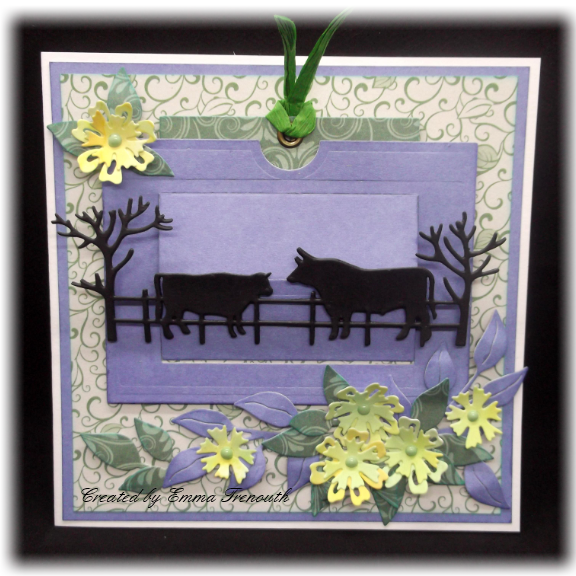
Today Im sharing the card Ive made for my dad for Father's day, I've used the sizzix slider die again and gone with a farming theme.  


This first photo shows the slider panel closed.

6x6 White cardbase.  Ive used beautiful papers in blues & greens from B&M.  I first die cut the sections of the slider mechanism from my chosen papers, these B&M papers are ideal for this as a good weight but also light enough to fold easily.  I stamped my greeting on the panel that is revealed when you pull the slider part back.  I added an eyelet in the hole and added some green paper raffia to make it easier to pull the slider up. 

I cut a panel of the green leaf paper and layered onto a large piece of the blue paper and attached to the card front. I then attached the slider to the card front with foam tape. I attached the bull & cow chipboard after painting it black to the front part of the slider. 

From a scrap of yellowy inked card i die cut some flowers and die cut leaves from the green and blue papers. I then arranged these around my slider panel. I added some pale green enamel drops to the flower centres to finish. 


This photo shows the slider panel open to my (wonky) stamped greeting, i used 2 different sentiment stamps.


This photo shows the card laid down and the slider open so that the cattle are then stood up and sort of looks like they are in a field.  My yellow flowers could be buttercup's, celandine's, or primroses, alot of my dads fields are meadows so full of lots of flora & fauna.


Items Used:
Sizzix tropicool slider die set 662783
Tim Holtz funky foliage 663087
Cow&Bull fence chipboard
B&M Papers 12x12 'Seas the Day' & 'Botanical Bloom'
Justrite & clearly besotted sentiment stamps
Oxide inks twisted citron, lemonade & pistachio

You can see my first card made with the slider set here for more details

Thank you all for stopping by. Emma


Id love to enter the following:


*****


******


******


*****


******