Followers

Showing posts with label die cutting. Show all posts

Monday, 25 November 2024

Have a Merry Christmas

Good Morning everyone

Another Christmas card design.  I made a snowflake stenciled background for my large die cut snowflakes.

Card size approx 6x6.5"  I first die cut my hexagon base from white card and then a smaller hexagon from more of the white card.  On this panel i used a snowflake stencil mask and distress oxide inks in shades of blues, greens & lilacs and then added some splatters.  I Then over stamped with the same inks & grey ink the words winter, Dec & 25 aall&create 'seasons' set, inked the edge in grey and adhered to the card front.

I die cut a large snowflake from white vellum and pale lilac glitter card, off set these and adhered to the card front.  Sentiment die cut from charcoal satin mirror card card.  Sadly the photos don't pick up the shimmer and shine from both the glitter card and mirror cards but in real life they really make the card when the light hits it. 


Version 2 

Made the same way but this time using silver holographic card for the snowflake ad black mirror card for the sentiment.  I made 10 versions of this design and a great one for making a dent in my fancy card scraps drawer where i keep off cuts of glitter, mirror, satin card!  So they are all slightly different.  

I only glued the middle of the snowflakes so the edges are free to give a bit of interest and dimension otherwise its a flat card - always a mission for me!

Items Used:
Studio Light stencil (grunge masks) 'SL-GR-MASKS52'
aall&create stamp 'seaons'
Spellbinders die S4-286 '2010 snowflake pendant' 
Tonic studios sentiment die - old magazine freebie
Hexagon nested dies
Distress Oxide inks - shaded lilac, tumbled glass, peacock feathers, twisted citron, evergreen bough
Versafine Clair ink 'Morning mist'
White vellum
Various glitter, mirror and satin card

I hope you all survived Storm Bert without too much damage, we did lose electric for several hours and luckily didn't need to venture out in it, on the plus side i guess is that its much warmer than all that snow last week!  I hope you all have a good week - scary that its the last week in November! Big hugs to you all. Emmax

Id love to enter the following:


Sunday, 13 October 2024

A Partridge in a pear tree

Good Morning everyone

My first Christmas cards this year using this fab partridge in a pear tree die from crafters companion. 

approx size 6x6"
I had this matt metallic silver card for nearly 15 years so decided it was time i did something with it - So i coloured it with my alcohol inks in shades of blue and green - this totally transformed it into something i liked.  I then cut the partridge die from this card.  

From cream pearlised card (another one that needs using up!!) i die cut my base card and a smaller frame.  As the partridge die cut is square, I adhered the frame over it and then cut off the excess at the corners and then added to the base card.

I die cut just the partridge part of the die again, added more colour and detail with alcohol markers so that it stands out and then decoupaged it onto the base image.  I added green alcohol marker over the pears in the background and then covered them with stickles glitter glue.

Stamped sentiment and added top and bottom of the frame to finish.

When the light hits it it comes to life with the metallic which still shines through the alcohol inks


Items Used:
Crafters companion die - 12 days of Christmas range 'Pretty Partridge' 
nesting die set
Tim Holtz Alcohol inks
Alcohol markers
Ranger stickles 'crystal'

Thank you for stopping by once again.  I hope you all have a great week. Emmax


Id love to enter the following:

*

*

*


Saturday, 20 April 2024

Yellow & Pink

Good Morning everyone

I was inspired by this challenge colour combo of Yellow & Pink over at color hues challenge 


To start with I coloured A4 white cardstock - 1 with yellow brusho powder, 1 with bubblegum pink dylusions shimmer spray and 1 sheet with a mix of the two colours and left to dry over night while i thought about what i would create.


I made 2 cards the same just reversed the colours

DL (8x4") White linen cardblank, I lightly inked the edges with picked raspberry & sqeeshed lemonade distress inks.  I die cut a smaller panel from white linen card and a stitched edge die and adhered to the card front.

I die cut a large leafy swirl from the pink card, a flower from the yellow and the sentiment from the sheet which i sprayed both colours onto.  I matted the sentiment onto white card.  To make the flower bigger and stand out clearly behind the sentiment i cut it in half and did the same with the leafy flourish so i could make it longer - the gaps are hidden behind the sentiment.   This meant i could also slightly tweak the angle of the foliage to fit the DL shape better. 

I did cut some smaller flowers from the yellow card and adhered with some pink gem centres.  I then added a few yellow enamel dots to finish which give the feel of flower buds. 

Just a close up, sadly the amazing shimmer of the pink spray doesn't show up in the photos.


and version 2
Ive just made this one the other way around. A few more pink gem flower buds on this one as the gems were alot smaller than the yellow enamel dots i used on the first one. 


We finally have had a bit of sunshine this week so hopefully winter is soon a distant memory and we get some warmer sunnier days!

 Items Used:
Brusho's pigment powder 'yellow'
Ranger Dylusions shimmer spray 'bubblegum pink'
Distress Inks 'picked raspberry & squeezed lemonade'
Simon says stamp SSSd112057 'detailed leaf cluster' die
Daisy flower die
Tonic studios (hello sunshine) 3278e 'The four seasons sensational summer' die
Stitched edge DL dies
Altenew yellow enamel dots
Papermania pink gems


Thank you all for stopping by.  Emma

Id love to enter the following:


**

https://unicornchallenge.blogspot.com/2024/04/unicorn-97-use-dies.html

**


**


Monday, 11 March 2024

Mothers Day

Good Morning everyone

Today is the card i made for my mum for Mothers day yesterday

A5 in size.   I first die cut the poppy die from silver mirror card and then coloured them with alcohol markers in green, orange & red.

I made my white card blank using the largest nesting die.  I then took another piece of white card and embossed with the 3D lace embossing folder, i did the letter press technique and inked one side on the folder with tumbled glass and cracked pistachio distress inks and then run through my machine.  Doesn't show up well in the photo and more noticeable in real life but its gives a subtle background colour. 

I then used the nesting dies and using every other size die to cut the embossed panel into frames.  I adhered the largest outside frame to the card front with 6mm of foam tape, the next size down with 4mm of foam tape and the next size down with 2mm, i then added the smallest piece flat in the middle. This card was hand delivered so i could put as much foam tape & dimension as i liked on it.  Its just a way of adding interest to what is essentially a very simple card. 

I then arranged the mirror card poppies, using 3 of them and cutting up the various stems/flowers to alter them and build them up, i tucked the ends into the frames so it looks like they are growing out of it. 

Stamped sentiment to finish


You can really see the colour on the poppies here, when the light hits the mirror card them really do shimmer and shine. 

Items Used:
Crafters companion 3D embossing folder 'ornate lace'
XL Nesting dies
Pennyblack poppy die
Clearly besotted sentiment stamp
Silver mirror card
Alcohol Markers
CraftUK ltd smooth white cardstock
Distress Inks ' tumbled glass & cracked pistachio'

Thank you all for stopping by.  I hope you have a good week.  Hugs Emmaxx


Id love to enter the following:

**

**

**

**


Monday, 15 May 2023

Bluebells

Good Morning everyone

Today is 2 cards Ive made for my sister-in-laws birthday, she likes more blue tones so thats what ive gone with.

This first one is another DL using another paperartsy stamp set i was given.I thought one of the flowers looked like a bluebell and as they are in flower at the moment thats what i went with.  I first stamped the flower onto card previously coloured with blue brusho powders & hints of mica, I then cut the flower heads out.  I stamped the stem twice onto green inked card and cut out.

I die cut the largest DL die from white linen card and built up a garden scene with stencils & distress & oxide inks, i added the sun rays to the area i wanted the flowers so that the yellow contrasted with and helped the blue bells stand out.  I mounted the panel onto silver mirror card which i had turned blue with alcohol inks.

I glued the flower stems down flat and then added the flowers with glue gel.  Sentiment stamped onto white linen and matted onto more of the blue mirri card and added to finish.

A close up of the bluebells, i actually cut the top stem in half so that i could build them up to look like our native British bluebell where the flowers are only on one side of the stem rather than the Spanish bluebell which has flowers on both sides of the stems. 

Items Used: Paperartsy stamps ELB22 & JOFY11, Brusho powders, Cosmic shimmer pixie powders, Stencils - sunburst, foliage (sheena),  umbrella stencil (funky fossil, DL eyelet dies (brand?), Tim Holtz oxide inks - fossilised amber, spiced marmalade, cracked pistachio, evergreen bough, blueprint sketch, tim holtz  alcohol inks, silver mirri card, craftUK white linen cardstock, 

Id love to enter this card in the following:

***

***

***

***

***


Card 2. 

Approx size 6x6".  I found this pretty butterfly paper which i decided to go with. I die cut my base card from white and then a mat layer from blue glitter card to pick up on the blue in the paper.   

I then die cut the paper into using 3 sizes of nesting die to make frames, I added 2mm foam tape to the back of the largest and attached into place, then i used 1mm foam tape on the middle layer and attached into place making sure the pattern lined up, the smallest one i glued flat into the middle, again lining up the pattern - kind of based on the old pyramage - just to give a bit more interest to a basic card which also lets the paper shine. 

I then die cut the birthday sentiment from white card and matted onto a larger blue glitter circle and attached to the middle.  I fussy cut some butterflies from the paper and added over the top to finish. 

Items Used:  Inverted nested dies, birthday circle die, circle dies, The works paper pad 'vintage feelings', blue glitter card, CraftUK white hammered cardstock, 

Thank you all for popping by.  I hope its a good week for you.  At the moment the sun is shining. Hugs Emmax


Thursday, 6 January 2022

Lever fold card

Good Morning everyone


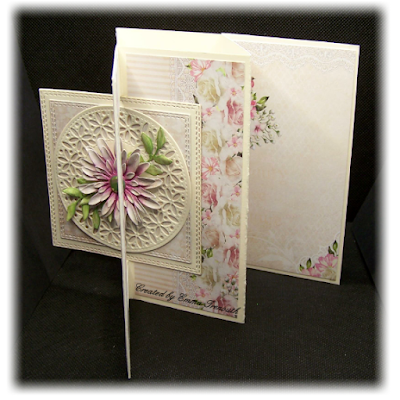
Today im sharing a lever fold card i made for my mum for her best friends birthday.  First time ive made one and as always i learnt from this first one by the mistakes.  I was given these beautiful papers by a friend, its a polish company called AltairArt, a new company to me but the quality is outstanding so i let them do the work here...


6.5x6.5" card. Using instruction i found on pinterest i made up my lever card from A3 cream cardstock, i went with cream as felt it was softer with the papers i wanted to use.  As im dangerous with a craft knife i used a square die to cut the mechanism aperture, marking where i wanted it with pencil as you only need to cut half way...... I then cut and adhered different papers to the sections and glued the 2 parts together.  
I die cut another square the same size as the aperture and glued into place, a smaller one from paper.  I die cut, inked and shaped a flower, added it to the flower with a die cut floral circle.  Gem to finish

Showing it open

The inside

a close up of the flower.

Items Used:
paper pad by AltairArt 'mysterious garden'
Square dies
floral circle die
Flower dies
A3 CraftUk ltd cream cardstock
Distress inks citron, wilderness, picked raspberry, seedless preserves


Id love to enter the following with this card:


***

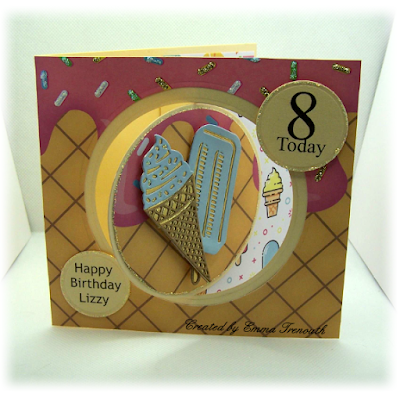
I then made a version for my niece Lizzy's 8th birthday, i found this fun ice cream themed paper in my stash and some ice cream dies too so thought it would be the ideal theme as Lizzy does love her food😁

6x5.5" card.  I made up the card using cream pearlised cardstock and a circle die for the lever action & aperture.  I covered the whole front of the card with the ice cream paper after cutting a circle out of the middle, i then used that circle to line up on the middle topper section.  I die cut and layered the ice creams using kraft, gold & pale blue card.  Computer printed sentiments die cut into circles, glued into place.

Showing it opened up, i used a different ice cream paper on the inside panels

To finish i added lots of glitter glues to the ice cream sprinkles and around the toppers

Items Used:
Old Papers from B&M
Spellbinders Circle dies
Itricut ice cream dies
Cream pearl cardstock
Kraft, blue & gold mirror cardstock
Ranger stickles glitter glues

Thank you all for stopping by once again.  I hope you all enjoy the end of the week and weekend.  Hugs Emmax