Followers

Showing posts with label brick embossing. Show all posts

Wednesday, 12 February 2025

Mums birthday

Good Morning everyone

Today Im sharing the card I made for my mums birthday.  Ive gone full on flower power this year with these lovely hydrangeas I built up.  By using brushos & pixie powders to colour the cardstock I was able to get a quite realistic colour for some of the bushes my mum has in one of her gardens.  Growing up I always remember my gran wanting Blue ones, every blue one she planted turned Pink and my other gran (nan) always wanted a pink one but they all turned Blue, even when adding various additives to the soil they would eventually change colour😁

7x7" scalloped card base.

I first coloured 3 sheets of A4 card with brushos and pixie powders and let dry.  Once dry I die cut alot of the petals, I then shaped the petals with an embossing tool to give them more concave curve.  I die cut a circle from the same background so that I could build up my flower - by using the same colour as the flowers any gaps aren't noticeable.  I then got building, starting from the outside working in, adhered the outside ones flat and using more glue gel on the inside ones to get more dimension and a more realistic shape.  Each die cut petal had a hole in the centre so i added a drop of lime green stickles glitter glue to hide that.  I made the flower heads in 3 slightly different sizes.

I die cut lots of leaves from green coloured brusho card.  I used a brick embossing folder onto a piece of white card slightly smaller than the card front, lightly inked over it with peeled paint & dried marigold distress ink and added it to the front.  I then arranged the flowers and leaves until I was happy with the look. 

To finish I die cut 'mum' from the same card as the flowers and added.


This shows the colour better, with the pixie powder there is a shimmer when the light hits it 

With the brick embossing folder technically i used the debossed side as the bricks should be the embossed and the cement debossed but that side of this embossing folder never looks good to me for some reason so i always use it this way round.

Here you can see the dimension better

Items Used:
Hydrangea die - brand unknown as I bought secondhand 
Crafters companion 8x8 brick embossing folder
Crafters companion alpha dies
CraftUK ltd 7" scalloped card blank
Ranger Stickles 'lime'
Distress Inks 'peeled paint, dried marigold'
Brusho Powders 'Ost blue, purple, rose, lime & leaf green'
Cosmic shimmer pixie powders 'plum'

 Thank you for stopping by once again and taking the time to visit and comment.  I appreciate both.  Happy Crafting. Emmax

Id love to enter the following:

Thursday, 20 July 2023

Its Summertime

Good Morning everyone.

The Katzelkraft stamp set i used for my Christmas in July cards had a 4th door stamp which was more square than the others so didn't fit my arch shape so here Ive made a summery card with it instead. 

6x6" white card base.  I first stamped the image and watercoloured with distress inks, i added glossy accents to the little window & the lanterns and glitter to the flowers.  Once dry die cut into a wonky stitched square.

I took a piece of white card, inked one side with iced spruce & shaded lilac distress inks which id used to watercolour some of the image and added to one side of a brick embossing folder and ran through the machine.  On putting the card together I think i should have inked the other side of the folder so that the bricks were white and the mortar grey, but i think as ive covered most of it up I can get away with my wall building error😀

I die cut ivy from card previously inked with green brushos & pixie powders so it has a subtle shimmer in the light.  I inked up a scrap of white card with raspberry & persimmon distress inks which i used to watercolour the flowers on the topper, once die i die cut into small flowers .I attached my door topper with glue gel and then arranged the ivy and flowers.  I added glitter glue to the flower centers for a bit of shimmer.

Stamped sentiment to finish.

Just a close up

Items Used:
Katzelkraft stamps 'les portes'
Clearly besotted stamps 'seasonal sentiment' 
Crafters companion 8x8 brick embossing folder
Ivy & flower dies
Distress Inks: Iced spruce, shaded lilac, twisted citron,peeled paint, picked raspberry, ripe persimmon, evergreen bough
Brushos
Cosmic shimmer lime pixie powder

Thank you all for stopping by once again.  Hugs Emma


Id love to enter the following:


Thursday, 19 September 2019

Away in A Manger

Good Morning everyone.

Today im sharing my first set of Christmas cards.  I went with a stained glass feel and the traditional Nativity scene.


6x6" cardblank.  I first die cut the scene from black cardstock and attached a square of acetate behind.  I then used Imagination Crafts Starlight paints on the back of the acetate with a sponge, it needed 2 layers but the paint dries fast.
 I then cut a piece of white cardstock smaller than my cardfront and die cut the nativity die from the middle of it so that i had a 'window'  recess to sit my black one back in.  I then embossed the panel with a brick design embossing folder.  I attached this panel over my nativity scene, mounted onto black card and then the cardbase.   To avoid waste i did actually cut my black nativity from the piece of card i used as my 'mat' layer as i knew it wouldn't be seen so no one would know.

I then stamped a greeting and die cut into shape.  I die cut some winter foliage from card painted with shades of green Starlight paints and added underneath the sentiment. 


Version 2, i made 20 and all are slightly different with my stained glass window and a good start to my christmas cards. 


A close up, you can just about see the shimmer from the starlight paints but doesn't really do it justice, in real life the shimmer and shine is amazing. I found i got a smooth effect using a sponge to add the paint rather than a brush.  Ive had this die years and remembered why i haven't used it much since the first year - it cuts beautifully but takes ages to get all the bits out as it is a solid die so you have to use a pokey tool to poke each little piece out so very time consuming, even using wax paper or a tumble wipe makes no difference.

Items Used:
Cottage Cutz nativity die
Spellbinders circle & oval dies
Tim Holtz foliage dies
Various sentiment stamps
Imagination Craft starlight paints
Acetate
CraftUk Ltd 6x6 cardblanks
Payper box black cardstock

Thank you all for stopping by once again and all the comments you take the time to leave.  I hope you all enjoy the rest of this week and the weekend.  Emmax


Id love to enter the following challenges:


*****


*****


*****


Monday, 12 March 2018

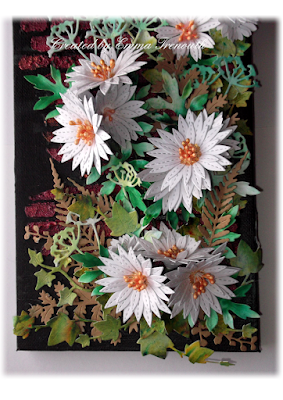
Daisy Mixed Media Canvas

Good Morning all, i hope you all enjoyed your weekend. 

Today i am sharing this Mixed Media Home Decor Canvas that i made for my mum for Mother's Day. 


Box Canvas 16x6" (40x15cm)  After doing the brick background (see below for details) I die cut lots of daisies from white card, made them up, added yellow stamens & florists wires for their stems.  I then die cut various foliage from brusho and inked cardstocks in different shades of greens and ferns from kraft card.  I then slowly built up the layout.


The top half.  I added a lovely big bee metal charm ive had in my stash for years.

The bottom half, i added more foliage and ivy in the bottom as you naturally find at the bottom of a wall


Just close ups. Once it was all stuck on i sealed everything with a matt sealant to keep it all fresh. 


The wall - first i added texture paste through a stencil and once dry i added black acrylic paint over the whole canvas.  Once dry i put the stencil back over and added red and orange starlight paints to the bricks, i found doing it this way kept the black between the bricks better.  I then added touches of green paint to give a kind of mossy effect once everything is added on top. 

Items Used:
Tattered Lace fern dies
Joanna Sheen & Brittania Ivy dies
Heartfelt Aster die set
Stitched Daisy dies
Tim Holtz foliage die
Brick stencil
Imagination crafts starlight paints
Golden Texture paste
Cracked Pistachio & twisted citron oxide inks
Brusho's


Thank you for stopping by and all your visits and comments last week and congratulations on the arrival of my new niece. I hope you all have a good week. Emma 


Friday, 2 December 2016

Hollyhock Shaker Card


Good Morning Everyone, tis chilly out this morning.  So today im sharing this birthday card i made for a wonderful friend, using my all time favourite die, hollyhocks by impression obsession. 


First i die cut lots of hollyhocks from white card and then coloured them with wild honey & ripe persimmon distress inks. Die cut leaves from green card, i then die cut 2 mason jars from white card, uisng a knife i cut out the middle of one and backed with acetate, fill with glitter and mirco beads and added the 2nd one to the back, these i coloured with tumbled glass distress ink.  Brick embossing folder from Stampin Up and woodgrain from sizzix to give the jar something to sit on.  I was sad to see this one leave home but knew it was going to a loving home😎.  

Thank you for looking and all of you wonderful people leaving amazing comments, you make my day. Warm hugs Emma x