Followers

Showing posts with label Stampin up Curly cute. Show all posts

Thursday, 18 January 2024

Jacks birthday

Good Morning everyone

December and January are busy months for birthdays in my family.  These are the 2 cards i made for my brothers birthday this month

While wondering what to do for him, I saw these coffee themed stamps from aall&create in the countryview crafts Christmas advent sale which are perfect as he is a coffee addict for sure. 


A5 card size.  I used soft cream cardstock so its softer than white and stamped in brown ink.  I stamped the coffee cup twice,  one i die cut into the label shape, on the 2nd one I lightly watercoloured the cup with vintage photo and label with twisted citron distress inks, cut out and decoupaged onto the base image with glue gel, putting a curve in the cup. I die cut my card blank using a larger nesting shape and then found 2 pieces of paper in my stash to coordinate, die cut smaller than the base and adhered.  

I splattered some of the vintage photo ink onto the background too. The topper panel i added with foam tape for some dimension.

The stamped image had some flowery words which weren't suitable for my brother so i covered them up with a stamped birthday sentiment die cut into a fish tail banner.  I added some stamped and cut out coffee beans to finish.

Items Used:
aall&create stamps #642 'caffeinated'
stampin up sentiment stamp 'curly cute'
XL nested label die set
Distress inks - vintage photo, walnut stain, twisted citron
Patterned papers
Hammered ivory cardstock

Id love to enter this card in the following:


***


and card 2 I made while i was making my building block fold cards in November (see here), i found this fab monochrome paper in my stash which was ideal teamed up with black and white cardstock.


After making the base card from white cardstock, i matted the paper onto black card and then the base.  To add some interest i die cut barbed wire dies from silver holographic mirror cardstock and adhered to the front left edge and back right edge, sadly the photos don't pick up how it dances in the light.

Die cut birthday sentiment from white card, matted onto larger black circle and a bigger white circle and then added to the front


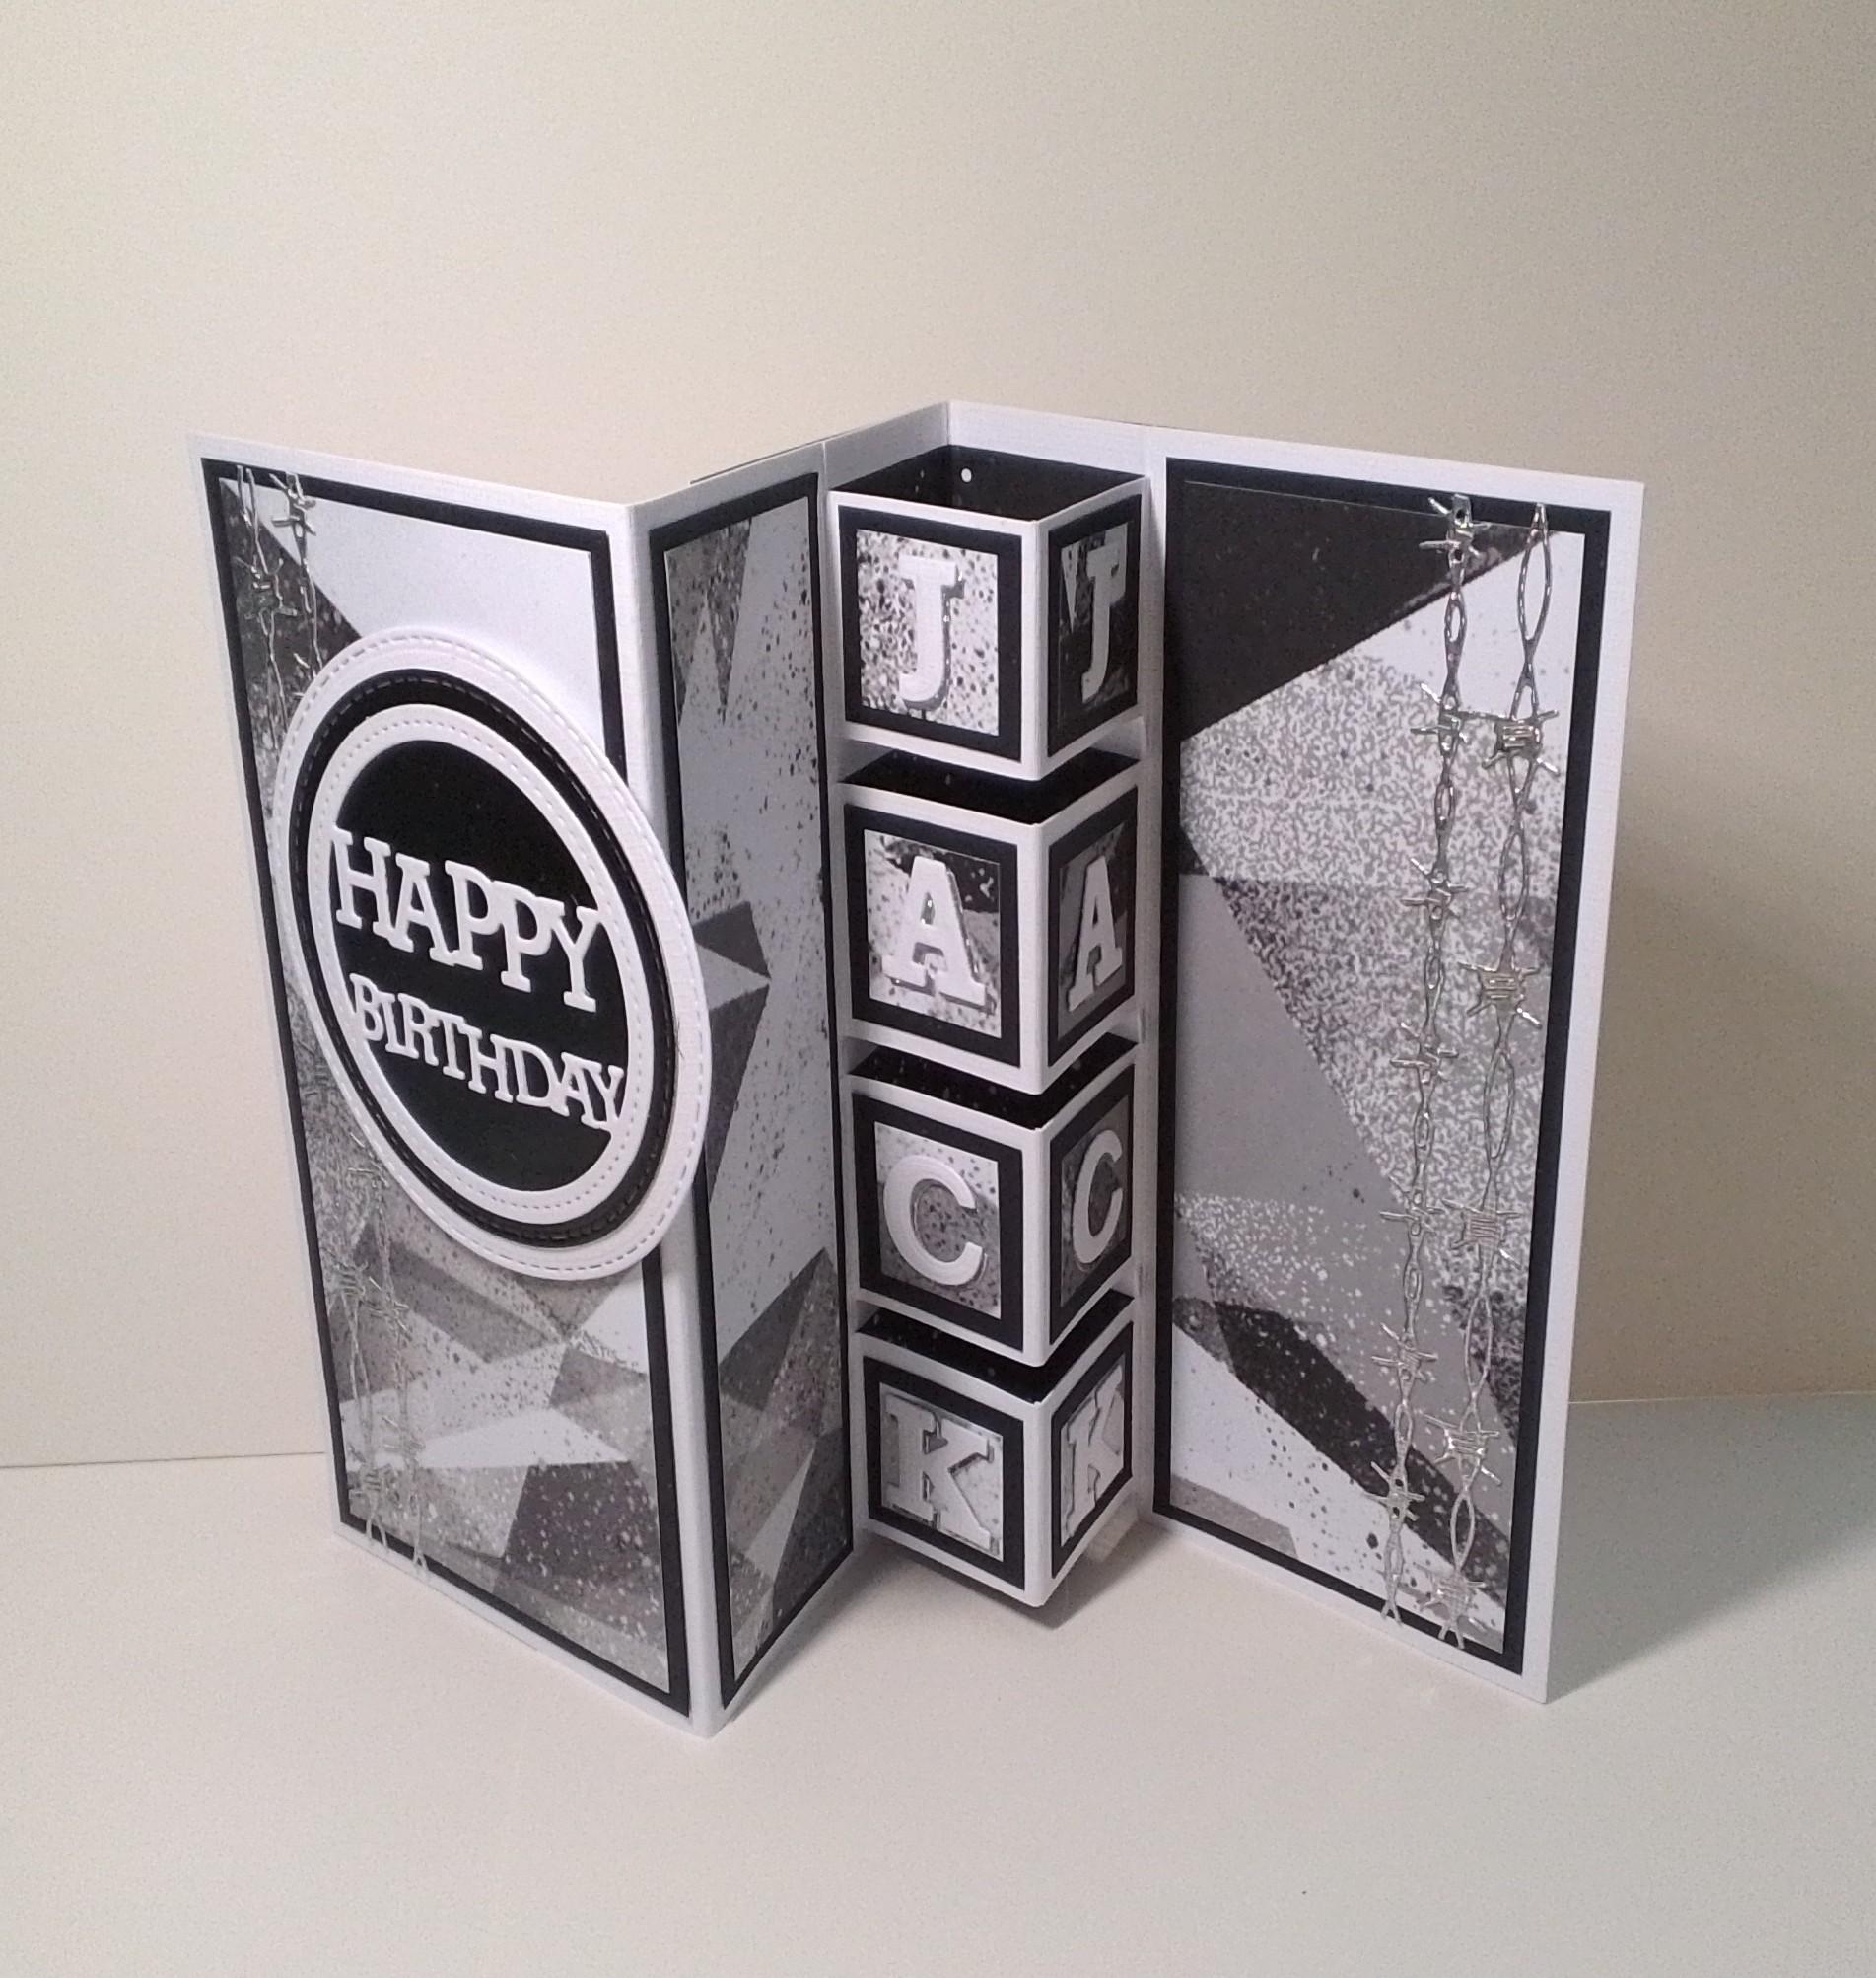
Showing it opened up. I die cut the alphas from white card and the silver holographic and off set them so have the mirror card drop shadow.  Not the best photos as it is much brighter in real life and especially when the light hits the silver holographic mirror card

Items Used:
Memory box alpha die set
Birthday sentiment die
Cheerylynn barbed wire die set
Patterned paper
Black & white card
Silver holographic mirri card

Thank you all for popping by once again.  


Wednesday, 21 September 2022

A Waddle of Penguins

Good Morning everyone

Back to Christmas cards today and this batch is using up scraps of inky backgrounds and the fab aall&create penguin stamps.

Ive already put these away but  I think the size was 5x8".  I took a piece of card smaller than the cardbase and stencilled a light pattern with distress inks shaded lilac, cracked pistachio & evergreen bough and added some splashes of the same inks.  Then i used a very old texture paste which has a gold shimmer when the light hits it and put through a snowflake stencil and put to one side to dry.

I stamped and cut out the penguins.  I matted my background onto black card and then the base & stamped my sentiment onto a strip of card, matted onto black and added across the bottom of the card with foam tape.  I then arranged my penguins and adhered with pinflair glue gel.


You can see the soft stencilling in the background here

The texture paste has  a lovely gold shimmer when the light hits it

Version 2

Version 3

and version 4 - in all i made 20 variations 


Showing them all stamped up onto left over offcuts of backgrounds made using various inks, brushos, oxide inks, pixie powders

and them all cut out - for me i find cutting out more relaxing than colouring in. Usually when cutting out, I cut upto the line but in this case i found they stood out more against the background by leaving a small border of the colour around them.

Items Used:
aall&create stamps 'penguin #604' & 'frosty #603'
Stampin up sentiment 'curly cute'
Funky fossil stencil - snowflakes
Woodware mini stencil - swirl
Creative expressions texture paste
Distress Inks shaded lilac, cracked pistachio, evergreen bough
CraftUK ltd smooth white cardstock

Thank you all for stopping by.  I hope you all have a good week. Hugs Emmaxx

Id love to enter the following:


***

***

***

***


Monday, 17 January 2022

Thank yous

Good Morning everyone

For christmas i was given 3 A7 aall&create stamps which i decided to use for some thank you cards, the first one was for the lovely person who gave me the stamps and i decided to use all 3 on one card.  I used ombre ink pads which are great for adding instant interest.


On small off cuts of white linen card i stamped the 3 stamps with ombre ink pad, die cut with stitched rectangle dies, mounted onto gold mirror card and added to a white base card with foam tape.  Sentiment die cut from white and turquoise card to finish.


Small cards approx 3x4.5" - ideal for using up small off cuts of white card from making card bases.  Here i added a snippet of green pixie powdered cardstock that i had lying on the desk.  Stamped sentiment to finish.


Here i stamped with black stazon ink onto previously alcohol inked acetate, stamp on the opposite side to the alcohol ink and then on the side of the alcohol ink i used a clear alcohol blending marker pen and removed the colour from around the flowers.  Added a white card frame and added to the base with foam tape.  Sentiment die cut from gold mirror card to finish

I did this one for my uncle as i thought it had more of a masculine feel, again stamped onto a previously alcohol inked acetate panel.

Items Used:
Aall&create stamps #556 'leaves'  #557'open leaves' #602 'rippled blossom' 
Stampin up curly cut sentiment stamps
Cheerynlynn thank you die
MFT pierced rectangle dies
Kaliedacolor ombre inkpads - 'desert heat' 'caribbean sea'
Tim Holtz alcohol inks

Thank you all for stopping by once again.  Ive been out with a mega migraine so will get around to your blogs soon.  Keep warm, stay safe.  Hugs Emmaxxx


Thursday, 6 June 2019

Triangle Trees

Hello everyone, thank you for stopping by once again.  

Now i normally don't even think about Christmas cards until August/September but when i was playing the other day with my triangle dies and my marbled papers i was laying out the triangles in various ways to see what i liked and one of them looked like a tree i thought, so made a couple up.I think come September i shall make a few more. 


5x7white cardbase.  I die cut a mixture of the small and large triangles from my marbled paper and the fancy top layer from white card and adhered together.  I cut a piece of white card smaller than the card front and dry embossed with a snowfall EF, i splashed on some of the same inks i used on the marbled paper.  I layered onto a piece of purple card and then the cardbase. 

On a piece of white card i die cut a curved border edge die and a stitched line die.  I stamped the sentiment using colbalt archival ink.  I then die cut a few stars from the little left over pieces of marbled paper. I added one of the larger stars on top of the tree.  A few touches of glitter glue to finish. 


A close up showing my pink, purple & blue marbled paper better.


Second version using marbled paper in blues & greens.  

Items Used:
Altenew Shattered Triangle die set
Star dies
Stitched Curved border edge dies
Justrite sentiment stamps
Aquatint inks
crafters companion snow embossing folder

If you missed my marbling fun, you can find the details here

I hope you all have a good end of the week and weekend. Emma


Id love to enter the following:


****


*****


Thursday, 25 April 2019

Black Cats

Good Morning everyone.  

Today im sharing a Male birthday card i made for my parents elderly neighbour Harry.  He eats his evening meal each day with my parents and joins in alot of family gatherings so is sort of an 'adopted' grandad to us.

Harry has a black cat that was dumped on the farm as a kitten, the cat is also called Harry, Harry the man is very eccentric and all his cats have been called Harry too, so this cat now is Harry the 6th or some such.  My parents also have male black cats, one rescued at 1 yr old after it was abandoned.  Anyway Harry's cat spends his life patrolling the perimeter to keep all others at bay.  My parents cat just ignores him.  So for this  card for Harry the man i went with a black cat theme for a change.  

Unusually for me this is a one layer card, i wanted to cut the paw prints into the base card so it peeked through into the insert.  

6x6 white cardblank.  I first stenciled the paw print, but as my stencil is a heart shape and i didn't think that was apt for Harry i also used a circle die to cut a circle out of a piece of scrap card for a mask.  I taped down the heart stencil on the base card and then placed the circle aperture piece over the top and then brushed on my oxide inks.  This meant i kept the paw prints in a circle shape.  I then removed the stencils, replaced the circle mask and lightly inked around the outside edge of the circle.  Hope that makes sense?

I then used my 2nd paw print stencil to add some paw prints around the outside edge of the cardblank and then again lightly inked around the outside with the same oxide inks. I then die cut the paw print die into the middle of the card.  I stamped the greeting.

I then stamped two of the crazy cats onto white card and coloured with grey & black distress inks.  I used green oxide ink for their eyes.  I then fussy cut them out, after gently shaping their bodies i attached them to the card front with glue gel.  

I used some black patterned paper for my card insert so that where it shows through the paw print apertures you see the black paw prints.  I added a little strip/off cut down the left hand edge of the card front to tie it together a bit. 


A close up, trying to show peeking through the paw prints into the inside of the card and my black paper insert.  I use a beautiful double sided paper from the 2019 range of paper pads at B&M - so recommend them for quality.  Ideal for boxes and envelopes too.


This shows the 2 plastic paw print stencils and the circle mask i made to turn the heart into a circle.  Of course you can use this method to turn any stencil into a circle shape if you only want part of a stencil.  Or try die cutting another shape. 


Items Used:
Tim Holtz Crazy cats mini stamps
Elizabeth Crafts 'hearts & paws prints' die '1563'
Paw print stencils
Circle die
Stampin up sentiment stamsp 'curly cute'
Oxide Distress inks - twisted citron, cracked pistachio, peacock feathers
Crafts You Create papers (B&M) 12x12 paper  'B&W'
CraftUk Ltd, white card


Thank you all for stopping by and waving hello to all my followers via email, thank you to all of you who sent me beautiful Easter cards, all unique creations. I hope you enjoy the weekend whatever you get upto.  Hugs Emma


Id love to enter the following challenges please:


***


Thursday, 5 October 2017

A Mixed Medley of thank yous

Good Morning all.  

Thank you for the welcome back and all your views and comments on mondays card.  Today im sharing a few thank you cards i made recently.  All very different. 


This first one was to thank a good friend who sent me lots of lovely crafty goodies to 'play' with.   First i stamped the lily twice, once onto the topper and the 2nd one to cut out the flower and decoupage.  I coloured it all with Wink of Stella pens and added some splats to the background.  I die cut using tattered lace square die (you don't want to know how long ive had them without using!!!)  Matted onto a Turquoise 6x6 card blank.  Die cut thank you and gems added.


Close up catching the mica in the wink of stella pens.  I also added highlights with a white gel pen. 


*************************************************


This 2nd one was is a thank you for looking after the cats while i was away,  I made 2 the same as Tilly goes to the farm to stay when im away and the other two stay at home being looked after. 


I first die cut the collage circle design then using my stamp platform i lined up the cat stamp so that its front paws were over the die cut as it its was hanging on, using the stamp platform i could stamp over the cat 3 times to get a lovely dark silhouette on the linen card. I then stamped the greeting. Due cut into a square and mounted onto a 6x6 black pearl cardblank. 


Close up, i slotted a scrap of orange card behind the 'aperture' 


****************************************


And below a simple CAS thank you to thank my neighbour for feeding my hedgehogs while i was away.


  First I die cut the floral border, mounted on foam pads over a scrap of brusho/pixie powder card.  Glitter glue to finish. 3x5" card


Close up showing the die cutting better.


Items Used:
Penny Black Slapstick Tiger-Lily 
Kuretake Wink Of Stella Pens
Tattered Lace 'Decorative Edge Square' dies
Katzelkraft MINI Catz 002 stamp
Poppystamps ring collage die 1760
Floral border die - make unknown
Stampin up 'curly cute' sentiment stamp


Thank you for stopping by.  I hope you have a lovely day. Emma 


Wednesday, 13 September 2017

Floral Thank you cards

Good Morning all, i hope its not too windy where you are. 

More thank you cards i made after my birthday. 

The first ones using the rose die but this time i cut it straight into the card front, and added a pattern paper insert to show through. 


5x7 white cardblank.  Rose die cut direct into the front, then i cut a frame from co-ordinating colour cardstock.  Stamped greeting die cut into an oval and a matching butterfly. 


close up showing the aperture/die cut


Another 2 versions


Showing how it looks side on and the insert


4th version, completely flat for posting


and onto a couple of little cards


4x4 little cards, i first die cut the one flower into the blank to create an aperture, then cut the overlay in a contrasting colour.  Cut 2 more flowers and layered up.  Stamped Greeting.  I add a peachy insert to show through the aperture.  

Just showing it open and the aperture


The same but different colour combo.


Items used: 
Brusho's
Cosmic shimmer pixie powder
Stampin up 'curly cute' sentiment
Chocolate Baroque 'pretty poppies' (merci sentiment)
Spellbinders oval and butterfly dies


You might also like

Thank you for stopping by and taking a peek.   Emma