Followers

Showing posts with label memory box dies. Show all posts

Monday, 18 August 2025

WLS Aug #2 Flowers - foxgloves

Good Morning everyon

Time with our mid month inspiration for We Love Stamping where the theme is 

FLOWERS
So a nice easy theme this month, but we always have the anything goes option too as long as you use stamping

Ive made a little wall hanging picture using strong printed acetate from Stamperia as the base

A5 size. I first did the background which you can see below with photos.

I then stamped the Pink Ink foxgloves onto white card, watercoloured with derwent inktense penciils and cut out.  I also stamped bee using a stamp set from chocolate baroque and cut out, I did all the stamping using purple ink so its softer than black.

I stamped the sentiment using a paperartsy JFOY cut out and adhered with pinflair glue gel.

From green brusho coloured card I die cut memory box pine foliage border twice, off set and added to the bottom so it looks like the foxgloves are growing out of it. To finish i punched holes and set green eyelets in the top and threaded with green waxed cotton so it can be hung up

The printed acetate has a lovely shine to it and adds a different texture 


I gave the foxgloves and pine border a coat of mod podge to seal them

I first cut the printed acetate to A5 size and rounded the corners with my WRMK corner chomper - I did this so that less chance of injury as its very stiff and corners quite sharp if caught.

I then added torn strips of washi tape here and there - this aall&create tape has similar tones in purples, teal and green.  Then stencilled on foliage in a vintage white matt acrylic paint this helped to break up all the glossy shine from the solid acetate.  I then stencilled on smaller foliage with green and fuchsia dora paint which has a beautiful shimmer to it.  I added some green acrylic paint across the bottom where the foxgloves would be growing out from.  

To finish I edged the whole panel with fuchsia dora paint to frame it 


This is the acetate before use  - clear prints from Stamperia range 'Sleeping Beauty'


Items Used
Stamperia 'Clear prints' 'Sleeping beauty' SBA410
Pink Ink Designs stamp set 'flourishing foxglove'
Paperartsy JOFY stamp set 'jofy14'
Chocolate baroque stamps 'honey bee'
Memory box die - pine edge (very old)
Foliage stencils
Plaid folkart matt acrylic paints
Cadence dora paint - fuschia, green
Derwent inktense pencils
aall&create washi tape #50
ranger stickles 'twinkle'
versafine clair ink 'Monarch'
Mod podge matt


Our prize this month is a fabulous £25 voucher for Personal Impressions which have lots of fabulous goodies to tempt you with


Monday, 31 March 2025

Hollyhocks for mum

Good Morning everyone

Today Im sharing the card I made for my mum for Mothering Sunday.  I used metallic flakes, printed acetate and my very old well loved hollyhock die to make a DL card for her.  Nightmare to take photos of though with all the shimmer and shine!

DL (8x4") white linen cardbase which i lightly inked the edged with cracked pistachio and tumbled glass distress inks.  I die cut a lacy panel from white linen card and added to the front.

I adhered a sheet of double side adhesive to white card and on the other side rubbed in the metallic flakes and then die cut them with the hollyhock die.  I die cut foliage from pale blue and pearl teal cardstock.

I have packs of 'clear prints' from stamperia which is very very heavy weight acetate with beautiful printed images, so I die cut a jar from one fo them.  Now this acetate is so thick the die doesn't cut right through but enough that i could then finish cutting it with scissors and get a clean edge.  I added this to the card front with pinflair glue gel and then got arranging the flowers and foliage. 

I added a torn scrap of green paper under the jar to 'ground' it

Side view of the dimension.  I added curve to the hollyhocks with a ball tool

The acetate jar has a lovely shine which adds interest and another texture.  I debated where to put a sentiment but decided against it, I know mum will have this on display for months so doesn't really need a sentiment on the front. 

Here you can really see the colours better, the metallic fakes really are shimmery and gorgeous but I do so hate them! lol

No matter how hard I try every time Ive used guilding flakes or metallic flakes they go everywhere and stick to everything - for weeks afterwards they turn up somewhere, for days the cats had red speckled fur - one even had a red sparkly nose for a few days,  the hoover has a lovely coating of them where they stuck to the warmth of the outside plastic areas.  So I did use the whole pot up in one go adding to adhesive sheets to get it over with - I still have them to use.  I was give the pot as a Christmas present and the effect if beautiful with the different colours in them but yep a product I still Hate to use😒

Items Used
Cosmic shimmer metallic flakes
Stamperia clear prints
Impression Obsession hollyhock die
Jar & foliage dies
Various printed papers 
Distress Inks - tumbled glass, cracked pistachio

Thank you for stopping by once again.  I hope you all have a great week. Emma


Id love to enter the following


Monday, 24 February 2025

Kitty-Bea bunting

 Good Morning everyone

This week my 2nd youngest niece is 7.  At the moment she is really into garden birds so instead of a card I made some bunting with her name on and lots of lovely birds. 


Trying to get a decent photo of this not been so easy.  This is it hung up - ive left the ribbon long on one end so that they can adjust it if need be for hanging up, then they can trim the excess.


As Kitty-Bea has an unique name its always nice to make something with her name on it.  She also has an abstract art style so the funky colours of these digi birds are ideal for her. 

They are Mixed Media Birds clipart from etsy shop Double Helix digitals   I printed onto digital printer paper, cut them out and sealed with mod podge.  I flipped some of them before printing and printed at different sizes so that i could have them looking at each other like a pair etc...

I made a box using feather printed kraft card and used a tag I had left over from the bunting


I used a couple of beads on the ends of the bunting for some interest. I die cut the cross stitch effect fishtail banner dies from 350gsm kraft card.  I found a very old paper pad in my stash which has some of Kitty-Beas fav colours and went well with the birds. These i die cut into a smaller banner and adhered to the kraft card.  Circles die cut from the off cuts and alphas die cut from white and kraft card, matted together with a drop shadow and covered in glossy accents to give an enamelled finish. 

As well as the panels with the alpha's on I added a blank panel each end so i could add a bigger bird.  I added bronze effect eyelets and used organza ribbon to join it all together. 

Ive used different birds on each panel.  Although they aren't real to life colours you can easily tell by the shape and stance of each bird which type they are based on.  Kitty-Bea is lucky that where they live they get alot of different garden birds.
I added a small touch of stickles glitter glue to each bird just to add a little sparkle as what little girl doesn't love sparkle


Items Used:
Double Helix Digitals - Mixed Media birds clip art
MFT Xstitch fishtail banner die set
Stitched circle dies
Memory box Alpha dies
Very old paper pad from create&craft
Craft UKltd kraft card
Ranger glossy accents
Stickles 'diamond'

Thank you for stopping by once again and all your previous comments, I really do appreciate them all.  I hope you have a good week.  Emmax


Id love to enter the following:


Monday, 11 February 2019

Doing the Spring Fling

Good Morning everyone.

After getting these fantastic zinski art sheep stamps for christmas i decided to do a little dimension box frame picture for my wall to replace my penguin one i made.  

I used a mix of stamping and die cutting to build my spring scene.  Finished size is 10x8"


Taking a piece of card 10x8 in size i added blue ink for the sky.  On another piece i used green inks, i die cut this one with curved border dies into 4 pieces, i then added some more detail with a grass & foliage stencil and inks.  I layered these bits up onto the base panel.  From brown card i die cut a fence and tree.  On the tree i used starlight paints in green for the leaves and dots of pink to act as blossom.  I added a bit of green to the fence to age it. 

From a left over scrap of orange/yellow inked card i die cut the sun. From more inked snippets i die cut lots of little birds and rabbits.

I stamped the sheep onto white card and simply coloured with derwent inktense pencils, i like using these on home decor projects as once water set they are permanent & colourfast, so ideal for then working over the top of, also the vibrancy lasts well.  Anyway i coloured them in vibrant colours, fuzzy cut out.  I cut out second heads which i added with glue gel to add dimension. 

I arranged them into my field scene.  As i had cut the arms and legs off them (ouch) i doodled some simple arms and legs for the front two and cut out and arranged on my sheep - The left one is sure doing a swinging fling😀 

I stamped the fun words that came with the stamps, cut out and arranged at the bottom.  I die cut using alpha dies the words spring fling from white foam.  I then arranged all the little birds and rabbits to finish. 


I had also added glossy accents and glitter highlights to the sheep.  


This one just shows the picture in its box frame.


Its a riot of colour and fun. I love seeing all the animals and birds coming out for Spring, even when you let the cows and calves out into the fields after a winter indoors they kick their legs and gallop and frolic full of spring fever. 

Items used:
Paperartsy Zinski art stamps 'ZA26'
Memory box tree, birds, fence die
MFT sun die
IO rabbit die
Curved border edge dies
Alpha dies
Distress inks
Oxide inks
Brushos
Imagination crafts starlight paints


Id like to enter the following:


do-allkreatives/2019/02/26-mixed-media - different inks, paints, foam


Thank you all for stopping by and all your amazing comments last week.  I hope you all have a good week. Hugs Emma


Monday, 1 May 2017

Make My Monday #45 - May flowers

Good Morning everyone, welcome to May. 

I hope you all had a lovely weekend. 

Today is the start of a new challenge over at Make My Monday
The theme for this fortnight is MAY FLOWERS, so if you fancy joining in and to see the rest of the design teams work do pop over.  

As the bluebells are in full flower here at the moment i decided to go with them as my May Flowers.  As well as bluebells i also have white and pink bells in flower at the moment.


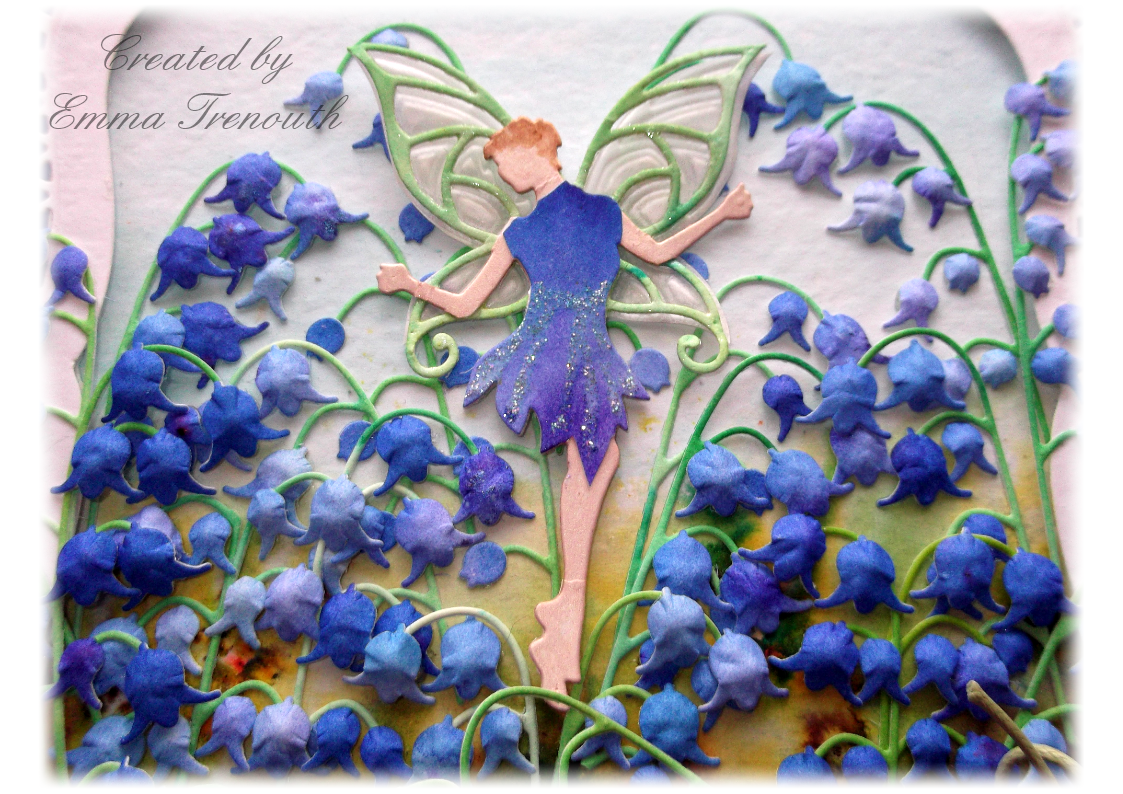
To start with i coloured A4 watercolour card with brushos, one with blues, another with greens and the background panel with a very pale blue sky and grass.  I then die cut lots of stems and flowers and shaped them using a ball tool and foam mat.  I then die cut my fairy from white, green and blue brusho card and paper pieced her so that she matches the colours of the flowers.  

Then using spellbinders grand decorative and plain label's 1, I  die cut the card blank and frames from white and blue cardstock.  I mounted the inner white frame die cut on 2 layers of foam so that i had a nice recess to sit the bluebells into.  Computer printed sentiment die cut into shape, silver eyelets added and ribbons and twine added.  Glitter glue highlights to finish.  8x8" in size. 


Close up, i also added vellum behind the fairy wings, she looks to me like she is dancing among the flowers


Another close up.  To build up the depth of flowers i glued a few on and then let them dry, adding them at different heights and angles makes them look fuller and also laying some on top of others.   


Just to show that it does stand up.  

Items used:
Spellbinders grand labels 1 decorative and plain, 
Spellbinders Fairy Cierra S2-103
Memory box 'Arched stems 98842' & 'Fairy flower drops 98844'
Sizzix 657556
Brushos, stickles 'stardust' 


So if you fancy finding out more or joining in then please click the link


Thank you for stopping by and to all of you who popped by last week with comments.  I hope you all have a wonderful week and enjoy your May day bank holiday. Emma