Followers

Showing posts with label Vellum. Show all posts

Sunday, 4 January 2026

WLS Jan #1 - something new

Good Morning everyone and welcome to 2026

I hope you all had a good Christmas and wishing you all a Happy & Healthy New Year.   All those months of build up to Christmas and its over in a flash


Its time for the first challenge of the year over at We Love Stamping and the theme is fairly simple 

SOMETHING NEW
So could be new baby card, happy new year or in my case a new stamp set


I bought this stamp set purposely as the girl looks exactly like my oldest niece Sophie, she is super tall and legs like bean poles with long flowing hair so I thought the image would be perfect for her birthday card.  She was 14 in December.


Card size 6x5"     I found a funky paper pad in my stash that is perfect for a teenager and predominately Sophie's fav colour of greeny blue.  To make the most of the papers I decided to do a fancy fold.   

Black card base - I simply folded the front of the card in half back on itself. I cut the papers to size for each panel, edged with a black pen, matted onto solid teal paper and then the black card base. I added border strips of the paper across the front to break it up a bit.

 I stamped the girl onto white card, one of the pink papers and one green paper and paper pieced the top and skirt onto the white version.  I coloured her hair with alcohol markers and used a satin alcohol marker for her skin - Sophie has very very pale skin - like me - they used to say Id been moon bathing!๐Ÿ˜. I then cut around the image leaving a white edge, which I don't normally do but in this case felt it would help the image stand out a bit against the busy patterns.

Die cut the sentiment from pink paper and added a drop shadow die cut from the black, this i matted onto a vellum circle.  Gel heart stickers added to the corners to finish.
Here she is...Sophie is expressive with her hands also so loved that the image had attitude with her hands


I used a vellum circle to add the sentiment as it just softens the busy pattern enough to help the sentiment stand out but doesn't actually hide any of the paper.  Sophie likes writing affirmations so the paper is ideal for her....I knew Id kept this paper pad 10+yrs for a reason....eventually the perfect occasion comes along๐Ÿ˜

And the back of the card a place to write, I took a piece of solid pale pink paper and stamped the sentiment and added off cuts of papers used on the front to the bottom to tie it all together.

Items Used:
 Jane Davenport stamps CEJDCS003 'Dreamy days'
woodware birthday sentiment stamp
Birthday sentiment die
Circle dies
6x6 Paper pad My Minds eye 'Jubilee - wild berry' (very old!)
Vellum
Black cardstock
gel heart gems


We have these fabulous prizes for the lucky winner
Various dies from Tonic - may vary to picture

A voucher for overseas winners

So hop over to We Love Stamping to join in with your stamped creations and be in with a chance of winning.

Thank you for stopping by. Emmax


Id love to enter the following:

**

**

**


Friday, 7 March 2025

Creative Artist March - Bee Awesome

Good Morning everyone

Its time for a new challenge over at Creative Artist Mixed media blog where its anything goes with mixed media

Ive decorated a little mdf hexagon and gone with a summery bee theme...I did see a couple of honey bees out this week in my garden so things are beginning to warm up for them.

Approx Size 6x6"

See below for how i did the background.  My bees were stamped onto white card and the wings onto white vellum.  I watercoloured the bees bodies and cut out, i cut out the wings from the vellum and adhered below the bodies to hide the glue.  I curved their bodies and adhered into place with pinflair glue gel to give them a 3d appearance - leaving the wings free

Stamped sentiment onto white card and matted onto black, after alot of arranging and trying out i decided it fitted best in this corner and trimmed the edge to fit the edge of the hexagon.


I first added texture paste through a hexagon stencil, once dried i added acrylic paints - yellow, green & fuchsia pink. 
Once dry I dried brushed on white gesso

and then a light layer of fuchsia pink cadence dora paint which has amazing shimmer to it.  Im trying to step away from always using my gold tone finish.  I went with pink as a good contrast to the yellow of my bee

I had some scraps of mirror card that i had coloured with green and pink alcohol inks which fitted the tone here perfectly - but a real nightmare to take a decent photo of mirror card - trust me in real life it is lovely and bright!  I stamped the little honeycomb stamp onto it with black stazon ink, cut out and adhered. They catch the light adding another texture & dimension to the finished project.

I used a grey inktense pencil and added shadow around the hexagons on the background to really make them stand out.

'Bee Awesome' stamped onto white, cut out, matted onto black and added after working out best placement with the bees - this took longer than it might have!  

When trying to work on layouts i will often adhered it all with a little repositionable tape on the back and stand it up on my desk so I can keep looking at it - this is especially good when something isn't quite working.....when the answer finally arrives and usually it is only a little thing that can take a project from not working to Yes thats it! 

Items Used:
Pink Ink stamps  - 'queen bee'
Chocolate Baroque stamps - 'honey bee'
funky fossil mdf hexagon
funky fossil hexagon stencil
texture paste
Cadence dora paint
pebeo acrylic paint
papermania white vellum
silver mirror card
alcohol inks - pink & green


Do hop over to Creative Artist Mixed Media to see what the rest of the DT has created and to join in

My brother took our mum & I to 'The lost gardens of Heligan' this week, it was a beautiful spring day and quite a few bees were out among the spring flowers and with all the birds chirping it was lovely.  If you are ever in Cornwall its definitely worth a visit.     

Thank you all for stopping by once again.  Emmax


Id love to enter the following:


Saturday, 18 May 2024

Old Bear

Good Morning everyone

Mid way through may we have another vintage make for we love stamping or you can go with the anything goes option

.   I wanted to go completely different to my first card and looking through my stash had this lovely old bear which reminds me of my teddy bear as a child so i went with muted colours, old script, torn paper & vellum for a vintage vibe.

7x5.5" cream card base - I went with cream as softer for a more aged feel.  I watercoloured the bear with distress inks ' dusty concord, stormy sky & forest moss' and a little 'black soot' for shadows, then cut him out. 

I found this old script paper in my stash and tore around the edges for it to fit my card and blended the same distress inks around the edges and then adhered to the card front. I then tore a piece of vellum big enough to fit the bear and added this to the card with a little scrap of the script paper.  I then gently curved the bear and added with pinflair glue gel. 

The bear saying came with the stamp so i cut it out, lightly inked, matted onto some of the cream card and added to the top left corner with a little blue button to finish.

Just a close up on Mr Bear, you can see the vellum behind him better here


Items Used:
Pink Ink designs stamp 'bear hugs'
Papermania script paper & vellum (very old!)
Distress inks - dusty concorde, stormy skies, forest moss, black soot
cream cardstock
blue  button

Thank you for popping by once again.  I hope you all have a good weekend and upcoming week. Emmax

Id love to enter the following


Tuesday, 30 April 2024

Vellum butterflies

Good Morning everyone

After making my last card i had some left over pieces and off cuts so decided to use them up on 2 little cards.

4x5" cream card base.  I layered a peace paper onto the base.  I then tore a piece of the printed vellum, layered onto a piece of torn cream card by gluing the ends of the vellum behind the cream card so no adhesive on show, then matted onto a different printed paper and then added to the left hand side. 

I die cut the 3 lacy layers of the butterflies from the printed vellum and the base layers from more cream card and added to the card with just a dab of pinflair glue gel under their bodies so the wings are free.  By adding the cream card behind the patterned vellum it helps keep the colours clean and crisp. 

Stamped sentiment in grey to finish.


Card 2
4x4" cream card base.  I added 2 of the papers to the base, the peach one on an angle so you can see a bit more of the lovely pattern on the black one.  I tore one edge of a piece of vellum and pale peach paper and added to the left edge with another piece of grey paper - using up all the off cuts

I had die cut the hello sunshine die from the middle of the black paper i used for my first layer on the card - a good way to make it go further and no one would know as its completely hidden! I then matted this onto a larger circle die cut from more of the cream card and added to the front with glue gel.  Butterfly die cut from vellum matted onto cream to finish. 

Items Used:
Kanban paper pad & velum 'Apricot dreams' (very very old!)
Studio light 'just lou' dies - Butterflies
Hello sunshine die (memory box?)
woodware sentiment stamp 'Curly greetings' FRS850
Cream cardstock

Thank you all for popping by my little crafty space in blogland.  I hope you all have a good week. Emmax


Id love to enter the 1st card in the following

*

*

*


Friday, 26 April 2024

Creative Creases


 Good Morning everyone

Today im honoured to be a guest designer over at creative-creases-challenge


I decided to try a new fold for me a 'double vertical stepper card' which was perfect for using this beautiful peach and grey paper pad from Kanban which ive had for years.  I love with this fold that i get to use lots of the different papers together.  


I made my base card out of cream cardstock - the finished folded up size is 5x5" and it squashes closed to fit into an envelope. The side folds are  1" 1" 2" & 2" and the back panel 5"   but can easily be adjusted to any size.  The band across the middle helps it to keep its shape and easily stand up.

I got cutting up the papers for the panels, covering both the sides of the side panels as they can all be seen when its on display. 

I had some matching vellum so die cut that into a flower, the vellum has gold foil highlights as do some of the papers which is why i went with gold satin card for my die cut leaves - this also helped break up the colour a bit.  I die cut a circle for my flower to sit on and added this to the belly band of the card.  A nice peach pearl in the centre of the flower to finish. 

I stamped some butterflies onto one of the peach papers, cut them out and adhered to look like they are flying around the panels.  I added a touch of diamond stickles to their bodies and wings for a bit of sparkle. 


and the back of the card, i used more of the papers, die cut a circle from more cream cardstock as a place to write the greeting and added a stamped happy birthday in grey ink. I also added another of the smaller butterflies.


Items Used:
Uniko Ltd stamps (butterflies) 'English country garden'
Woodware sentiment stamp 'A birthday moment' JGS718
Kanban paper pad & vellum 'Apricot dreams' 
Craft UK ltd A3 smooth cream cardstock
Crafters companion gold satin cardstock
Stitched circle dies
Leaf die
Ranger stickles 'diamond'


Thank you all for stopping by and please do hop over to creative creases to join in with your fancy folds. Emma

***

Id love to also enter the following:

*


*


Sunday, 31 December 2023

Happy New Year

Good Evening everyone

I hope you all had a good Christmas, due to life and ill health I haven't been able to post for a while so im doing a mass upload of my Christmas cards so that I have a record of them.

Wishing you all a Happy and more importantly a Healthy New Year. 


Christmas Poinsettia's

Using up offcuts of acetate, i had some folded thin strips which i adhered between folded strips of white pearl cardstock - these were also offcuts from making card blanks.  Sentiment stamped with iced spruce distress ink using Lisa Horton stamps 'festive flurry sentiments'Tim holtz tattered poinsettia die used to cut more offcuts of acetate which were coloured with red alcohol inks. 

Version 2 - the holly was die cut from silver mirror card which was coloured with green alcohol inks  Cheerylynn holly die    Gold gems added for some bling.  I used lightly patterned papers for  my inserts which show through the acetate panels


***
Christmas patchwork

Using Lisa Horton 'Diagonal square background' 'LHCCD073'  I die cut lots of little offcuts & scraps from various Christmas papers, green pearl card, red satin card and gold mirror card and paper pieced them together.

Ideal for batch making and very therapeutic to make.

***

Nativity

Woodware 'rejoice' stamp set  I have stamped the image onto white vellum and coloured the back with alcohol markers.  Used DL nesting dies to make a frame and mounted onto a white card blank.  Touch of glitter glue added.

The same but different colourway

***
Winter berries

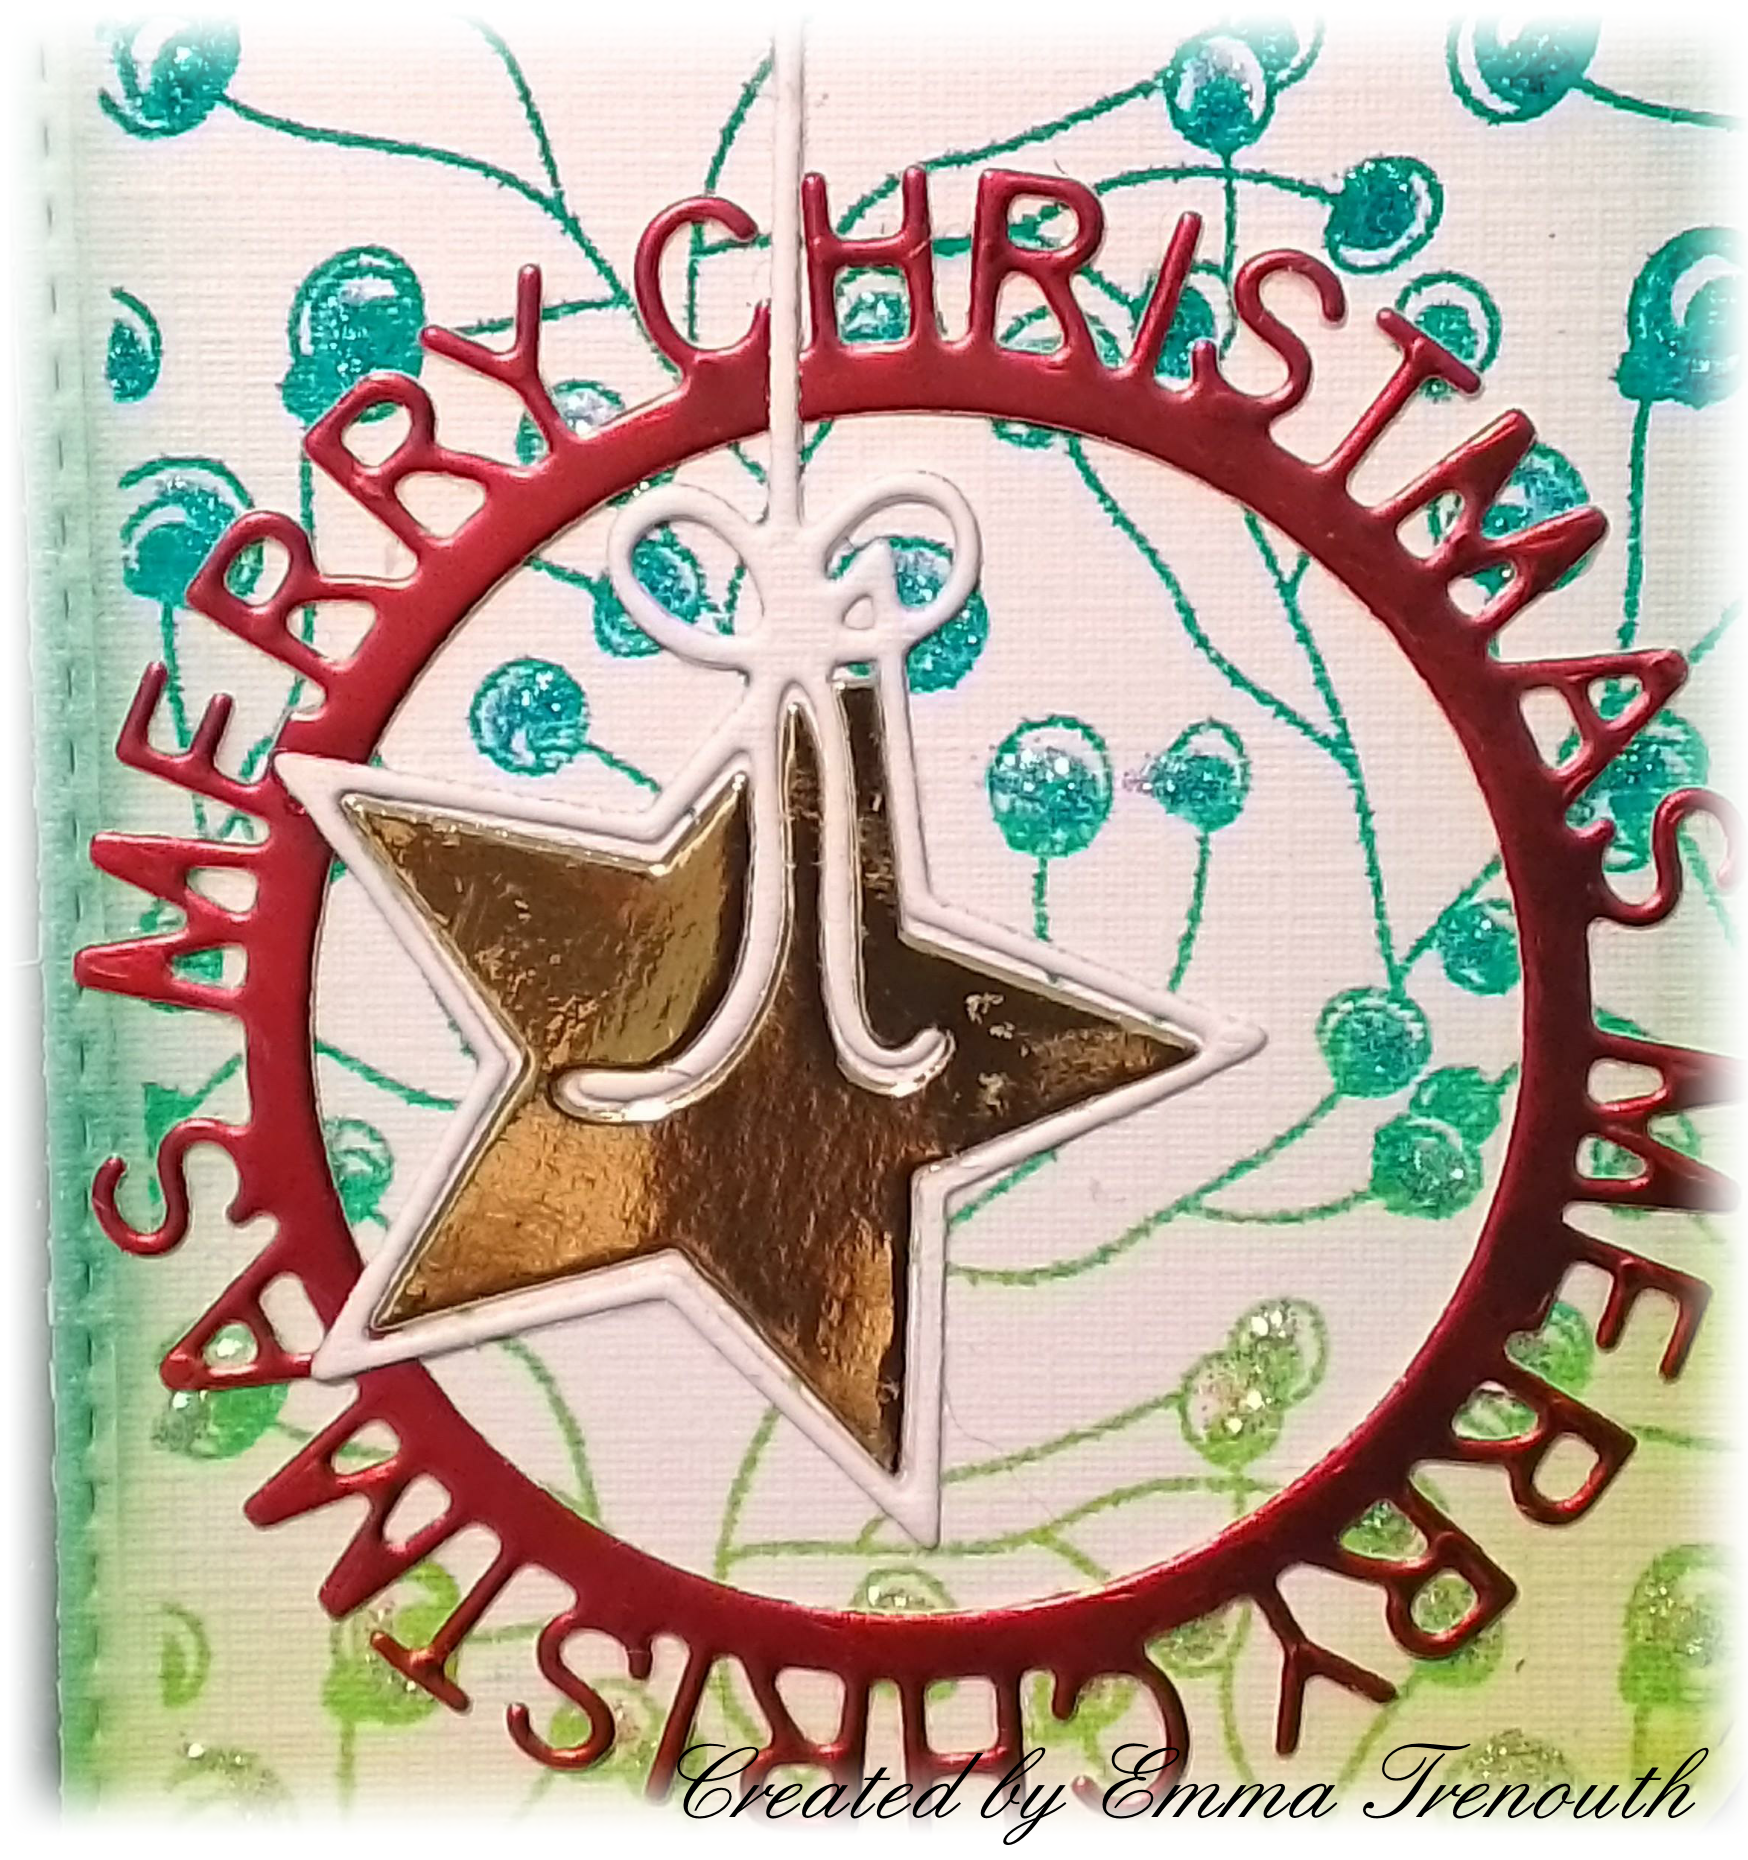
aall&create stamps 'squiggles' #498, MFT christmas sentiment die, star die.   I stamped the berries with a green ombre ink pad and inked the edges with the same ink, matted onto a dark green pearl cardstock and then my white base card.  I then raided my scrap box and die cut the sentiment from red satin card and the star from white and gold mirri card and layered up.  Glitter then added to the berries to finish. 


Sadly the photos don't do the satin & mirror cards justice

This version is gold mirri for the sentiment, red satin for the star outline and gold glitter card for the stars body.

***


Father Christmas


Using Katzelkraft stamps 'reindeer sleigh' 'SOLO144' , hunkydory snowfall acetate I stamped the image and watercoloured with my derwent inktense pencils and cut out.  I used an Ivory violet pearl cardstock for the base, frames and sentiment.  Using a Christmas paper pad from the works (called let it snow) for my inserts which also acted as the background showing through the snowfall acetate on the front. Sentiment is an old magazine freebie which i stamped with a blue ink so softer than black. 

Different colourways

Thank you all for popping by.  I look forward to getting back into blogland and seeing all your creations this year.  Happy Crafting for 2024! Emmax