Followers

Showing posts with label interactive card. Show all posts

Monday, 20 February 2023

Fluttering butterflies

Good Morning everyone

My 4th niece Kitty-Bea will be 5 this week - thats scary where the years go, I got to spend some lovely time with her and her sister last week for half term and they are getting so grown up. 

For Kitty-bea's card from my parents ive gone for full on butterflies with a surprise hiding inside with a spiral pop up design


6x6" white cardbase.  I picked a paper with subtle rainbow hues for the front and die cut lots and lots of butterflies from patterned papers in a rainbow of colours.  Die cut the birthday sentiment and 5 today from white card matted onto gold glitter card circles and then arranged the butterflies.  I added a touch of glitter glue to the butterfly bodies.


and inside.....I actually did the inside first and then decorated the front.  I used panels from the same soft rainbow hued paper.  I then die cut a circle from acetate Id saved from some plastic packaging.   I then used scissors to cut a spiral into the middle of the circle.  Using red liner tape I attached one end of the acetate spiral to one side of the card, once that was secure i added red liner tape to the other end and closed the card onto it, doing it this way meant it was lined up perfectly so closed nicely without catching. 

I added large die cut gold glitter flowers over the ends of the acetate spiral to hide the glue and help keep them in place, i added a few more of the gold flowers around the panels.

I then arranged the butterflies onto the acetate spiral, gluing 2 back to back so that they clamped the acetate between them and looked nice from all angles.  I added lots of little butterflies and some flat orange gems to the centres of the flowers. 

Computer printed sentiment die cut into an oval to write the greeting on to finish. 

You can see the flying butterflies better here


Not having made anything like this before i was rather pleased with the effect and i think Kitty-Bea will have hours of fun opening and closing it

Items Used:
Sizzix  butterfly die set
memory box mini butterflies die
flower & birthday sentiment dies
Sizzix  oval die
Ranger stickles 'unicorn'
Papermania orange glitter dots
12x12 make&create paper pad 'ombre'


Thank you all for stopping by once again, I hope you all have a good week. Emmaxx


Id love to enter the following:

***

***

***

***


Thursday, 7 January 2021

Male twist & pop

Good Morning everyone.

Today im sharing the card i made for my brothers birthday.  I made my first twist and pop design and went with a DIY & robot theme as his hobby is metal work, creating amazing things out of scrap metals.

Approx size 6x5"  Using a template from pinterest which took  me to this crafters blog and a very easy step by step twist&pop
I made the twist and pop mechanism from 300gsm white card and then the cardbase.  I then dug out some old papers with a metal plate design and trimmed to the size of the panels and attached. I then glued the twist and pop panel into the cardbase and covered those panels with the black nuts and bolts paper. 

For the front of the card i die cut the sentiment and tools from white card and coloured with orange and blue alcohol markers, i also die cut the tools from silver mirror card, i cut off the coloured handles and glued onto the silver ones. I added the sentiment to a white circle and mounted them all on the card front.


I die cut the robots from white card and coloured with alcohol markers, grey for the bodies and a mix of blue and orange for their arms/legs etc.  I backed them with silver mirror card which shines through their eyes etc. I attached these to the pop out sections.

I did also add a die cut oval panel to the bottom to write the greeting on but forgot to take a photo after that.

A close up on the robots.

For  my first attempt with the twist and pop i was very happy with the outcome and i know my brother will be intrigued how it works - who ever created this first must have an amazing mind!


Thank you all for stopping by once again.   Stay safe everyone.  Hugs Emmax


***
Id love to enter the following with my robot card
 

Thursday, 23 April 2020

Giant Ladybird

 Good Morning Everyone

Today im sharing a fun card i made for my Niece Kitty-Bea's 2nd brithday.  She loves all her animals & creatures and never happier than when out about the farm with nature.  I used a gold mirror card that i had coloured with various red alcohol inks so it has a more marbled effect to the finish.  My giant ladybirds wings open to reveal the message.

approx A4 in size - so yep its giant😁. So i first die cut grand ovals - 2 black 1 red mirror.  From the red one i used circle dies to cut out the ladybird spots.  Adhered the red oval to a black oval and cut in half down the middle - this just made my wings more substantial for little hands playing with it and then the black underneath shows through the 'spots'..  

I then die cut 2 circles & 4 tiny circles from black card for my head - for the antenna I sandwiched 3 layers of black card strips between 2 tiny circles to give it more strength.  Using the spare black oval i glued on the bigger circle for the head. I attached my antenna. I then added my wings with brads. I then glued on the second circle to the bottom.  Doing it this way just makes it tidier underneath to look at and hides the brads from little hands!

I die cut a 3rd black oval, scored an inch down to create a hinge and glued to the back of the card. Off this back piece i cut along the bottom edge to make it flat so that my ladybird could stand upright. 

Opening up the wings i added my greeting using die cutting and scraps of card.  I added the number 2 too 2 of the spots too😃


this shows the wings opening

the wings fully open showing the die cut greeting, you can really see the colours of the alcohol inks on the gold mirror card here too.  Its amazing as you still get the mirror effect through the alcohol inks and you get a different tone with the alcohol inks if you start with silver mirror card rather than gold.


And finally this image shows side on how it stands up - much to my surprise it will even stand up nicely with the wings open.  This was one of those projects that had a life of its own and very much evolved as it went on.  It can simply be made smaller if you don't have the A4 grand dies and its all made from simple circle and oval dies. 

Items used:
Spellbinders grand and standard circle and oval dies
Alphabet dies 
Birthday sentiment die
Ranger Tim Holtz Alcohol inks
Gold mirri card
Payper box black card

Thank you all for stopping by once again.  I hope you are all doing ok and keeping safe.  
A big thank you to all of you who are amazing in keeping our country going be it key workers, voluntering to help others and so many getting hands on -
 you are all wonderful💖.  Hugs Emmax


*****
Id love to enter the following

http://thesisterhoodofcrafters.blogspot.com/2020/04/happy-birthday-or-fun-fold-or-both.html

Monday, 16 December 2019

Poinsettias

Good Morning everyone, i hope you all had a good weekend.

I bought this plant pot die set for my mums birthday card and after making it i wondered how it would look with poinsettias so this is the outcome.  The pot die folds to make a little pocket and then has a tag that fits inside with flowers on the top - i added a hidden surprise inside my pots too for some fun.  I shall show the version i made for mums birthday in January.


5x6" white cardblank.  I used patterned papers all from the same pad, i matted a bluey tone and striped paper onto gold mirror card and then the base card.  From the pot die set i cut the pot from gold tone paper and then the tag that goes inside from green paper.  I die cut poinsettias from a red tone paper and arranged on the top of the tag, making sure the tag would slide in and out freely - to help this i added foam pads to the sides of the pot pocket.

I then arranged more poinsettias around the pot and some die cut foliage.  I added glitter glue and gold gems to the centres.

and below is the surprise...... whats hiding in the pot?


Oh look at where that cheeky kitty has been hiding😁


Showing the tag completely removed.  You could also add a secret greeting to the back.

A close up on naughty kitty - my cats love helping (hindering) me while crafting so this idea came to me as my mums cat loves helping her garden😁 .  Using tim holtz mini crazy cat stamp and watercoloured with distress oxide inks.  Glossy accents added to her eyes.  Coloured in tones to match the recipients cat. 

Items Used:
Honey bee die - flower pot
Tim Holtz crazy cat mini stamps
flower & foliage dies
MFT curved border/edger die
Basicgrey paper pad 'evergreen'
Oxide inks - cat - candied apple, spiced marmelade, lemonade, black soot
Stickles - diamond

This is my last upload before Christmas so i would like to wish you all 

A VERY MERRY CHRISTMAS AND A HAPPY & HEALTHY NEW YEAR

Thank you for all your support for my blog this year, every visit you make and comment you leave is such an encouragement.  Such lovely new friends Ive made in blogland around the world and thank you to those following me by email, hopefully ive inspired a few of you with my ideas and creations and sometimes odd ideas😁.  Lots of festive hugs to you all. Emmax


Id love to enter the following:
http://cutitupchallenges.blogspot.com/2019/12/challenge-189-anything-goes-christmas.html
*****


http://christmasblogchallenge.blogspot.com/2019/12/end-of-year-anything-christmas-goes.html
*****
https://www.simonsaysstampblog.com/wednesdaychallenge/simon-says-interactive-christmas/
*****


http://thesisterhoodofcrafters.blogspot.com/2019/12/anything-christmas.html
*****


******
http://diesruschallenge.blogspot.com/2019/12/challenge-135-anything-christmas.html

*****
https://merrylittlechristmaschallenge.blogspot.com/2019/12/mlccb-17-december-anything-christmas.html
*****
http://mytimetocraftchallenge.blogspot.com/2019/12/challenge-412-christmas-flowers.html
******
http://inkspirationalchallenges.blogspot.com/2019/12/challenge-202-designers-choice.html

Monday, 5 August 2019

Ladybird Penny Slider card

Good Morning everyone. 

Today im sharing the 2nd card i made for Alice's birthday, this one was for me to give to her.  I've made a penny slider so the ladybirds are 'flying' to and from the flowers.  My niece's are quite easy to make cards for as they are big into nature so lots of choice. 


A5 White cardbase.  I first took a piece of blue floral paper and attached it to red glitter card so that its more substantial.  I then worked out placement to die cut my slider slot dies, typically the slots turned out too narrow for the foam circles i had to i lined up the die again and cut it beside the first one, so this made it double width to easily fit my pennies and foam dots.  I then added alot of 2mm foam tape to the back, leaving room for the pennies to slide freely and attached to the white cardbase. 

I made up my ladybirds with black glossy & red glitter card. I then took 2 penny coins and added a foam dot between them, then attach the ladybird on top, i did this twice.  I die cut and made up 3 white flowers, adding a touch of yellow to the centres and the yellow buttons.  I inked up some card with lime oxide ink and die cut some leaves, I then used the same ink and stamped a tiny birthday sentiment to each leaf.  

Stamped greeting mounted on more of the red glitter card.  I then handwrote Alice in the top slider gap and 4 in the bottom one, just so i could personalise it and i think Alice will like the fact that the ladybirds move to reveal her name......well hopefully

Just showing the ladybirds in a different position


A close up on my middle flower and hopefully you can make out the birthday sentiment i stamped on the leaves.  Very subtle. 

Items Used:
Elizabeth crafts ladybird die set
Floral & leaf die set
Slider die set
Birthday sentiment stamps
Floral pattern paper
Jellybean red glitter card

We had a lovely day on Saturday for Alice's birthday, all 4 of my nieces are growing fast and seem to all have the tall gene.  Thank you all for stopping by again.  I hope you all have a good week. Emmax

Id love to enter the following:


*****


*****


*****


*****


Monday, 29 July 2019

Alice Shaker card

Good Morning everyone.

Today im sharing a shaker card i made for my nieces 4th birthday, can't believe Alice is 4, she is growing so fast. Alice's favourite colour is purple so ive used purple mirri card, sadly the photos don't do it justice. 


A5 white cardbase. I first started by printing the name Alice direct onto some lilac birthday script cardstock.  I picked a font that would be easier to cut out with a craft knife as i don't have any large alpha dies. Once printed i carefully cut around the inside of the printed line so that it left the outline to help define the word for little Alice to read.  

I then backed this piece with acetate and then foam tape, i went around each individual letter with the foam tape. placing this face down I then put different shades of sequins and micro beads into each letter.  I backed this section with lilac cardstock. I then mounted this whole panel onto purple mirri card and added to the base card. 

I computer printed the sentiment and age in grey with a black outline onto white card, cut out and mounted onto more purple mirri card.  I then die cut lots of tiny butterflies from the purple mirri card and added around the cardfront. 

You can make out the purple better in this one


A close up on the shaker part.  No matter how many shaker cards i make its always a case of either not adding enough shaker bits or adding too many, sometimes i get it just right.  Could have done with a few more sequins in the 'A' but im sure Alice won't notice😀

This is just to show you the font i printed direct onto the lilac card.  In my graphics program serif craft artist i edited it so that i just had a thick outside line and the middle was blank, this made it so much easier for me to hand cut it with a knife, i cut inside the line.  Not being very good with a craft knife i needed it as simple as possible. 

Alice's birthday is on Saturday and i have my invite, so looking forward to that. 

Items Used:
Anna Marie birthday script cardstock
Mirri card - chocolate box purple
White card craftUK ltd
Memory box mini butterfly dies
Acetate
Shaker pieces - sequins, glitter, micro beads

Thank you for all stopping by and your well wishes, im on the mend.  Mojo not completely returned so ive been having a serious sort out of my craft stash - a job well done i think.  I hope you all have a good week and can keep cool if its hot with you. Emmax


Id love to enter the following:

http://colormyheartcolordare.blogspot.com/2019/07/color-dare-353-splash-of-color-purples.html

*****


Thursday, 13 June 2019

Happy Fathers Day

Good Morning everyone, thank you so much for all your amazing comments on my seahorse creation. 

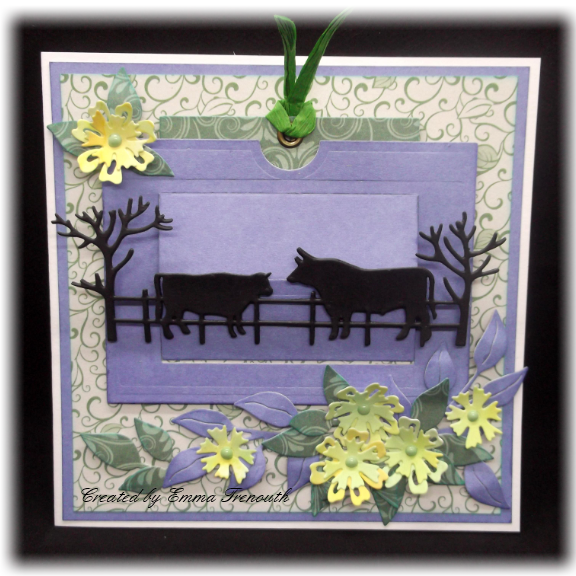
Today Im sharing the card Ive made for my dad for Father's day, I've used the sizzix slider die again and gone with a farming theme.  


This first photo shows the slider panel closed.

6x6 White cardbase.  Ive used beautiful papers in blues & greens from B&M.  I first die cut the sections of the slider mechanism from my chosen papers, these B&M papers are ideal for this as a good weight but also light enough to fold easily.  I stamped my greeting on the panel that is revealed when you pull the slider part back.  I added an eyelet in the hole and added some green paper raffia to make it easier to pull the slider up. 

I cut a panel of the green leaf paper and layered onto a large piece of the blue paper and attached to the card front. I then attached the slider to the card front with foam tape. I attached the bull & cow chipboard after painting it black to the front part of the slider. 

From a scrap of yellowy inked card i die cut some flowers and die cut leaves from the green and blue papers. I then arranged these around my slider panel. I added some pale green enamel drops to the flower centres to finish. 


This photo shows the slider panel open to my (wonky) stamped greeting, i used 2 different sentiment stamps.


This photo shows the card laid down and the slider open so that the cattle are then stood up and sort of looks like they are in a field.  My yellow flowers could be buttercup's, celandine's, or primroses, alot of my dads fields are meadows so full of lots of flora & fauna.


Items Used:
Sizzix tropicool slider die set 662783
Tim Holtz funky foliage 663087
Cow&Bull fence chipboard
B&M Papers 12x12 'Seas the Day' & 'Botanical Bloom'
Justrite & clearly besotted sentiment stamps
Oxide inks twisted citron, lemonade & pistachio

You can see my first card made with the slider set here for more details

Thank you all for stopping by. Emma


Id love to enter the following:


*****


******


******


*****


******