Followers

Showing posts with label Tim holtz mixed media dies. Show all posts

Monday, 13 September 2021

40th Birthday

Good Morning everyone

This is the 2nd card i made for my brothers 40th birthday for me to give him.  Ive gone for a funny one using my new Katzelkraft bird stamps which i got for my birthday last month.


I first made a background with brushos and pixie powders and let dry.  Using my hexagon dies i made a white cardbase.  I then cut a frame from white card.  I then cut my background with a hexagon die and then used a tim holtz die to cut out little circles from the middle of my coloured panel, i added gold holographic card behind this - it kind of gives the effect of a disco ball when the light hits it for my dancing birds.  I added that to the base and then the frame on top with foam tape.

I stamped the birds and simply coloured in grey tones so they stand out with the bright background, just a hint of colour for the beak & feet, i then cut them out.  I computer printed the 40 & no way and die cut into speech bubbles & stamped the happy birthday and die cut into an oval.  I added the birds and sentiment to the base card with glue gel to finish.


A close up trying to show the light hitting the holographic, in life its really shiny and bright


Items Used:
Katzelkraft bird stamps 'SOLO168'  'SOLO167'
Sentiment stamp
Tim Holtz mixed media die set
Stitched hexagon dies
Sizzix oval dies
Speech bubble die
Brushos & pixie powders
Grey promarkers
CraftUK ltd white linen cardstock
B&M Gold holographic card

Thank you all for stopping by once again, i hope you all have a good week.  Hugs Emmax


Id love to enter this card in the following:


***

***

***


Monday, 31 May 2021

Blue Iris

Good Morning everyone. 

Today is another shaped card using those spellbinders grand labels 4 which i made for my sis in laws birthday.  I used this lovely aall&create Iris stamp which she and my brother gave me for Christmas.


I cut the largest spellbinders grand label 4 from white cardstock and folded it in half.  I stamped the iris in place and then die cut the tim holtz die from the middle of the card front.  I stamped the iris again onto white cardstock and water coloured with wink of stella pens so its really shimmery and the cut it out.  I glued the stems on flat to the one on the card front and then added the flower head with glue gel....to avoid the glue going through the apertures and sticking it all together i added a piece of scrap paper inside which i removed once the glue was dry.
I took a piece of orangy/yellow patterned paper to use as my insert which picks up the orangy/yellow i used in the center of my iris.  Die cut it with a smaller label 4, folded in half and attached inside the card so that it peeks out of the diamond apertures.
Stamped sentiment die cut into an oval to finish.


Showing it stood up side on.

Items Used:
Aall&create stamp set #333 'Iris'
Clearly besotted sentiment stamp
Spellbinders Grand labels 4 dies
Tim Holtz Sizzix mixed media die set
Sizzix oval die
12x12 paper pad from the works 'basic vintage'

There are changes happening in blogland which means those of you who follow me by email will no longer get those emails. I have (hopefully:) ) set up the new system with the button on the left side of my blog if you would like to re apply for emails of my posts.  In order to protect everyone's privacy and GDPR, I won't import the current subscriber list into the new follow it feature, instead will leave it up to you if you wish to continue following my blog via email using

 Of course you can still pop by to read my blog whenever you wish too.   I really do appreciate all of you following me and popping by when you can. 


Thank you all for stopping by and all your lovely visits and comments.  I hope you all enjoy the sunshine and if here in the UK this bank holiday Monday.  Im off to see my nieces for the first time in 10mths so looking forward to it.  Hugs Emmax


Id love to enter the following:


Monday, 18 January 2021

All at sea

Good Morning everyone

Today im sharing 3 cards i made with my Christmas present - these aall&create stamps - love the sea theme.  Here i just used backgrounds id made before and left the creatures white so they stood out against the colourful backgrounds.


A thank you card for my Uncle

A6 white cardblank.  After picking my background - this one is oxide inks (pistachio & ocean) i die cut the scalloped frame die, on the middle panel i then stamped the image in black and then die cut the tim holtz die from the middle - i thought the little holes could be bubbles.  I then attached a piece of silver mirror card to the back and attached to the middle of the card.  I added foam tape to the back of the frame and attached that.  I stamped the image twice more and just cut out the octopus on one and just the hat on the second one and added colour to the hat.  I then added them to the base card.  Stamped sentiment to finish.

Showing it stood up - please ignore my face showing in the mirror card in the background - getting a good photo was not easy😁


Version 2 is using the whale stamp exactly the same way for a little hello friend card


Version 3 - the seahorse stamp is much smaller so i used a smaller scalloped frame die for a 3x5" card.  This background again from the 'pile' is brushos and pixie powders so has a lovely shimmer. Glossy accents 'water drops' added to embellish. 

Items Used:
aall&create stamps #390 sea life
Sentiment stamps
Tim Holtz Mixed Media die set
Scalloped frame die set
CraftUK ltd white card
Brusho's & Pixie powders
Oxide inks
Glossy accents

Thank yo all for stopping by and all your amazing comments on my mums birthday bee card.  Stay safe. Hugs Emmax

***

Id love to enter the following with the octopus card:


Monday, 20 May 2019

Marbled Hollyhocks

Morning everyone, i hope you had a good weekend.

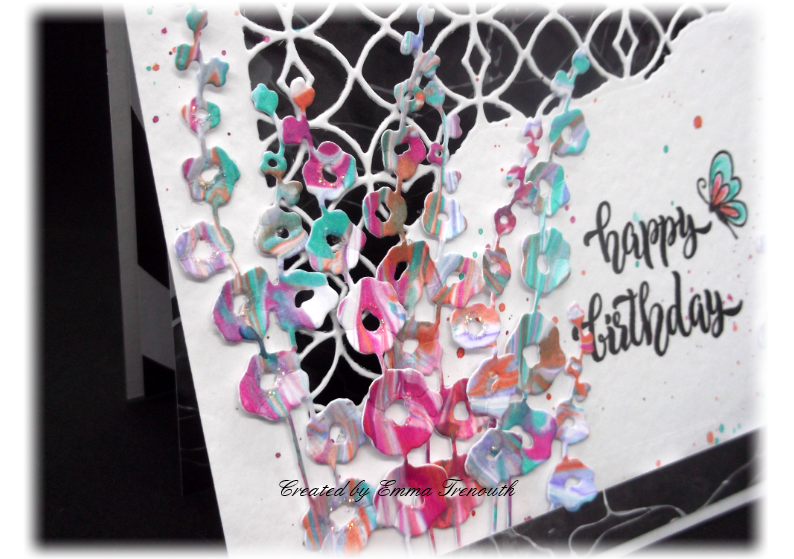
Today im sharing a card i made for my sister in laws birthday, i die cut up some of my marbled card using my most used flower die - hollyhocks.  


6x5x5" white cardbase.  I die cut the Tim holtz corner die in the top left corner. I used a black & white patterned paper for my insert so that it peeked through the corner die cut and helped my multi colour flowers stand out.  

I die cut several hollyhocks from marbled paper, using a ball tool i gently shaped the flowers into a cup shape.  I first stamped my greeting and then using the same colour inks i used for the marbling i added ink splashes to the background.  I then arranged my hollyhocks.  I added a strip of the black and white paper to the top and bottom edges.  Glitter glue highlights to finish. 


A close up showing the side so you can see how i added the insert and the mix of colours in the hollyhocks. 

Items Used:
IO hollyhocks die
Tim Holtz Mixed Media corner die
Sentiment stamp
B&M paper 'B&W'
Spectrum Noir aquatints
Stickles diamond glitter glue
CraftUK ltd white card.

If you missed my marbling post you can take a peek here   Thank you for all your comments on my marbling - and im pleased to hear a couple of you had fun trying - i wonder who first came up with the idea of using shaving foam? Very inventive.


I hope you all have a good week whatever your plans are. Emma


********


***


***

Monday, 4 March 2019

Poppies

Good Morning everyone.  

Where do the weeks go to? 

So today im sharing a birthday card i made for my sister in law.  She loves poppies. Ive coloured them with my wink of stella pens so very blingy for her. 

6x6 Kraft cardbase.  I die cut a square of kraft card smaller than the card front, i die cut one of the Tim Holtz dies into this panel.  I cut some gold glitter card to fit behind the cut out and glued that in place on the cardblank, i then mounted my top panel on top with foam tape.  

I die cut the poppy die twice from white cardstock and coloured the flowers with orange & red wink of stella pens, i coloured the stem green with a marker pen.  I decoupaged the flowers using the second die cut, first shaping the petals where the cut lines are and glued with glue gel. 

I splashed some of the wink of stella pens over the background to add some interest - they really shimmer when the light hits them.  Stamped greeting in black. A little butterfly - i cut 2 and layered up, a gold glitter one and then one coloured with the wink of stella's on top. 


A close up.  It doesn't really show the glittery effect of the wink of stella and the glitter card.


As i was rather happy with the outcome i made another couple for the box


Yellow poppies and pale green glitter card, i used a different die from the TH mixed media set this time.  The only poppies that really love it here are the little yellow welsh poppy, they line the paths and verges - so delicate and pretty.


I also added some white gel pen highlights just to the edge of the poppies.  Yellow and orange wink of stella pens used

Blue poppy and silver glitter card.

Im not really very good at colouring in - no patience😊, I did these with a wet into wet technique.  Wet the poppys with water using a brush, then added the pale blue ink first and then dab the dark blue in where it would naturally be darker. They then bleed into each other.  I tend to add some of the ink to a mat first and pick up with a paint brush for a bit more control than adding the pen straight on the cardstock. 


Items Used:
Pennyblack poppy die
Tim Holtz Mixed Media dies
Sizzix butterfly dies
Clearly besotted sentiment stamp
Kuratake Wink of stella pens
B&M glitter card
CraftUK ltd kraft card

Thank you all for stopping by, i had a lovely day last Monday for my little niece's birthday.  I hope you all have a good week. Hugs Emmax


Id love to enter the red poppy card 
pixies-snippets-playground-challenge-347  - the glitter card, poppies and butterflies all cut from snippets/off cuts of card


Monday, 26 November 2018

Non Traditional Christmas Colours

Good Morning everyone.

Its time for a new challenge over at Make My Monday.  The theme for the next fortnight picked by Mia is:

NON TRADITIONAL COLOURS FOR CHRISTMAS

So not really a challenge for me as those of you following me over the years know any colour goes for me even at Christmas.  For this set of cards i have gone with a more traditional Christmas image though of the Angel. 


Purple and green version.  Full details are below. 


I first die cut black card using a spellbinders grand label 1 and folded it in half to create my base card.  I cut a smaller white size, cut in half and counted on the front and back of the base, i then added a strip of inked card the same as ive used on the topper panel.

For the topper panel i die cut a white scalloped label 1 die and then die cut into it with a Tim Holtz mixed media die.  I mounted over inked card using foam tape and then added to a black labels 1 die cut.  I then die cut the Angel in contrasting inked card - ideal for all those little snippets i have amassed over the year from my brusho/pixie powder backgrounds.  I also cut the Angel from black card and added to the back as a shadow to help her stand out on the card.  I gently shaped her and added to the front with glue gel.  I only added glue to her body so her wings are free. Stamped greeting.

I then added the topper panel to my base card and added some gems picking up on the base colours.  Finished size is approx 5x5"


View from the top, a easy design to make with any square shaped dies.  


Just a close up of the angel


Purple & Green version, here i used the memory box collage die for the background.


Red and blue/lilac version


Red & Glittery Purple version.  I am slowly making a dent in all the off cuts ive collected all year from my sheets using brushos, pixie powders, inks etc and here the Angel is small enough to use up the little bits (approx  2x2").  I also seem to be using alot of dies this Christmas that cut into the card rather than out.  They seem to be a good way to add interest and depth without lots of layers. 

Items Used:
Echo Park Angel die
Tim Holtz Mixed Media dies
Memory box collage die
Spellbinders Labels 1 and grand labels 1
Brushos, pixie powders & wink of stellas

So if you fancy joining in with us and make a Christmas card with unusual colours and to just see what colours the others come up with do hop over to MMM

Thank you for popping by, I hope you all have a good week. Hugs Emmax


Wednesday, 29 November 2017

1st Blog Birthday

Good Morning all, gosh can you believe today my blog is 1 year old, and what a year.  Thank you to all my regular followers and those that stop by now and then.

Today i am sharing a batch of cards that came together from backgrounds made with brusho/pixie powder mix left over from my Christmas cards and the white inverted scallop squares which were the 'left over' from die cut frames i used. 


Lemon & Blue combo, Violet flower die
5x5 cardbase.  I die cut the tim holtz mixed media die into my white top panel, this i mounted over a panel of lemon & blue brusho cardstock.  I cut my violets from the same card, i added a little blue glue to the flower centres.  Sentiment can easily be changed to any occasion. 


5x5" White base card.  Square mat cut from my backing paper.  I then die cut the collage corner die into the topper, stamped sentiment in grey and mounted with 3D foam.  Die cut butterflies and glitter glue to finish.

This first one is a lilac/green combo


Orange & Lilac combo.  The photos don't really do the colours justice as the pixie powders really do sparkle when the light hits them.


Lilac & Peach, Tim holtz mixed media corner die


Orange & Blue combo


Green & Orange,


And finally a mix up of orange, green & Lilac.  I gently shaped the butterfly wings and only add glue down the middle so that the wings are lifted up off the card.  


Items Used:
Tim Holtz Mixed Media dies
Poppystamps Ring Collage die 1760
Sizzix Butterfly die set
Memory box viola die
Double stitched square die set
Justrite sentiment stamps
Brusho's & Pixie powders


If you fancy seeing what my first upload was 
My First Upload


and this shows you the cards that i had the backgrounds and toppers left over from

So thank you for stopping by once again and all your support, i look forward to continuing my blogland discovery with you all.  Emma

Thursday, 26 October 2017

Here Come the Men!

Good Morning everyone.

So today im sharing a couple of Male birthday cards. 


A5 Kraft Cardblank.  First i die cut the wheat from brusho coloured card.  Embossed white card with brick embossing folder and then added some colour using the same brusho's as the wheat.   Printed greeting die cut into a rectangle.  I then die cut a frame from kraft card and mounted on foam pads.  I then added the wheat and a twine bow. 


A close up of the wheat, i shaped it a bit with a ball tool first.  I went with wheat as its for a farmer and also apt for this time of year. 


on to a simple card

6x5 white cardblank.  I then die cut into the card front using the tim holtz mixed media die.  I add an insert from patterned paper, folding so the pattern is on the outside and white on the inside.  Stamped sentiment die cut into an oval.  I cut some of the red paper with the mixed media die and added them to the front for more interest. 


Close up showing the detail.


and below a very simple card for an elderly gentleman with no interests


5x5 white card blank.  Black and white pattern paper matted onto red card.  He had bad eyesight so went with bold colours.  Stamped sentiment die cut into an oval and a strip of the same paper added across the front.  A simple card but might give one of you some inspiration for those pesky males! 

Items used:

IO (Impression Obsession) wheat die
Crafters companion brick embossing folder
Brusho's
Double stitched rectangle dies
Tim Holtz mixed media dies
'Seas the Day' Papers by B&M
Stampin up 'curly cute' sentiment
Bold & Beautiful papers by B&M


Thank you for stopping by and taking a peek.  I hope you are all having a good week. Hugs Emma 


Monday, 31 July 2017

Blue Iris


Good Morning all, i hope you had a lovely weekend and found a bit of sunshine. 

Today im sharing a little card I made for a friend, i treated myself to a set of 12 Wink of Stella pens recently so this is my first outing with them.  I used them to both colour in the image and make a matching background. 


I first stamped the iris twice and coloured with 2 blue, 2 green and a touch of orange stella pens, i used them like watercolour and you still get the full sparkle effect.  I then die cut one into shape, using a mixed media die i cut out the hole detail, i then decoupaged the 2nd iris flower on top. 

I die cut a matching size and shape as the topper and using the stella pens made a background, once dry i glued it behind the topper, and mounted onto a cardbase using foam tape.   


Close up to try and show the sparkle, you can just about catch it, i had also shaded around the iris with yellow ink to give a softer effect. 

Items Used:
Chocolate Baroque 'elegant iris' stamp
Tim Holtz 'Mixed Media' dies
Sizzix framelits '658204'
Kuretake Zig Wink Of Stella pens


Thank you for stopping by and all your amazing comments last week on my crazy birds.  I hope you all have a good week. Emma 

Monday, 30 January 2017

Motorbike male birthday card


Good Morning all, i hope you had a good weekend and all that rain we had missed you. 

So for something completely different today, i had to make a birthday card for a older male family member, in his youth he loved his motorbikes.


First i die cut the bike in red gloss and black gloss cardstock, as the outside line of the tyre is so fine i wanted to back it with card to add stability, so i embossed the die only onto grey pearl cardstock, i then cut around the outside line.  I then glued the black gloss bike onto the grey one, sticking those fine outside tyre line not so easy, so don't look too close! lol I then cut parts off the red gloss bike off and glued on top, slightly offset so the black peeks through and adds more depth. 

For the background i embossed sizzix framelits shape with spellbinders kicking rubber embossing folder, matted on black gloss cardstock.  I then die cut tim holtz corner from white cardstock and mattered again onto black gloss cardstock.  White A5 cardblank.  Sentiment die cut in red and black and cut in half to fit.  


and one for the box using a different corner die in the background. and on this one instead of the black gloss card i used dark green mirror card. 

items used
Bike die - unknown make
Spellbinders M-bossibilities 'kickin rubber'  EL-016
Spellbinders - sentiments 3 - S2-139
Sizzix framelits 658204
Tim Holtz tattered corner, mixed media dies 660220

Thank you for looking and all your amazing comments last week.  I hope you all have a good week. Emma