Followers

Showing posts with label Tim Holtz. Show all posts

Thursday, 24 October 2024

Witches supplies coffin box

Good Morning everyone

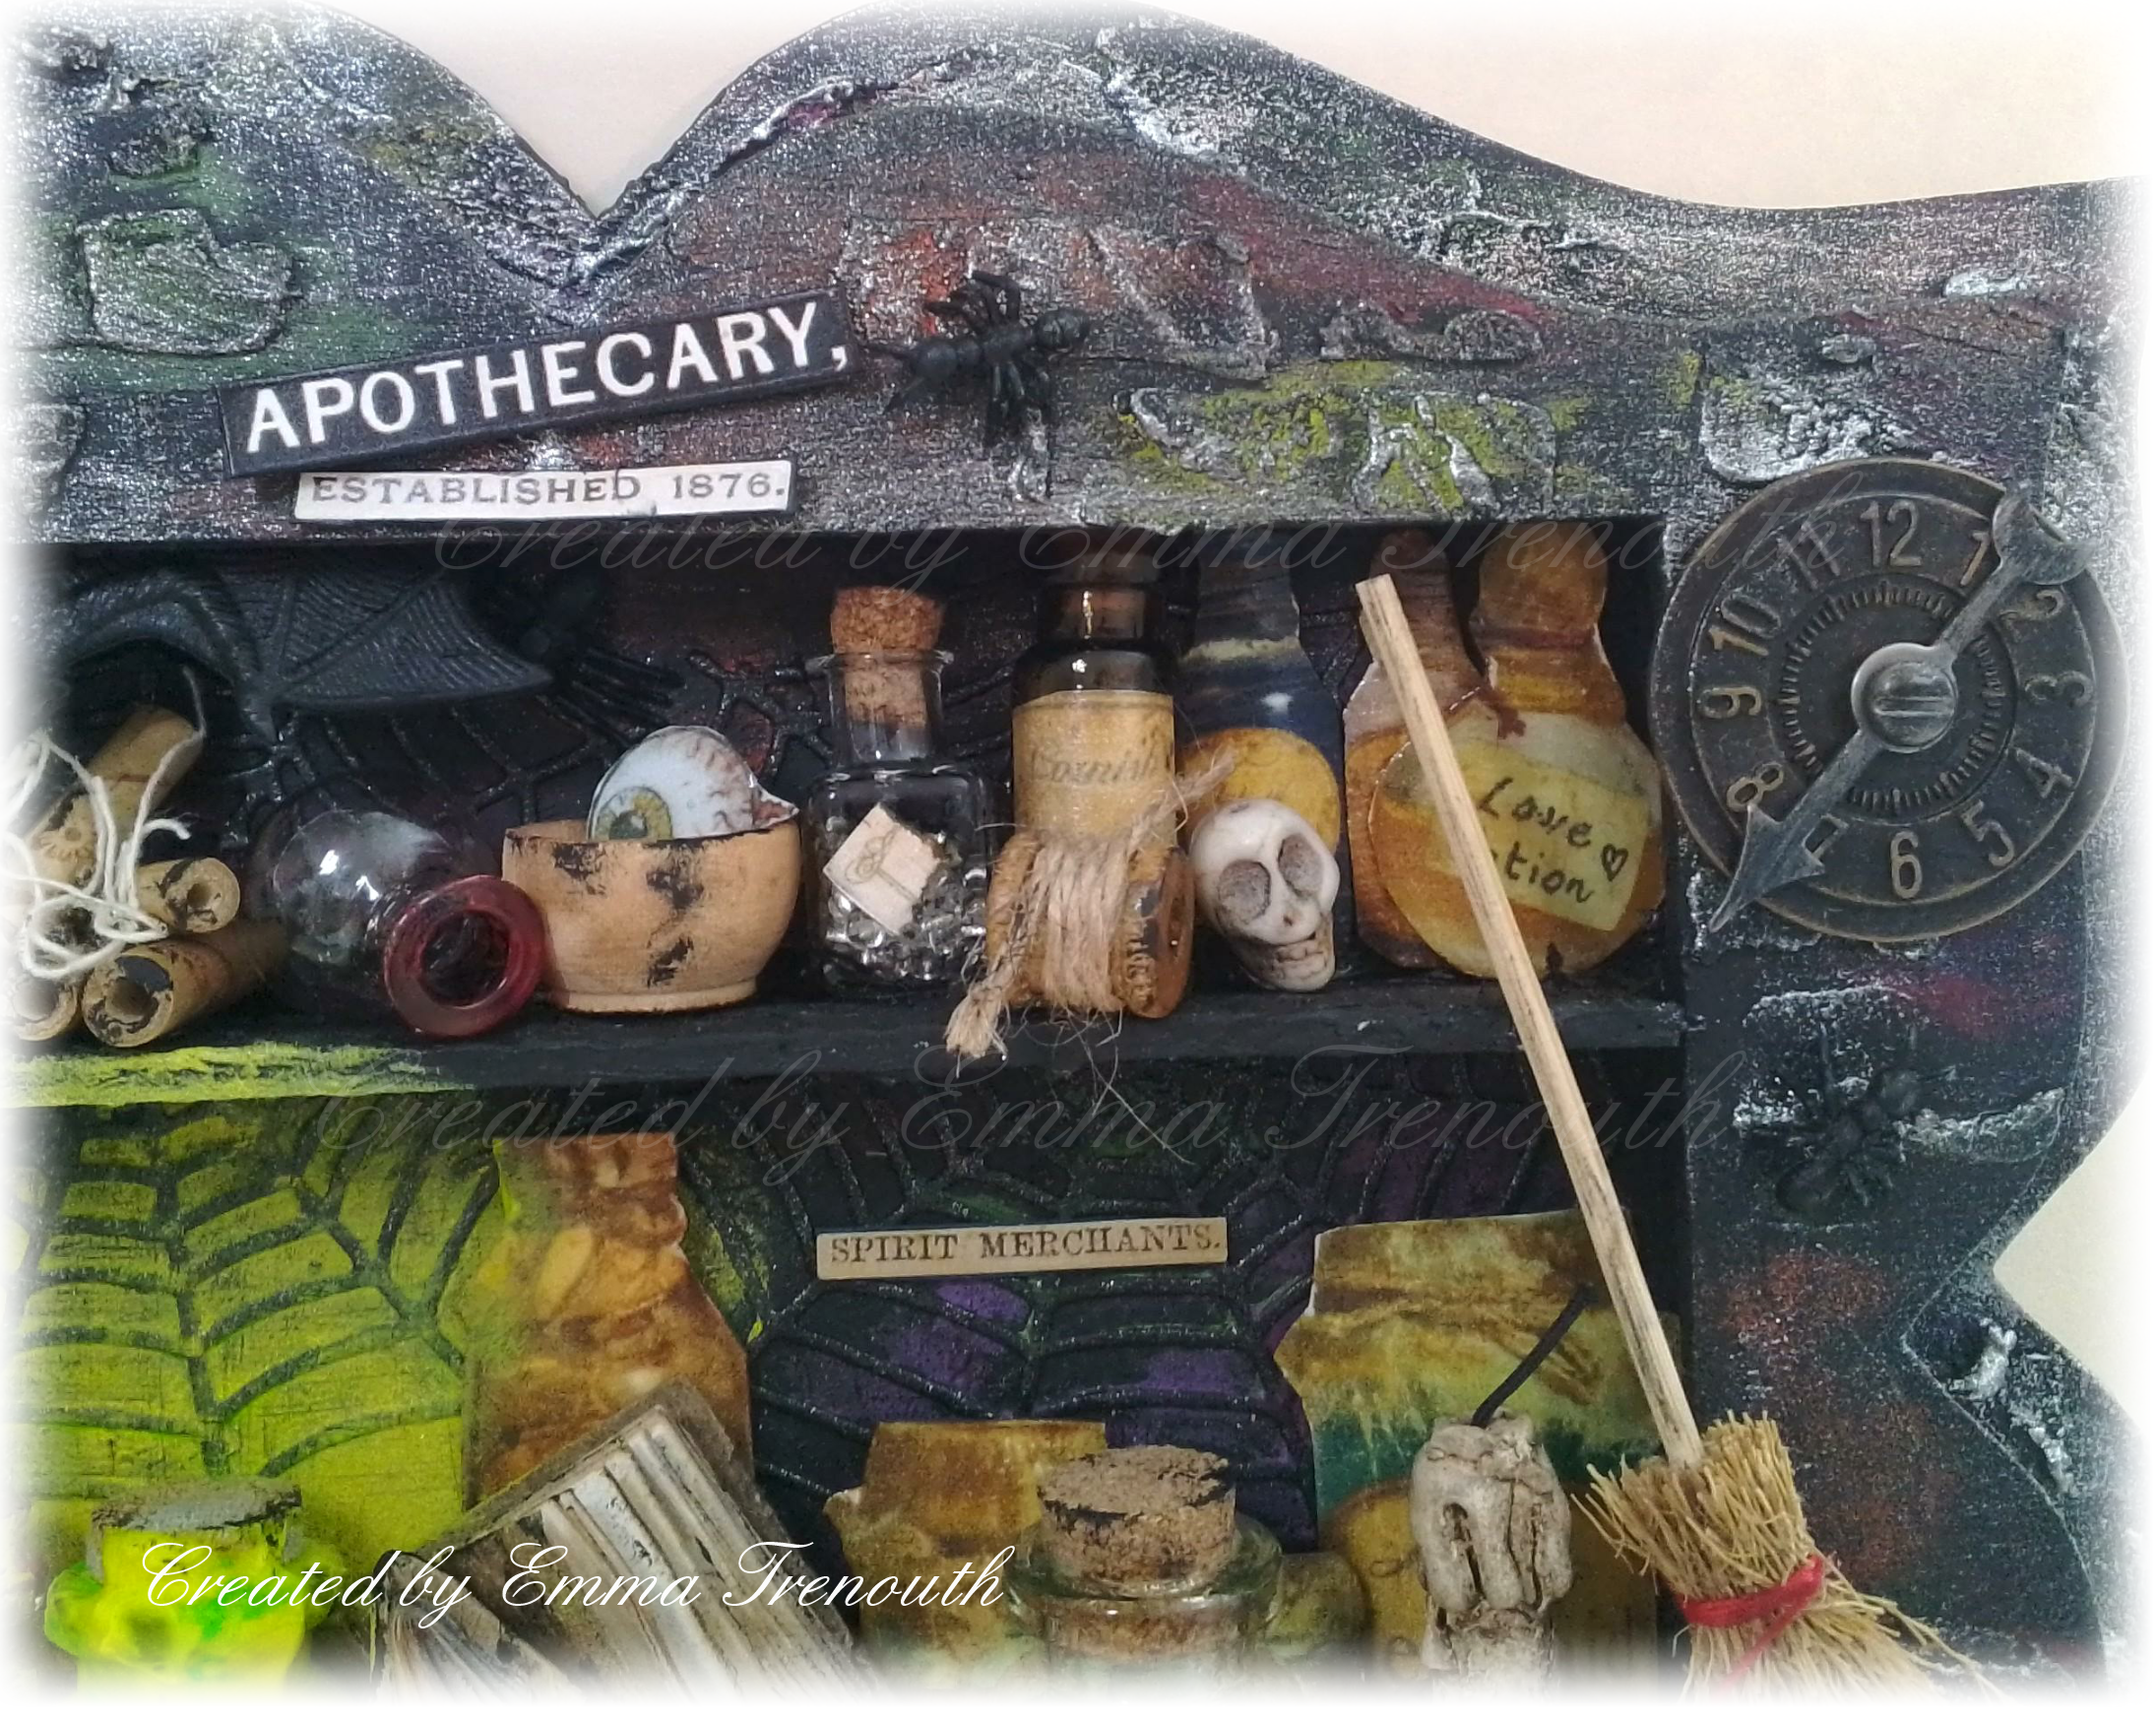
Last year I bought a couple of  wood coffin shaped boxes, Ive turned this first one into a witches portal and hidden supplies cupboard

Details of how i added shelves further down post.  Once shelves added i covered it all with black gesso.  In the shallow lid side i added green and gold dora cadence paint which really shimmers in the light to give the effect of the witch coming through a portal.  I then added one of Tim Holtz paper dolls which fitted perfectly.

Using items in my stash collected over the years i built up a collection on the shelves of various little bottles and potions, a little caldron and pumpkin, skulls, bones and a little spell book

On the top shelf i had some printed digi images of bottles which i added right at the back to help make it seem deeper than it is and then added a real small bottle with some black beads in.  A bone and little skull bead and then a little book i made up last year which i use kraft card for the cover and a little twine

On the middle shelf - in the back i added a piece of die cut spider web and die cut spider - both of which id added a little dora paint to highlight. Tim Holtz chat sticker reads 'calls answered day and night'
  Tim holtz candle and little pumpkin - the pumpkin i had also added a little orange dora paint too. A plastic ant on top of the pumpkin. 

 A small bottle Id added red alcohol ink too an the poured in a little white paint - from this uncorked bottle springs a ghost - this is chipboard painted with white gesso and a little diamond stickles glitter glue added. 

At the front another small bottle which i coloured inside with blue alcohol ink and then filled up with some cheap glossy accents i bought years ago which had a horrid finish so has just been languishing in the back of the cupboard but using in like this it makes a great mystery potion! 

and the bottom shelf - a little plastic cauldron filled with neon yellow and green paints. A little chipboard cat which i painted with blue gesso putting it on thick to added texture and then highlighted with black dora paint.  I added a strip of card behind its eyes coloured with the same neon paint.  The cats favourite sleeping spot, curled up nice and warm by the cauldron.

All my family have black cats and here in the UK they are still mostly seen as a good thing. (a black cat crossing your path is considered good luck, especially if it runs across your path. In parts of England, a bride who receives a black cat as a wedding gift is said to have good luck in her marriage)  - just as well as my old cat collects waifs and strays so we have 6 black cats that visit daily as well as my own black cat😺

Tim Holtz chat sticker in the back reads 'wool of bat and tongue of dog' 

The Cadence 'dora' paint really glows behind the witch.  These paints used to be called 'starlight' by imagination crafts.

I highlighted all the edges with the gold paint.


This shows how i added shelves.  I took some stiff card from cat food boxes, cut to the depth & length needed and just scored some tabs each add to glue into place and then covered with black gesso. 

The outside.  I added texture paste through stencils on the top, a shattered one which i think is a bit spider web like and a grungy one that contains a few numbers and letters.  Covered all in black gesso, added a few patches of green & red acrylic and highlighted with silver, black and gold dora paint.  

I added a plastic bat and a little tim holtz sticker to the bottom which i covered in glossy accents.

Items Used:
Coffin box from 'The works'
Tim Holtz Ideology range - pumpkin, candle, bone
Tim Holtz paper dolls & chat stickers
Spider & Web die
skull, cauldron, bat, mini bottles all ebay finds
Chipboard cat & ghost - the works
Cadence dora paints

Thank you for stopping by once again.  Next week is half term so i will be crafting with my nieces and also have a cousin and her family coming down to Cornwall so will be lovely to catch up with them. I hope you have a good weekend and don't forget the clocks fall back an hour so then it will be dark and wintry.  Hugs Emmax


Id love to enter the following:

*

*

*

*

*

*


Friday, 3 November 2023

The apothecary

Good Morning everyone

Im honoured today to be guest designer at MMTOTY


My last halloween make for now is this apothecary shelf mixed media project.


Approx overall size: 10x7"
I made up this MDF box frame and added texture paste through a brick stencil and also dabbed some here and there to give a rough wall effect.  Out of stiff cardboard box card i cut two strips and glued into place to act as shelves.  Once dry i coated it all in black gesso.  Splodged on some acrylic paint in red, orange and green and then dry brushed over the top with more black gesso and then silver and black cadence dora paint which really shimmers.

I then had fun raiding my stash to fill the shelves.

I knew i wanted a potion bottle that looked like it was glowing & luminous.  I used my daler-rowney acrylic neon paints and poured some of the yellow and green neon into the bottle, dabbing some onto the outside and then popping the cork back in so that it looks like it is really bubbling over.  To give the effect of it really being luminous i then dabbed more of the neon paint around the bottle so it looks like its lit up.  

I also knew i wanted some mini spell books so i played about to make my own, using kraft card and rubbing glycerine in until you get a leather like effect and its becomes malleable for the covers and cut up thin paper pages for the inside - these are just glued into place.  I used twine, touches of distress inks and paint to make them look used and well loved. 


From previous projects i had lots of mini bottles printed out from a very very old daisytrail 
digi-kit, they were printed, cut out and covered with glossy mod podge, so i have used lots of these in the back of my shelves along with real mini bottles to make the shelves look fuller with more depth.

Some of my mini glass bottles i added some alcohol ink and swirled around, others have little beads in them.  The little skulls are beads.

I added some little plastic bugs to the frame, along with the clock and keys.

I used some old wood beads as thought side on they looked a bit like scrolls on the shelf.  A printed eyeball covered with crackle accents in a little wooden bowl.  Can you spot the bat? he really is camouflaged - a little rubber bat, i gave him a coat of black gesso and adhered him up inside the frame.  


Tim Holtz bones, candle & candlestick.  A little broom and a bottle of green glittery potion - this i made up with cotton wool, green ink and gold glitter.   I added die cut spider webs to the back.  Tim Holtz chat stickers added to the scene.

I had really great fun building this up and raiding my stash.

Do hop over to MMTOTY where you can join in with anything halloween or Christmas - my brain is now in full on Christmas crafting mode -scary we are not into November, i know we say it every year but this year really is flying by😀

I hope you all have a great weekend. Crafty hugs Emmax


Id love to enter the following:

***


Monday, 23 October 2023

The specimen jar

Good Morning everyone

Today card is for a good craft friend who is halloween & tim holtz mad, she loves using Tims paper dolls so i have teamed up 3 paper dolls with an acetate jar i had.  It is sat on the shelf in the witches den among her other lotions & potions 


   I took a piece of white card and drew around the jar acetate as it has a border around the actual printed line, i then used a craft knife to cut just inside the pencil line, i used very thin super hightack tape to adhered the bottle behind the aperture.  Before actually sticking the jar in, i used glittery texture paste through a shattered stencil and inked up with oxide inks, once dry attahed the jar.

I cut another piece of white card with the next size up die, in the middle where the bottle would be i inked with lemonade and twisted citron inks to give a glowing effect, the outside edge i inked with violet, potion and sapphire inks.  I worked out where i wanted my 3 paper dolls so that they would appear in the bottle and adhered them in position.  I added foam tape to the back of the front panel and stuck into place.  

From previous years i had these digital images of jars, skulls, eyes, bugs printed off and covered with glossy accents.  They are a very very old daisytrail digi-kit.  I arranged them around the main image.  I also had an offcut of spider web and 2 spiders, all cut from black card and dry brushed with silver paint - i also added crackle accents to the spiders.

Dreadfully wicked chipboard
and then 3 chit chat stickers which i mounted onto black card
'Watching and waiting'
'what horrors they had seen'
'Here in the darkened house of weeping'

..............one day the specimen jar will break and they will escape and get the witch😊


This is my last halloween card for this, ive had great fun letting the imagination run wild and distract from real life for a while.


Items Used:
PET/acetate/transparency jar 
Tim Holtz Stencil - shattered
Tim Holtz Paper dolls
Tim Holtz Halloween clipping stickers & Halloween baseboards
Stamperia texture paste 'arctic ice'
Distress Inks 'squeezed lemonade, twisted citron'
Oxide inks ' violet, villainous potion'
Spider & web die
Discontinued daisytrail digital kit for all the bottles, skull, eyeball etc...

Thank you all for stopping by once again. I can't believe its half term already, babysitting 3 nieces so lots of crafting to be done which is lovely, i provide the stash they provide the energy & imagination.  I hope you all have a great week.  Big hugs Emma

Id love to enter the following:


***

***

***

***

***


Monday, 9 October 2023

The gravedigger has risen...

Good Morning everyone

For some reason im on a roll with halloween this year.  This is a little MDF stand as a home decor item.


Approx Size: 7x5"    See below for how i did the background.  I then added cream acrylic for the base layer on the skeleton and arms and added touches of  blue, purple, green & orange to give more interest and depth and pick up on the colours used in the background - I used matt finish paints for this which really contrast to the shimmery background.  I added green & brown paint around the arms to make it look like they are pushing out of the ground.

I dry brushed cadence dora paints in silver & black onto the gravestone to give the effect of moonlight hitting it. 

 Tim Holtz chat stickers attached and glossy accents added to give them an enamel effect.  They read 'as if a tombstone should giggle'
'the dead hour of the night'
& 'The grave digger has risen' on the bottom plinth
 To finish a coat of mod podge to seal. 

You can see the colours better on this one, especially on the skeleton


This is how it started, both plastic skeletons & arms are from poundland,  i cut the end off the arms to make them different lengths and attached them at different angles .  The MDF base came from the works.

I then added texture paste through a hessian stencil and just dabbed some on in places to help give a worn weathered effect and added it around the arms to give the effect of them coming out of the soil.   I then covered it all in black gesso, once dry dabbed on some orange, green & purple acrylic paints to the background and then dry brushed over the top with more black gesso.  

Id love to enter this in the following:


***

***


***

***

***
***
***


Monday, 11 September 2023

Beware...

Good Morning everyone

Although its a bit early for halloween i had the urge to make something for my craft friends birthday as she absolutely loves anything spooky. I came up with this home decor piece which can either be hung up on the wall or stood up on its pumpkin feet to display. 


I have put step-by-step below with how i built it up.  Once i had the background and paint work finished i added a black die cut spider web which i added touches of silver paint to, 3 tim holtz chip board sayings and covered with glossy accents, a candle and then the plastic spider, fly & ants, these i covered with black gesso to take away the plastic look and then a touch of black cadence dora paint. . 

I sealed the final piece with mod podge to give it some protection

I took a chipboard page from a very old chipboard album i bought and never used, added polyfiller through a crackle stencil to give a spider web effect and then just dabbed the excess onto the side of the panel to give some texture and interest to the finish effect.   I glued 2 little wooden fences into place.

I took 2 of the larger polystyrene pumpkins and cut slots into them to slide the bottom of the chipboard into and glued into place, this gave it feet so it can stand up on its own.  I cut a 3rd large pumpkin in half and glued one half into place in the middle.  I cut a smaller pumpkin in half and glued both halves into place, building up my pumpkin stack.  

I chopped the head & one arm off a plastic skeleton, pushed the neck into one of the pumpkins and the arm to the top of the pumpkins.  I took a plastic arm and glued between the bottom pumpkins.  Once the glue was totally dry i covered it all in black gesso.

I added a couple of small tim holtz pumpkins to the top of my pumpkin stack & I then splodged on acrylic paints in orange, green & purple - Yes it is a right mess but a necessary step to give the final finish depth and colour rather than just flat black.  Even once you add all the top layers of paint these colours really do still show through. I also rounded the top corners with my WRMK corner chomper which easily cuts the chipboard

I then dry brushed on more black gesso

I then dry brushed silver & black candence dora paints to the background, these are super shimmery in real life and when the light hits them.  I built up the pumpkins with orange & gold dora paints & acrylic paints, adding little by little until it was at a level i was happy with which happened over several days. 

This shows the bits before i assembled, collected over the last few years, the plastic skeletons from poundland (I think) are great as for this project i just cut the head and arm off one which leaves more body parts for another project.  The plastic dolls arms came from poundland many years ago too, the insects were from morrisons and the polystyrene pumpkins from ebay

Id love to enter the following:

***

***

***

***