Followers

Showing posts with label Stampin up sassy salutations. Show all posts

Monday, 18 July 2022

Fungi thank you

Good Morning everyone

A lovely craft friend kindly gave me a pack of kraft card blanks so this is the thank you card i made for her using said kraft card blank, one for the base and i also used one to stamp all my images onto and cut out. 


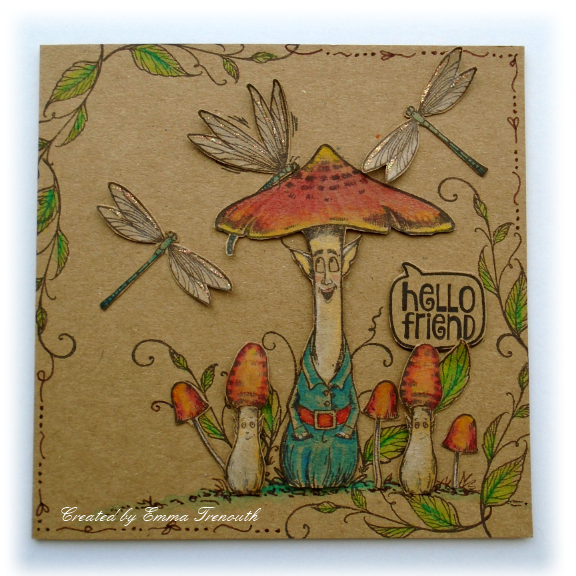
Direct on the kraft base i stamped the pink ink fungi stamp, using the leafy flourish in the set around the edges to help frame Mr Fungi.  I also stamped the sentiment.  On another piece of kraft card i stamped Mr fungi and some of the smaller images in the set and watercoloured them with derwent inktense pencils.  I then cut them out and attached to the base building up a little scene.  

I used a brown finliner as i had stamped everything in brown and doodled in some ground a border around the edge to join up the leaf flourishes.  Glitter glue highlights on the dragonfly wings to finish.
Version 2, the same but different😁🍄


Items Used:
Pink Ink stamp 'shitake happens'
Stampin up stamp ' sassy salutations'
Clearly besotted sentiment stamp
Derwent Inktense pencils
Brown fineliner pen
Versaclair fallen leaves
Ranger stickles 'stardust'

Thank you for stopping by and taking the time to comment, i really do appreciate it.  My little seagull chick has doubled in size and the parents not quite so protective or they have learnt this human is no threat so they are now letting me water my plant pots so thats good😊.  I hope you all have a good week, keep cool. Hugs Emmax

Id love to enter the following:


***

***

***


Thursday, 11 November 2021

Tropical Birthday

Good Morning everyone.

Today is a birthday card i made for a friend who usually enjoys a few hot sunshine holidays a year but hasn't for a wee while now so i decided to make her a sunny holiday vibe birthday card. Maybe the sun will come out for her birthday today🌞


7x7" white scalloped card blank.   I die cut the top layer of the tropical wreath from white card and the base layer from a background made with brushos. I used a craft knife and cut out the middle of the wreath, i added foam tape to the wreath and attached to the card base adding a scrap of blue paper behind the aperture to act as the sky or water. I found a piece of paper that had a sunshine vibe in my stash stamped the greeting and added to my base, i had 2 little off cuts of the green card that i added under this paper just to pick up on the green and tie it together.   A few extra die cut leaves added with glue gel for dimension.

I stamped the flamingo's onto scraps of patterned papers and white paper.  I cut out the head from the white after colouring with alcohol markers and glued that onto the paper version. I then added them into the aperture of the wreath, using the foam tape meant i could easily get their legs behind the frame.  

Just a close up - it seems my flamingo's have had one too many pina colada's🍸 as they aren't quite upright😁

Items Used:
Katzelkraft flamingo stamp
Stampin up sassy salutations stamp
Tonic wreath die 'tropical fiesta frame' 
Brusho's
Patterned papers -the works
CraftUK ltd 7x7 scalloped card blank


Thank you for stopping by once again, i really appreciate all your visits.  I hope its a good day for you. Hugs Emmax


Id love to enter the following:

***

***

***

***


Thursday, 9 January 2020

Thank you

Good Morning Everyone

Today im sharing a small set of one layer CAS stamped thank you cards.  I used my ombre ink pads - i decided before chrismtas i need to use them much more as they are years old and they are so effective. 


5x5 White linen cardblank. Using the ink pad ive stamped the crazy cat stamps and their accessories randomly over the card and then stamped the sentiment - learning from this first card i stamped the sentiment first on the next one to get it more central - for this first card i had orginally planned to stamp the greeting seperately and die cut into a shape but after stamping the cats i thought it would be a shame to hide them. 


2nd version using the crazy dogs.


and 3rd version using Hobbyart linocut hare stamps and the cappuccino inkpad. I also doodled in a stitched border with a co-ordinating fine liner pen.  Was pleased how effective the inkpad was on a more solid design than the crazy cats/dogs.


These are the ink pads, looking at the open one, the little tab to the left you slide and it slides the different ink colours together so that you get a seamless join inking up stamps, then you slide them apart for storage so they don't seep into the colour beside.  Im not sure why i haven't used them more but this year that is changing!

Items Used:
Tim Holtz crazy cats & dogs mini stamps
Hobbyart 'lino cut hares' stamp set
Stampin up 'sassy salutations' sentiment stamp
Kaleidacolour ink pads - caribbean sea & cappuccino
CraftUK ltd white linen cardstock
Brown fine liner pen

Thank you all for stopping by.  I hope you enjoy the rest of the week and weekend.  Emma


Id love the enter the following:


*****


*****

january-challenge-something-new-or- old   - ive used something old - the ink pads

*****

http://sirstampalotchallenge.blogspot.com/2020/01/january-favourite-stamps.html - my fav stamps are the tim holtz crazy cats & dogs

*****

Monday, 12 November 2018

Winter Foliage

 Good Morning all, i hope you had a good weekend and the weather wasn't too wild. 

Well once again its time for a new challenge over at Make My Monday  the theme for the next two weeks chosen by me is:

WINTER FOLIAGE
Ivy, Holly, pine cones, mistletoe, any greenery that you get in the winter months.

Ive gone with a branch on a Christmas tree, built up with die cut pine leaves.


A5 white linen cardbase.  I then cut a piece of white linen card slightly smaller than my card front and using evergreen bough DI through a stencil i stenciled a light patterned, with it darker and lighter and then inked around the outside edge, stamped my sentiment in black and added the panel to the cardfront.

I found the evergreen bough distress ink in a draw never used although i must have bought it years ago - its now my favourite green ink as its not too dark and has a nice blue tinge. 

I die cut lots of pine branches from green inked cardstock.  I arranged them on the front like one bough on a christmas tree, i also added some gold mirri die cut mistletoe to add more interest.  Then i arranged my die cut fairy lights.  I cut them first from white card and coloured with a grey marker then i cut just the light bulbs from small scraps of glitter card which id had left over from another project. 


Close up, sadly the photo doesn't do the jellybean glitter card justice, when the light hits it it is soo sparkly. 

Items Used:
Elizabeth crafts pine branch die
Cheerylyn pine branch die
Memory box mistletoe die
Fairylight die set
Jellybean glitter card
Brushos & pixie powders in shades of green
Gold mirri card
Stencil
Evergreen bough distress ink
CraftUk ltd white linen card


So if you fancy joining in and to see what everyone comes up with for winter foliage do hop over to MMM

I hope you all have a good week, i must get my head down and crack on with the Christmas cards!  Hugs to you all Emmax


Id like to enter the following:
pixiescraftyworkshop - snippets  - my snippets are the little glitter light bulbs - lots of tiny offcuts now used up


Monday, 6 November 2017

Floral Acetate Birthday card

Good Morning all and welcome to Monday.  I hope you all had a good weekend.


Today i am sharing a card and chocolate wrapped set i made for a good friends birthday. 


6x6 Acetate cardbase, i then used this beautiful floral paper as the insert.  A white die cut frame added with foam tape to the front, white die cut birthday sentiment.  I then fussy cut some of the flowers and leaves out of the left over paper, gently shaped and added to the front.  Glitter glue to highlight and embellish. 


Close up showing some detail


Just showing the insert, the paper is double sided with a lovely pale lemon inside. I added the glue for the insert under the frame so you can't see if through the acetate. 


Chocolate bar wrapper.  I wrapped the paper around the bar to make a sleeve, stamped greeting die cut into a rectangle and more fussy cut flowers to finish. 

I just love this paper so was nice to use it as the main feature for the card and not hiding it all.  Its from Crafts you create 'springtime', the papers are very good quality and lovely designs. 

Items used:
Crafts you create 'springtime' papers (B&M)
Mama elephant frame die
Cheerylynn Birthday sentiment die
Stampin up 'sassy salutation' stamp
Hunkydory acetate
Stickles fruit punch


Thank you for stopping by and all your comments last week.  I hope you all have a good week, its a busy one for me starting with dentist today. Emma

Monday, 18 September 2017

Make My Monday #55 - Autumn Colours

Good Morning Everyone, i hope you had a good weekend.

So once again its time for a new challenge at Make My Monday

The theme this fortnight is

AUTUMN COLOURS


This theme tied in perfectly for the second card i made for my brothers birthday.  He loves his nature so an ideal theme. 


6x5.5" Russet cardblank, i also used the russet for matting as it perfectly picked out the colour in the tree patterned paper i went with.  After gluing the paper to the card base i die cut a frame and added on 3d foam.  I die cut lots of little leaves in autumn colours and arranged them around a stamped greeting.  


Close up and showing 3 little chipboard birdies i added to finish. 

Items used:
Carta Bella 'A perfect Autumn' paper pad
Memory box Cross Stitch rectangle dies
Mama Elephant frame die
Spellbinders 'little leafs' die set
Stampin up 'sassy salutations'
Calico Crafts woodchip birds

So if you fancy joining in and seeing what the rest of the design team came up with and lovely crafters entries do pop over

Thank you for stopping by and i hope you all have a wonderful week. Emma 


Monday, 28 August 2017

Rainbow flower thank you cards

Good Morning all and welcome to a new week, i hope you are all enjoying your bank holiday weekend.  Been beautiful weather down here in Cornwall. 

So today i am sharing a couple of thank you cards i made using a die i was given for my birthday.  It comes in 2 parts, the main floral part which cuts out and then an outside edge die, so you can either cut it into or out of your card. 


5x7" Navy cardblanks.  First i used my wink of stella pens to watercolour a rainbow background (see below), i then die cut the floral frame.  On dark navy cardstock i embossed the floral frame, which i then slotted behind the rainbow front and it gives the effect of quilting, much easier than cutting and gluing all parts back in to get the effect.  

To emboss a die and not cut it, just put it through your machine with a rubber embossing mat, this pushes the card into the gaps on the die.  Sandwich will vary to your machine, i use the embossing folder sandwich on my bigshots.

Wrapped with coordinating twine, stamped greeting die cut into a tag and eyelet added. Gems to finish. I didn't want to cover up too much of the flower so kept the sentiment small.


This one is the opposite of the first, the floral frame is die cut in dark navy card stock and the rainbow panel embossed and slotted in behind.  


Close up trying to catch the sparkle of the wink of stella pens


Just showing the wink of stella panel, i used a wet in wet technique which helps them blend together, you can see the sparkle. I actually used fired brick distress ink for the red, must get a red wink of stella.  So they blend perfectly together. 

Thank you for stopping by, i hope you all enjoy your bank holiday monday.  Emma 


Thursday, 15 June 2017

Scribble Roses

Good Morning all, i hope you are having a good week. 

So today im sharing the second lot of cards i made with the scribble rose dies. 


5x7" Cards, i embossed the largest double stitched die into the card front, then die cut 2 more layers with the double stitched rectangles and stamped the sentiment on the smaller one.  I inked up white card with distress inks and die cut lots of the scribble roses and stictched leaves and then layered up together.  Ripe persimmon ink for the flowers
Cracked pistachio and lucky clover ink for the leaves


Picked raspberry DI for the flowers 


Squeezed Lemonade DI, i also made a little gift card to go with the birthday card.  


To make the gift card i die cut another stitched rectangle, scored in one end to form a small pocket and then folded the rest in half. 


Items used: 
Stampin up - 'sassy salutations' sentiment stamps
Tim Holtz distress inks - squeezed lemonade, ripe persimmon, picked raspberry, cracked pistachio, lucky clover
Double stitched rectangle dies

You might also like


thank you for stopping by, and all your recent comments. Emma 

Monday, 15 May 2017

Make My Monday #46 - sugar & spice

Good Morning everyone and welcome to a new week. 

Its the start of a new challenge over at Make My Monday

The theme this fortnight is SUGAR & SPICE, picked by me this time, so if you fancy joining in just pop over and create something that comes to your mind when you think of sugar and spice, could be sweet and cute, hot and spicy, a mix of both or how about going down the sugar and spice and all things nice, that's what little girls are made of route and a card for a little or not so little girl? 

When i picked the theme i didn't have any ideas of what i would make but on looking through my stash i found a paper pad with the perfect hot warm spicy colours, but broken up with pastel pink and blue which said sugar to me.  So i started with a lovely backing paper which has a brown spicy background and bright flowers. 


5.5x6" card blank, corners rounded. Covered with paper leaving a small border.  Using papers i made up 3 flowers, die cut Sue wilson dies in white linen and a pastel pink paper from the pad and layered together on foam pads with a stamped sentiment. Foliage die cut from a green card that matches the background and the pink paper.  I found these little buttons in my stash that look like sweeties to me so the perfect finishing touch as they picked up on the pink used too. 


Close up to show the flowers better


Items used:
All papers are from - Echo Park 'Simple Life' by Deena Rutter
Sue Wilson -  French Collection 'provence' die set
Memory box 'Massa Leaf' die
Memory box ' Small Olive branch' die
Stampin up 'Sassy Salutations' sentiment


So if you fancy joining in and seeing what the rest of the design team came up with please do pop over to Make My Monday


You might also like:


Thank you for stopping by and for all your comments last week.  I hope you are all well and have a good week ahead. Emma 


Wednesday, 11 January 2017

Shutter card for mums birthday


Good Morning everyone, from a very wet and windy Cornwall.

So today im sharing this shutter card i made for my mums birthday.  I always find it hard to get back into crafting after all those christmas cards so this was hard going, but im pleased with the outcome. 


White Shutter card gifted to me by a craft buddy, peach & turquoise polka dot paper.  Lots of flowers cut in white, peach and turquoise and layered up. Stampin up Sassy Sentiment stamp, grey pearl card used for the foliage, little mini butterflies to finish.


Close up of the flowers, pearl and glitter glue for the centres. 


and the rear, decorated with the same peach and turquoise polks dots paper, white rectangle to write on. 

Thank you for looking and any comments you leave. Emma 


Thursday, 15 December 2016

Thinking of You

Good Morning everyone, so today im sharing this Thinking of You card


First i die cut the shape using spellbinders curved border dies and then cut the fancy pattern into the front of the card, script paper from Studio Calico 'LemonLush' collection, die cut to match the card shape.  Stamped sentiment using Stampin Up 'sassy salutations' set, die cut into an oval, matted onto a black oval, all edged with peach ink.  Peach flower from stash.  

Thank you for looking and all your comments on my previous uploads. Emma