Followers

Thursday 29 March 2018

Male Birthday cards

Good Morning..

Today im sharing 2 male cards i made, once again i used alcohol inks on silver mirror card, its a nightmare to take decent photo of it though.  The finished effect is brilliant.


6x5.5" white cardblank.  I then embossed a piece of silver mirror card and used purple, blue & green shades of alcohol ink on a blending pad to colour it.  I then cut it into 3 panels and mounted onto grey pearl card and added to the card base.  This embossing folder from spellbinders is actually 5x7" so on cutting up the sections i used the label section to add my sentiment.  

I die cut various cogs from white card and layered up with 'screw tops' die cut from silver mirror card.


This 2nd card is made the same way but mounted on a black 6x5.5" card base instead. 


Close up trying but not really succeeding in showing the colour better! 

Items Used:
Spellbinders Mbossibilities folder - EL-017 Industrial
Spellbinders De-lites 'S2-228 - Nuts & Bolts'
Cheerylynn cog dies
Ranger Tim Holtz Alcohol inks
Birthday sentiment die

You might also Like:

Thank you for stopping by.  I hope you all have a good Easter weekend and enjoy whatever you get upto.  Emma

Monday 26 March 2018

Easter Bunnies

Good Morning all, i hope you had a good weekend.  

Easter will soon be here now, this year seems to be flying so far. 


6x6 green cardblank, i die cut the foliage from the same green which is much brighter than the photo shows, i layered up several of the branches to get the wreath.  Little 'primroses' die cut from yellow card, inked the centre and pearls added to match my bunny.  The bunny was cut from card coloured with oxide inks. 

Sentiment stamped in green archival. 

A close up on the wreath.


and below i made little tags for my nieces 


I first die cut a fishtail banner, glued on a die cut sentiment and then i embossed it.  Little die cut bunny rabbits in various colours, i then mounted them onto matching coloured card.  Ribbon to finish. 


The same as above but just in a large tag shape.  3 are made in the girls favourite colours, of course little baby not got a fav colour yet and she's obviously not getting a chocolate egg from her aunt, ive got her a little something else! She is growing fast, nearly 1 month old now. 

Items used:
Impression Obsession Easter die
Rabbit die
Foliage die
Sizzix flower dies
Justrite sentiment stamps
Sunrays, puff ball, leaves, birds embossing folders


You might also like
                                             childrens-easter-cards


Thank you for stopping by and thank your comments.  I hope you all have a good week. Emma


Id like to enter the following challenges

Friday 23 March 2018

Doodling fun


Good evening all, back with another upload this week.  

I saw the challenge for Zentangle and had to join in, Id forgotten how much i enjoyed doing it and its so calming, ideal for passing time in waiting rooms as all you need is paper and a fine pen. Its certainly encouraged me to get 'tangling' again. 


This time i started with a stamped image, then just picked up the black fineliner and doodled, i then doodled a border to frame it.  Stamped sentiments.  I did add a touch of pencil shading blended with a paper stump.  Matted onto black and then a white A5 cardblank.


Just a close up of my doodling. 


This is the stamped image i started with, it was perfect already having lots of lines to guide me.  

I would love to enter this at 


Items Used:
Honeydoo stamps - fancy flourish
Clearly Besotted stamps - little sentiments
Uniball black fine liners 0.2, 0.5 & 0.8
4B pencil & paper stump

Thank you for stopping by today, i hope you all have a lovely weekend. Emma

You might also like


Thursday 22 March 2018

Sympathy Cards


Good Morning all, i hope you are having a good week.


Today im sharing those cards we don't like to make.  I kept them very simple. 


5x7" card, i used a leaf patterned pearl ivory cardstock for the base.  I then embossed a cross stitch rectangle into the front of the card.  Stamped greeting.  Feathers cut from cardstock coloured with oxide inks in cracked pistachio & twisted citron. 

Pale grey pearlised base card 5x7", the feathers die cut from card colours with purple brushos & copper pixie powder. 

Items Used:
Joy crafts feather dies
Memory box cross stitched rectangle dies
Distress Oxide inks - cracked pistachio, twisted citron
Brusho Powders
Cosmic shimmer pixie powders
Cardstock by payper box

Thank you for stopping by. Emma

Monday 19 March 2018

Easter Fun - Hipster animals

Good Morning everyone, i hope you had a good weekend and not too much snow.  

Its a new challenge at Make My Monday   The theme this time is 


EASTER FUN

I decided to have fun with the Tim Holtz hipster animals and my wink of stella pens.


6x6 Teal cardblank.  I stamped the chic chick in black and coloured in with a mix of alchol pens for his outfit and then wink of stella for his feathers.  Glossy accents on his glasses.  Die cut into a wonky stitched circle.  Then mounted onto a teal card circle.  For the background i first computer printed the sentiment & then die cut into a square, embossed a larger wonky circle die so that it will frame the topper.  Then using ink splat stamps with distress ink i lightly stamped in a diagonal across the front just to add interest.  

A little 'primrose' flower made up from yellow, lightly inked the centre in orange and a little glue dot centre.  A couple of die cut leaves to finish. 


A close up of the chick, you can just about see the sparkle of the wink of stella pens. 


A second version, this uses a little artistic license as you don't normally get ostrich's at Easter but i decided to colour her yellow and she could be a chick, duckling or maybe even a gosling or a hybrid!😀.
Made the same way as the first one just using a square topper instead. 

Items Used:
Tim Holtz Hipster Animals stamps
Stampin up Gorgeous grunge stamps
Peacock distress ink
Wink of stella pens
Wonky Stitched circle and square dies
Sizzix flower dies

So please do pop over to MMM and see what the rest of the team came up with and also to see all the entries, always very inspiring. 

I hope you all have a good week, thank you for stopping by. Emma

Thursday 15 March 2018

Take One Paper Pad....

Good Morning all, i hope you are having a good week.

Today im showing a batch of cards all made from the same paper pad, after using it for make my mums card for Mothering Sunday i thought it would be a good challenge for me to try and use up all the papers on different cards and in different ways.  I actually enjoyed the challenge.

The paper pad is 6x6" 'On the Bright Side' by My Minds Eye

Its a pad ive had years and loved so used it sparingly as us crafters do. 


This first card i made for mum, 7x7 white cardbase.  I die cut some of the papers with various stitched dies, all matted onto chocolate brown cardstock and layered up.  I die cut the flower from white card so it would stand out against all the busy patterns, i edge it with blue and added blue pearls to the centre.  Die cut mum from white too and then added blue pearls to finish.  


I then made a very similar one for the box just using different papers from the pad and orange pearls.  Im not usually one for adding lots of busy patterns together but found using just bits of them that it wasn't too OTT.


6x6 Chocolate Brown basecard.  New home card.  I die cut various stitched shapes from the papers and layered them up, this first takes a while playing with the shapes and placements until it works for me.  I then stamped the greeting in brown ink onto beige faux leather effect card and mounted onto the card base.   I then die cut my little house from 2 papers and stuck together. 


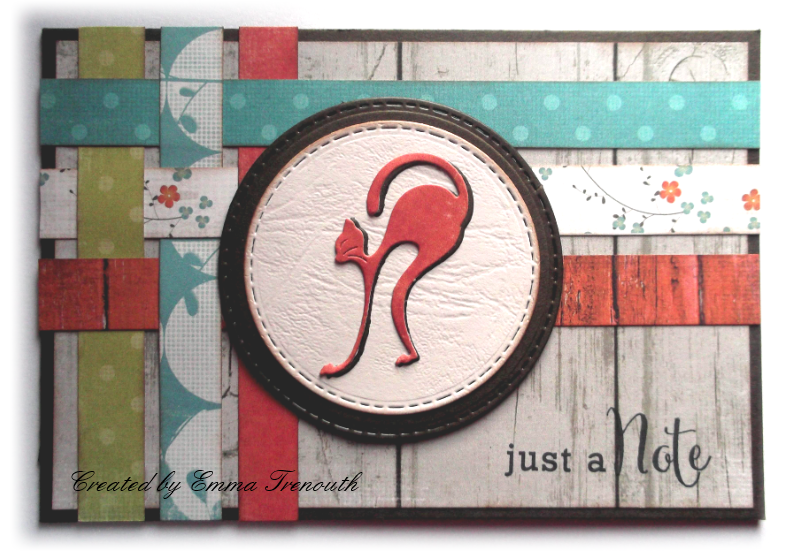
6x5.5" Brown card base.  I again cut some patterend papers and layered onto chocolate brown cardstock, added onto beige card stamped with the greeting.  I die cut my cat twice, ones from orange and again brown papers and off set so he stands out more. Blue pearls to finish. 


6x6" chocolate brown cardbase.  I had lots of little bits of paper left, not big enough to do much with so cut them into tiny little flowers.  I then die cut green leaves, a stitched rectangle which was left over too made a great flower planter!  All layered onto wood grain paper that also comes from the pads.  Die cut greeting and cat both in the brown.  I added liquid pearls to the flower centres which dried weird with a dent in the middle but after contemplation i think it looks like little seed beads so have left it.


5x7" Brown base.  Lots of papers die cut into various fishtail banners and layered up onto a beige floral pattern paper.  Again it took a while to get an order which worked for me.  Stamped greeting.


4x6" (A6) card, this one used all the left over banners from the first one.  


4x6" (A6) card, i had lots of little strips of paper left so did a little weaving, layered onto woodgrain paper.  Die cut cat as before and stamped greeting. 

And last but not least a gift tag, all the little scraps i die cut into banners, as most weren't long enough for the whole length of the die, I just die cut the tips with the fishtail end.  For the vertical strip i cut them off the front cover of the pad - not waste with any of this paper pad.  Ribbon to finish. 

This last card was made for a colour challenge with friends of using apricot, peach, anthracite and ribbon, the papers fitted perfectly instead of the brown card i used a dark pearl grey, i had matching ribbon in my stash and added loops of them along the top and bottom edges of the middle panel.  Die cut sentiment and flower. 

Items Used:
My Minds Eye 'On the Bright side' paper pad
Chocolate brown cardstock, Beige leather cardstock, grey pearl- payper box
Various Stitched dies, squares, rectangle, circle
Flower dies
Cat dies
House die
Pierced & cross stitch fist tail banner die sets
Clearly besotted fancy sentiment stamps


Thank you for stopping by, i hope you all have a lovely weekend. Emma

Monday 12 March 2018

Daisy Mixed Media Canvas

Good Morning all, i hope you all enjoyed your weekend. 

Today i am sharing this Mixed Media Home Decor Canvas that i made for my mum for Mother's Day. 


Box Canvas 16x6" (40x15cm)  After doing the brick background (see below for details) I die cut lots of daisies from white card, made them up, added yellow stamens & florists wires for their stems.  I then die cut various foliage from brusho and inked cardstocks in different shades of greens and ferns from kraft card.  I then slowly built up the layout.


The top half.  I added a lovely big bee metal charm ive had in my stash for years.

The bottom half, i added more foliage and ivy in the bottom as you naturally find at the bottom of a wall


Just close ups. Once it was all stuck on i sealed everything with a matt sealant to keep it all fresh. 


The wall - first i added texture paste through a stencil and once dry i added black acrylic paint over the whole canvas.  Once dry i put the stencil back over and added red and orange starlight paints to the bricks, i found doing it this way kept the black between the bricks better.  I then added touches of green paint to give a kind of mossy effect once everything is added on top. 

Items Used:
Tattered Lace fern dies
Joanna Sheen & Brittania Ivy dies
Heartfelt Aster die set
Stitched Daisy dies
Tim Holtz foliage die
Brick stencil
Imagination crafts starlight paints
Golden Texture paste
Cracked Pistachio & twisted citron oxide inks
Brusho's


Thank you for stopping by and all your visits and comments last week and congratulations on the arrival of my new niece. I hope you all have a good week. Emma 


Thursday 8 March 2018

New Baby Niece

Good Morning Everyone.

Last week with all that cold weather my 4th little niece was born, she picked a cold week to arrive.  So i kept in the warm and made some cards for her. 


Baby Bottle shaped card.  I first cut the bottle shape from white linen card, keeping the card spine to the left.  I then cut a smaller layer and die cut an oval into it,  then dry embossed with the swiss dots.  Added red gingham card behind the aperture and added the layer onto the front with 3d foam tape.  I then added an oval frame and my die cut giraffe. Id wrapped cotton twine around the neck. Computer printed sentiment die cut into a small tag and added with more twine and a co-ordinating button. 


For the second card i dug out my old fabulous stork stamp.  Ive stamped him onto white card and simply watercoloured in lilac and touches of yellow for his beak & feet. I then cut him out.  Stamped sentiment and die cut with pierced delight spellbinders die

6x6 white linen cardblank, matted and layered with a lilac pattern paper die cut into a wonky stitched square, matted onto die cut white square and onto lilac pearl card.  Pearls to finish.


And a card for the new big sister, i found this lovely image of two little girls in an old LOTV art pad.  Computer printed sentiment, and then ive just matted the image onto purple card to pick up the colours in the topper. 


I also made this tag for the new big sister to add to a little gift.  Elephant die cut into grey pearl card, yellow gingham circle, tag cut in white and grey pearl card and die cut alpha's. 


While i was at it i made a few more bottle cards for the box


Yellow gingham one

and blue and grey polka dot ones, all same details as the first one. 


Items used:
Tattered lace giraffe & elephant dies
Tattered lace square dies
Cuttlebug swiss dots embossing folder
Spellbinders oval dies
Spellbinders 'Pierced delight - S2-143'
Memory box cross stitch rectangles
Anna marie polka dot & gingham cardstock
Justrite stamps 'special delivery'
LOTV art pad 'Just for Girls''

Thank you for stopping by, i hope you all enjoy the rest of the week. Emma 

Monday 5 March 2018

Gold or Silver - alcohol inks

Good Morning all,  Brrr what a cold one, i hope you are all keeping warm and cosy. 

So the theme this fortnight at Make My Monday  is

GOLD OR SILVER

I dug out the mirror card and decided to go all out and use it as the main feature with alcohol inks, getting a decent photo has not been easy at all. 


I first die cut silver mirror card into stripes and dry embossed with flowers, i then used alcohol inks to colour it.  I then used a cotton bud and blending solution i removed the ink from the flowers.  I mounted them onto white card, then silver mirror card and a white 6.5 x 5" card blank

I then stamped a sentiment onto white card and die cut into an oval and mounted onto silver mirror card.  I kept the embellishment simple with one metal flower to show of the background. 


Trying to show the colour better.


This shows the embossed panels coloured with the inks before i removed it from the flowers, you can see the colours so much better here. 


and onto a gold mirror card version


Same details as the first ones but instead i used red, orange and yellow alcohol inks onto gold mirror card and all the mats are gold. 

This shows the colour a bit better


and below is the embossed panels before i added the alcohol inks
Its a shame i couldn't get a photo to do it justice, but i really enjoyed playing with my alcohol inks again and in a different way for me so will be doing it again. 

Items Used
Silver & Gold mirror card
Ranger Tim Holtz Alcohol inks
Lettuce, bottle, stream & wild plum (on the silver)
Red Pepper, sunshine yellow & Terra cotta (on the gold)
Spellbinders M-bossabilities EL-005 
MFT Stitched rectangle set
Clearly besotted sentiment stamps 'Fancy sayings'
Spellbinders oval dies
Tim Holtz Ideology metal flowers

Please do pop over to MMM we love to see what you will come up with for gold or silver.

I hope you all have a good week whatever the weather brings us. Emma


I wish to enter this in the following challenge