Followers

Thursday 21 December 2017

MDF Baubles Pt2

Good Morning all, i hope you are having a good week.

So today im sharing more of the MDF baubles ive decorated.  These ones are more papers and florals.  I really enjoyed doing both styles. 


Poinsettia Noel

First i covered the baubles in Christmas papers.  Once dry i painted the backs with co-ordinating starlight paints.   I painted a chipboard word 'Noel' with gold starlights paint.  I die cut a poinsettia from red card and splashed and edged with gold paint.  Die cut pine foliage and pearls and glitter glue to finish. 


***

Floral Candles

After covering with papers.  I die cut candles from ivory pearl card and built up.  Inked the flame and added glitter glue.  Various die cut foliage with ready made flowers, wired gems.  Colours picked to go with the LOTV nitwits christmas paper. 


Close up of the floral arrangement


***


Jingling Candles

This version had small pinecones and jingle bells in the arrangement.  


Close up, the bells do jingle.


***

Snowy Pinecones

Chipboard Peace painted with gold starlight paints.  Pine cones and red berries to go with the background paper.  Diecut foliage .


The pine cones came ready 'snowed' so i added some white to the red berries and sprinkled on glitter.


***

Poinsettia Joy

This one i went with red, green and gold and poinsettias picking up on the pattern paper in the background. Joy chipboard painted with gold paint.  I die cut the poinsettias from a co-ordinating red paper from the pad.  Added in green pine leaves and kraft card fern leaves.  Gold pearls to finish. 


Close up


Items Used:
MDF Baubles 
Kaisercraft Paper pad 'Holy Night'
Basic Grey Paper pad 'Evergreen'
LOTV/Nitwit paper pad 'woodland wishes'
Spellbinders Poinsettia die
Cheerylynn Pine branch die
Elizabeth Dies pine branch die
Tim Holtz tattered Poinsettia die
Tattered lace fern die
Candle die
Papermania chipboard words
Imagination Crafts Starlight paints
Ready made flowers, pinecones, berries


Thank you all for stopping by once again.  I hope you all have a peaceful Christmas.  Emmax


Monday 18 December 2017

MDF Baubles

Good Morning all, can you believe thats another week gone and next week will be the big day we've been building upto for months?

Ive added a page with all the amazing handmade Christmas cards ive received from friends, so if you fancy a peek its a tab under my header along from my home button.  


So today im sharing a set of MDF baubles i decorated, instead of cards for close family and friends this year i made them a bauble to enjoy year after year.  I had great fun making them all differently.  They are approx 5" square (13cm)  They see my funky set of paperartsy stamps in action, along with those penguins again!


Snowman in the twinkling fairy lights
So for this one.  I first stamped and coloured the snowman with inktense pencils as they are permanent when you add water so better for long term projects.  I then added texture paste with a stencil and once dried i used a mix of starlight paints on top.  Then splattered on white paint to act as snow.

The then added texture paste snow to the bottom for something for my characters to stand on. 

The fairy lights were die cut from white card, then coloured with inktense pencils and then glossy accents added.  I also added glossy accent to the snowmans eyes and buttons. 

Twine ribbon bows and hanging loops to finish.  The backs of each bauble i painted in the same colour starlight paints. 


Just a close up showing the light hitting the starlights background 


***


Christmas Characters in the moon light
This one has the paperarsty totem characters, all coloured with inktense pencils and cut out, glossy accents on the eyes.  A die cut sentiment behind, i added a little yellow ink to the centre circle to act as a 'moon' in the night sky. 


***


Polar Bears
This one has the starlight and snow background, but only texture paste for the snow, while the paste is wet i added loose glitter which sticks.  Fairy lights as before, this time a die cut polar bear, once die cut in white i gently added a little blue ink around him.  I added glitter glue to his little snowflakes. 


***


Jingling Penguins.   
I first covered the bauble in snowflake patterned paper, sanded the edges and then painted the edges and back in silver paint.  Added a large die cut snowflake, torn paper snow bank, to which i then added snow texture paste and glitter.  Stamped the penguins and added a little colour before cutting out.  To this one i added jingle bells to the top with the bow.


***


Hide 'n' Seek
This one was made for children so wanted a fun feel.  As above to cover the bauble with paper and snow.  I then stamped my characters and coloured them all in and cut out.  Rudolph, the penguin and Elf are hiding among the snowpeople.  Santa is trying to find them! 😁.   Again jingle bells added to the top. 


***

Penguins.
Now this one was a late make for my dad who absolutely loved the penguin cards i made for mum to send and asked for one for himself.  After id added the circular frame with the fancy inner edge it reminded me of some very old baubles my mum has, where on one side they are open with a fancy edge.  Anyway i coloured the penguins and cut out and added orange gems to the sky as stars that also pick up on the orange in the penguins.  The brusho/pixie powder background was left over from my penguin cards.  

He loved it so that was worth it! 

***

and below is a few cards i made similar

6x6 white cardblank.  Background made with the starlight paints as before, Torn white card snow drifts which i dry embossed.  Die cut sentiment, i lightly inked the inside yellow to kind of act like the 'moon'. Those pesky penguins again. 

***

Same as before but with the paperartsy characters which were all coloured with inktense pencils.


***


Paperartsy characters and fairy lights

***

and lastly the paperartsy snowman and fairy lights.  Die cut sentiment.


Items used:
Paperartsy Stamps - totems ZA19
Katzelkraft stamps - grumpy penguins
Imagination Crafts Starlight paints - 134, 135 & 139
Golden Modeling paste
Derwent Inktense Pencils
Brusho's
Cosmic Shimmer Pixie powders
Spellbinders Circle grand & Exquisite circle dies
Spellbinders Snowflake Pendant die
MFT Christmas Sentiment die
Tattered Lace polar bear & Cub die
Fairy Light die
Cheerylynn Sentiment die
That Special touch - circle mask


  Thank you for stopping by, especially when you are all so busy this time of year.  Emma


Thursday 14 December 2017

A Christmas Candle

Good Morning all, i hope you are having a good week.

Today im sharing a design made for a family member who lost his wife this year so i didn't want to do a full Merry/Happy Christmas card. 


The photo is a bit dark, but its ivory pearlised card that has a leaf pattern in it.  I first made an A5 cardblank and then using 2 sizes of the double stitched rectangle dies i embossed them only into the front.  I also die cut the candle in the same pearl card.  I added a soft layer or cracked pistachio distress ink to just help the candle stand out a bit.  I coloured the flame with alcohol ink.  

Ivy die cut from left over card that was coloured with Cracked pistachio & Peacock feathers oxide inks, die cut poinsettia with a pearl drop to first.  I had stamped the sentiment first and dried it with a heat tool to set. 


Close up to show detail. 


Items Used:
Ivory pearl cardstock by payper box
Spellbinders Poinsettia die set
Britannia Ivy Die
LOTV handwritten sentiment stamps
Double Stitched rectangle dies
Candle Die - Medlock Crafts
Tim Holtz Cracked Pistachio Distress ink
TH Crack Pistachio & Peacock Feathers Oxide inks


Thank you for stopping by.  Ive been very lucky to recieve lots of beautiful handmade cards in the post, so thank you to those who have sent me one.  Emma

Monday 11 December 2017

Sophie & Lizzy's birthdays


Good Morning all and welcome to a new week.  I hope you didn't get too much snow at the weekend, we had it very wet and windy down here.  

Today i am sharing the cards i made for my 2 nieces birthdays, Sophie had hers at the weekend and its Lizzy's tomorrow.  They are growing up so fast now. 

I had hoped to make them penny slider cards but ran out of time so dug out my sizzix flip it die sets, so quick cards but think the girls will love flipping them. 


Showing it closed up.  Red pearl card for the base, floral paper, computer printed sentiment die cut to fit the flip circle.  


Flipped Open which shows the otherside of the circle where i added the girls ages.  I picked up on the yellow in the paper and made some flowers, blue leaves and a pearl to finish.  I added glitter glue highlights as Sophie loves glitter.


Just showing the back of the card, i used a less patterned paper from the pad so can easily be written on.

and onto Lizzy's

Russet brown cardbase.  She loves owls and her bedroom is owl themed so found this fab paper.  I found this lovely chipboard owl in my stash too which i coloured with green paint to match the paper. 

Showing it flipped open


and again the back of the card using a less patterned paper from the pad. 

***

and then i made them up a simple house mouse card, i found these images id printed off a long time ago for the house mouse joanna sheen CD-rom

5x5 white cardblank.  I first decoupaged the image and added glossy accents to the bubbles.  Matted onto pink glitter card.  I then matted bubble pattern paper onto more pink glitter card and added to the card front.  Die cut sentiment. 

Same as before, using this lovely dandelion image, and gold mirri card.  I added frosted lace glitter glue to the dandelion seeds. 

Items used:
Echo Park 'Simple Life' papers (floral)
Carta Bella 'A perfect autumn' papers (Owl)
Joanna Sheen House Mouse Triple CD-Rom
Sizzix 'Circle Flip-it' 559171

Thank you for stopping by and all your comments and visits last week.  I hope you all have a good week and keep warm. Hugs Emma


Thursday 7 December 2017

Dads Birthday Cards

Good Morning all, i hope you're having a good week. 


So now dad's birthday has passed i can share the cards i made for him.  


A5 dark brown cardbase.  Kraft woodgrain cardstock, cream leather look cardstock.  I die cut the curved border from the cream card and then die cut all the different tools into it. I then using a brown fineline pen faux stitched around each tool to help them stand out, i then added that to the base on foam pads.  Stamped sentiment.


Just a close up.


and below another colour combo for the box. 

This one is totally flat for posting.  White A5 base card, teal cardstock and woodgrain patterned paper.  Spellbinders die cut sentiment.  I made faux 'brads' using a hole punch and glossy accents. 


***

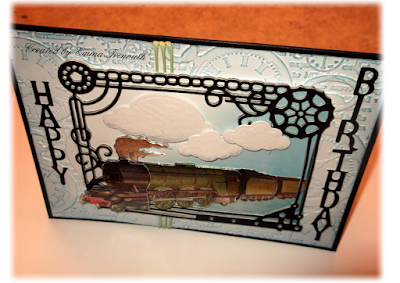
and on to the 2nd card i made for dad, he is a big steam train fan and i found this very old dufex train decoupage in my stash and combined it with a cog die cut frame.  


A5 Black cardblank.  I also cut the frame and sentiment from the same matt black cardstock.  After making up the train decoupage i backed the frame with pale blue paper and added the train so it kind of looks like its coming out the frame.  Die cut clouds.  White card embossed with a clock embossing folder and gently inked with blue distress ink.  Green twine added to pick up on the green of the train. 


Trying to show the colour of the train better.  My dad really loved it, so that was good as it gets harder each year to make him something different! 

Items used:
Cog Frame die - make unknown
Dufex train decoupage
Sizzix Tim Holtz clock embossing folder
Die-namics could dies
Tool dies
Spellbinders sentiment dies
Stormy sky distress ink
Papermania Mr Smiths workshop papers
Papermania pigments papers


Thank you all for stopping by and all your comments on my last uploads, as always i appreciate you taking the time.  Enjoy the rest of your week. Emma


Monday 4 December 2017

Babies & Men!

Good Morning all, and we are now really into the countdown to Christmas.  

Today im sharing a baby card and a men's birthday card, so a good mix!  


The first card i made for a friend who became a first time granny recently.


5x7 White cardblank.  I used dove grey pearl card and pink polka dot card.  I first computer printed the sentiment and added it behind the grey die cut frame on foam pads.  Die cut baby items added to the bottom.  I then embossed white card and matted onto pink and grey card, wrapped with grey satin ribbon.  Pink pearls to finish. 

***

and onto a 60th Male birthday card

5.5x6" white cardblank.  I die cut the star frame in black and gold mirri card, mounted it on foam pads on to the computer printed sentiment.  White card embossed with dogtooth and then mounted onto gold mirri and black card and added to the base.  I then die cut extra stars in the black and gold mirri and added around the frame. 

This was made for a man who doesn't really have any interests.  He loved it so that was good. 


Close up, the photo doesn't really show the gold mirri to its best. 

Items Used:
Star frame die - make unknown
MFT frame die
Baby icon dies
Crafters companion 'purl knit' embossing folder
Papermania 'dog tooth' embossing folder
Anna-Marie pink polka dot cardstock

Thank you for stopping by and all your comments on my 1st blog birthday post.  I hope you all have a good week. Emma 


Wednesday 29 November 2017

1st Blog Birthday

Good Morning all, gosh can you believe today my blog is 1 year old, and what a year.  Thank you to all my regular followers and those that stop by now and then.

Today i am sharing a batch of cards that came together from backgrounds made with brusho/pixie powder mix left over from my Christmas cards and the white inverted scallop squares which were the 'left over' from die cut frames i used. 


Lemon & Blue combo, Violet flower die
5x5 cardbase.  I die cut the tim holtz mixed media die into my white top panel, this i mounted over a panel of lemon & blue brusho cardstock.  I cut my violets from the same card, i added a little blue glue to the flower centres.  Sentiment can easily be changed to any occasion. 


5x5" White base card.  Square mat cut from my backing paper.  I then die cut the collage corner die into the topper, stamped sentiment in grey and mounted with 3D foam.  Die cut butterflies and glitter glue to finish.

This first one is a lilac/green combo


Orange & Lilac combo.  The photos don't really do the colours justice as the pixie powders really do sparkle when the light hits them.


Lilac & Peach, Tim holtz mixed media corner die


Orange & Blue combo


Green & Orange,


And finally a mix up of orange, green & Lilac.  I gently shaped the butterfly wings and only add glue down the middle so that the wings are lifted up off the card.  


Items Used:
Tim Holtz Mixed Media dies
Poppystamps Ring Collage die 1760
Sizzix Butterfly die set
Memory box viola die
Double stitched square die set
Justrite sentiment stamps
Brusho's & Pixie powders


If you fancy seeing what my first upload was 
My First Upload


and this shows you the cards that i had the backgrounds and toppers left over from

So thank you for stopping by once again and all your support, i look forward to continuing my blogland discovery with you all.  Emma

Monday 27 November 2017

Make My Monday #60 - Happy Christmas

Good Morning all and welcome to a new week.  

Its once again time for a new challenge over at Make My Monday  and the countdown to Christmas has begun with the theme of

Happy Christmas / Happy Holidays

Ive made a quirky fun card using my new paperartsy stamp set. Im seem to be going through a quirky stage with images. 


A5 white cardblank. I first stamped the images and simply coloured them with inktense pencils.  I added glossy accents to the eyes and rudolph's nose and then cut them out.  I die cut a frame backed with white card and the stamped sentiment.  Dry embossed background, ive matted them all onto multi-coloured paper.  I mounted the frame with 3D foam and slotted the characters in to look like they are peeking out. 


Close up.

Items used:
Paperartsy -Elenazinski Art 'ZA19'
MFT frame die
Sizzix Holly Embossing folder
Derwent Inktense pencils
Ranger glossy accents
Happy Watercolour paper pad - poundland

If you fancy joining in the challenge and to see what the rest of the team came up with please do pop over to Make My Monday


Thank you for stopping by and taking a peek.  I hope you all have a good week. Emma


Monday 20 November 2017

Its A Double Diamond Christmas

 Good Morning everyone and welcome to a new week. I hope you are all keeping warm and those of you with that nasty cough and cold are on the mend. 

So today i am sharing a set of double diamond fold cards i made for Christmas.  These are really fiddly to make up, although i use a die to cut them out. I dug out all those old Christmas papers and sat die cutting for several evenings. 


These first two use LOTV nitwit papers.  Using the tattered lace diamond fold die, line it up and cut twice, then carefully using a bone folder manipulate all the score lines until it all comes together.  Then i die cut the papers using the matting dies in the set. 


For my embellishments i picked up on the christmas roses and holly in the paper and built up simlar toppers with flower, holly and pine dies.  Pearls to finish.


This one is the opposite colours with buttons to finish.  Also shows them standing up easily. 


I computer printed the sentiment and die cut and added to the back of the card, plain paper added to the sides to write the message on. 


Button Holly.  Picking up on the holly and colours in the LOTV/Nitwit papers.  I die cut the holly from pearl olive and soft gold cardstocks, they matched the paper colours pretty well.  Buttons used as the holly berries. 


Just showing the front. 


Red & Gold Poinsettia.  Spellbinder poinsettia die cut from ruby red and green cardstock, gently shaped and a pearl centre.  All papers from Kaisercraft 'holy night'  The papers have gold foiling which doesn't show up too well. 

 Showing from the front.


and below a fun one with those grumpy penguins again


Katzelkraft grumpy penguin, stamped, coloured and fussy cut out, spellbinders snowflake die cut from white card and added behind the penguins. Papers poundland 'pure frozen', glitter glue to finish.  

Items Used:
Tattered Lace 'Diamond Fold' card die set
Brittania Holly die
Elizabeth Crafts Pine branch die
Spellbinders Poinsettia die
Spellbinders Build a snowflake die
Katzelkraft 'grumpy penguin' stamp set
LOTV Nitwit papers
Kaisercraft 'holy night' papers
Poundland 'pure frozen' papers


You might also like


Thank you for stopping by and taking a peek and all your comments last week.  I hope you all have a good week. Emma