Followers

Monday 31 July 2017

Blue Iris


Good Morning all, i hope you had a lovely weekend and found a bit of sunshine. 

Today im sharing a little card I made for a friend, i treated myself to a set of 12 Wink of Stella pens recently so this is my first outing with them.  I used them to both colour in the image and make a matching background. 


I first stamped the iris twice and coloured with 2 blue, 2 green and a touch of orange stella pens, i used them like watercolour and you still get the full sparkle effect.  I then die cut one into shape, using a mixed media die i cut out the hole detail, i then decoupaged the 2nd iris flower on top. 

I die cut a matching size and shape as the topper and using the stella pens made a background, once dry i glued it behind the topper, and mounted onto a cardbase using foam tape.   


Close up to try and show the sparkle, you can just about catch it, i had also shaded around the iris with yellow ink to give a softer effect. 

Items Used:
Chocolate Baroque 'elegant iris' stamp
Tim Holtz 'Mixed Media' dies
Sizzix framelits '658204'
Kuretake Zig Wink Of Stella pens


Thank you for stopping by and all your amazing comments last week on my crazy birds.  I hope you all have a good week. Emma 

Thursday 27 July 2017

A Flock of Crazy Birds

Good Morning All, i hope you are all having a good week. 


So today i am sharing a batch of crazy birds.  Back when i wasn't really crafting i was playing around with my various mediums, stamps and stencils with my crazy bird stamps.  Sometimes its fun to just let loose and play, learning how mediums work together or not.


I first stamped the birds and doodled some simple scenes and extras like flower, butterflies and masked them all with drawing gum.  Once that was dry i got out the brushos & pixie powders for the backgrounds.  Again once the background was dry i dug out my stencils and masks and used starlight paints to stencil on extra metallic details. Once dry remove all drawing gum.

Stamp and colour the birds with distress inks, just cut out the main body and shape it, using glue gel place them onto the panels, lining up with their legs.  Then use distress ink to add the grass and colour the flowers etc.  Shade around the birds with charcoal pencil to add shadow and depth.  Then mount them into the Polaroid frames. 


Close up, you can just about see the sparkle of the red starlights in the background.  I coloured these birds with cracked pistachio, lucky clover & salty ocean.  


Different colour combination which gives a completely different look.  I used blues and purple brushos and pixie powers for the backgrounds and stenciled in silver. 


I coloured this batch of cards in squeezed lemonade and ripe persimmon.  You can see the purple pixie powder and the silver stenciled flowers.  I added glossy accents to all the eyes.

I had great fun just getting inky and trying out new mediums together, not really with an end plan, but in the end turned these into simple cards, as the toppers are so busy and colourful Ive kept the card bases very plain. 


Black A5 card blanks, computer printed sentiments onto white card which is matted onto the black base, i mounted the Polaroid frames onto black card and mounted on 3D foam onto the base card.  I wanted the sentiments to be as quirky as the images so used a mix of capital and lower alphas. 


Items used:
Tim Holtz Crazy bird stamps
Sizzix Polaroid Frame dies
Brusho Powders
Cosmic Shimmer Pixie Powders
Imagination Crafts starlight paints
Tim Holtz Distress inks
Stencils:
Tim Holtz 'shatter - THS014'
Sheena Douglass 'Wildflowers & sunburst'
The crafters workshop 'mod circles - TCW424'


You may also like


Thank you for stopping by and taking a peek at my crazy mixed media birds, thank you for your comments on my monochrome upload too.  Enjoy the rest of the week. Emma 


Monday 24 July 2017

Make My Monday #51 - Monochrome


Good Morning all, welcome to a new week. 

So today is the start of a new challenge over at Make My Monday

The theme this time is

MONOCHROME

I decided to go with blue and white.  


A5 white card blank.  First i stamped the iris script image onto white card in blue ink and die cut with the leafy frame, keeping the die in place after embossing gently ink through it, so you get a blue frame around the image.  I then stamped the iris twice more and simply watercoloured in and cut out and decoupaged onto the main image.

I then cut a panel of white card bigger than the leafy frame and inked it up with the same blue inks, i then stamped the woodpanel on top to add interest. I added stickles frosted lace glitter to highlight the flower and around the frame edge. 


Close up of the flower, i layered up the flower head with glue gel. 

Items Used:
Chocolate Baroque 'Elegant Iris - UA5SP0318'
Stampin up 'Hardwood - 133035'
Spellbinders die 'Branching out - S6-006'
Archival ink - colbalt blue
Distress inks - tumbled glass, salty ocean & chipped sapphire


Please do pop over to join in and see the rest of the DT work.


Thank you for stopping by, i hope you all have a good week. Emma 


Monday 17 July 2017

Scribble Roses thank you cards

Good Morning all and welcome to a new week, don't they fly by. 

So today im sharing a set of thank you cards made using those scribble roses again.


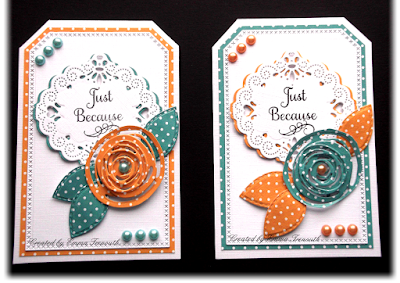
First die cut 2 rectangles using spellbinders die, score a line on the back panel and glue together to make a stand up card.  From the front panel die cut the large rose negative, use dotty paper as the insert which then shows through the apperture.  Then die cut the rest of the rose layers and layer up, die cut leaves and butterflies and stamped greeting to finish.  Touches of glitter glue.


Showing it stood up with the light shining through the rose aperture. 


Same design just opposite colours, orange and teal. 


close up again showing the aperture better.


and below another set of 4 i made 


First die cut the Stitched label and layered onto dotty red card and white card blank.  Die cut the pierced topper from white and stamp the sentiment.  I then die cut the topper again in matching colour card and off set to help it stand out.  Die cut the roses and leaves from red and lilac dotty cardstock.  Pearls to finish.  


Same just opposite colours 


Just showing that they stand up easily. 


and 2 more in different colour combo, again the orange and teal.  


Items Used:
Spellbinders card creator - 'Valiant Honor' - S5-217
Spellbinders D-lites - 'Pierced Delight' - S2-143
Memory Box mini butterfly dies
Justrite - 'lrg fancy sentiments' - CR 03815
Stampin up sentiment -  'kinda Eclectic' 
Chocolate Baroque - 'pretty poppies'  (merci sentiment)
Dotty card - Anna Marie Designs


Thank you for stopping by and all your comments last week and on my painting.  Wishing you all a good week. Emma 


Thursday 13 July 2017

Iris Painting

Good Morning all

As we are in the midst of summer i thought i would share one of my paintings.  


This is painted in soft pastels from a photo of one of my bearded irises.  They are one of my fav flowers as always so colourful and put on a good display.  16x20" in size. 

Thank you for stopping by and for all your well wishes, cards and lovely goodies lately - you are spoiling me😎.  Hugs Emma

Monday 10 July 2017

Make My Monday # 50 - travel

Good Morning to you all, i hope you all had a good weekend.

So its time for the next challenge at Make My Monday


The theme this fortnight is

Vacations & Travel  (or Holidays to you & I)

After 2 weeks without crafting it felt good to find my mojo and be home long enough to create this card.  I don't have much in my stash aimed at holidays and travelling but found this lovely elephant in my Indian dreams digi kit, so for my holiday we have hopped over to beautiful India. 

I have actually ridden an elephant, many many years ago here in Cornwall, its an exciting way to ride from a to b, a bit slower than horse😄 


A5 white linen cardblank.  I printed off the elephant 4 times and cut it out and decoupaged.  Printed off a matching backing paper and matted onto turquoise card to pick up the blue in the elephant.  Turquoise dotty ribbon, double bow, elephant charm and sentiment to finish.  


Close up, i also added glitter glue and glossy accents to highlight the beautiful elephant. 

Items used:
Daisytrail 'Indian Dreams' digi kit
Serif Craftartist 2
Double stitched rectangles
LOTV sentiment stamp

So if you fancy joining in and see what the rest of the DT came up with, please do pop over.


Thank you for popping by and all your comments last week.  Wishing you all a wonderful week. Emma 


Saturday 8 July 2017

<a href="https://www.bloglovin.com/blog/18499873/?claim=sp6ytas23ra">Follow my blog with Bloglovin</a>


Thursday 6 July 2017

A Cluster of Diamonds

Good Morning all

Today i am showing a batch of Diamond fold cards, these kept me quiet for a long while!  All using the Tattered Lace Diamond Fold die set.  Very photo heavy so you might like to sit down with a nice cuppa and your fav biscuit😊😊


I used the die to cut twice into the card, like i did for my dad card, this works quite well.  Then folded and scored it all into shape, a bit fiddly but it doesn't eventually come together. I rounded the corners on this one.  Spellbinders butterflies and gems to finish.  One sheet of 6x6 paper is the ideal size for these cards.  

Papers are MME 'Miss Caroline - Dilly Dally'


and showing the back and where i put the sentiment using matching papers. 


No2  Spellbinders butterflies cut in co-ordinating papers, pearls and glitter glue to finish

Papers are - Teresa Collins 'fabrications'


again showing the back and the sentiment. 


and below a selection of single diamond folds, they are quite small but i love them and enjoyed using all my designer papers. 


Papers - Kasiercraft 'Chanteuse' 


Sizzix hello die cut in white and blue/pink card

Papers - MME 'Kate & Co - Cambridge court'

Sizzix - 'Susan's garden - dogwood flower' die set

Papers - My Minds Eye (MME) 'Indie chic - citron'


Sizzix dogwood flower die

Papers - MME Jubilee


Sizzix dogwood flower die set, i doubled them up this time. 

Papers - Bobunny 'Isabella'


Sizzix butterfly die set, orange pearls.

Papers - Kasiercraft 'Lush'


Items used: 
Various designer papers 
Sizzix 'butterflies - 659971'
Sizzix ' susans garden - dogwood - 658405'
Sizzix - 'You & Me - 659780' 
Spellbinders 'Les Papillions - S4-371'
Elizabeth crafts - thank you & happy birthday sentiment dies

You might also like


Thank you for all your amazing comments on my Splat People, yes please do use the idea, i look forward to seeing your take on it and thank you for asking.  I shall be making a few for my charity boxes i think as i had great fun making them too. 


Monday 3 July 2017

Splat people! Children's birthday card

Good Morning All and welcome to a new week, i hope you enjoyed some sunshine at the weekend.  

Today i am sharing a fun children's card i made.


5x7" black card base.  I cut lots of splats out of brusho coloured card, ideal for those left over bits!  I then layered several onto the background.  For the topper, I matted a white rectangle onto black card and stuck to the card for foam pads.  I used 3 different splats, added googly eyes, black pen legs and doodled on a mouth and eyebrows.  Black die cut sentiment to finish. 


A close up of my little splatpeople


and below a little A6 card using the left over splats. 


My 5yr old niece asked me to be her penpal, their teacher is trying to get them all to have a penpal to practice their reading and writing, a great idea i think, as Sophie also loves crafting i thought i would send a little card with my letter for her.  I will have to make sure my scrawl is neat and tidy for her😊


Items used:
Spellbinders de-lites 'sentiments two & sentiments five'
Splat dies
Double stitched rectangles
Colorcraft Brusho's


You might also like


Thank you for stopping by, i hope my splatpeople made you smile.  Wishing you all a good week. Emma