Followers

Wednesday, 22 December 2021

Penguin fun

Good Morning everyone.

I hadn't planned another post before Christmas but ive had a little fun today.  In the countryview crafts advent event i bought (among lots of others!) these brilliant penguin stamps by aall&create and i thought they were the ideal size for some of the little snippets of alcohol inked acetate i had left over from cards so as Id cleared my desk I had a little play and made myself some penguin bunting.

Previously id coloured acetate with alcohol inks - this is ideal for using packaging acetate as it hides any little marks.  On the opposite side to the alcohol ink i stamped the penguins with stazon ink - i need to get a refil as some didn't stamp perfectly but a black sharpie marker came to the rescue.  Then I cut them out, leaving a little tab of acetate above their heads which i punched a hole in - i also removed any alcohol ink above the heads with blending solution and cotton wool so that only the penguins were coloured.  If i wasn't using up scraps of pre coloured acetate you could stamp the penguins first and then add alcohol ink to colour them.

I added a jump ring through the punched hole and tied them onto clear jewellery thread. As the acetate is see through it meant it was easy to flip some penguins  to face the opposite way.
Sadly my photos don't show up the true colours as its too long to fit in my light box and its so dark and gloomy today trying to take the photos.  


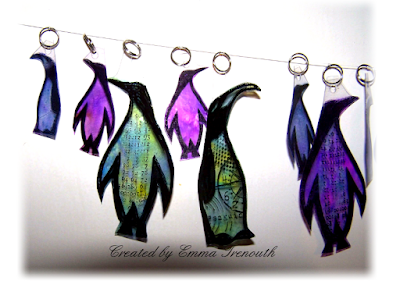
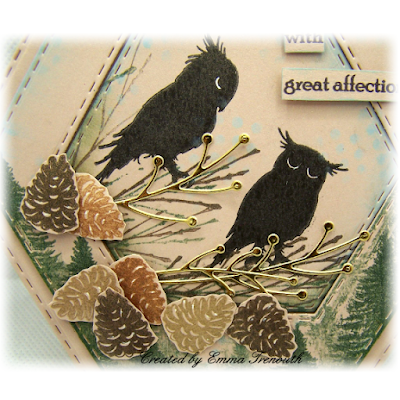
Just a close up on a few of them.  

Items Used:
Aall&create stamps #603 'frosty' & #604 'penguin'
Tim Holtz alcohol inks
Acetate
Jump Rings
Clear jewellery thread

Id love to enter the following:

***

***

***

I had hoped to enter this challenge but after hours of trying the link tool just keeps saying nope😕


******
Ive also added photos of the present ive made for my mum for Christmas.  In my stash busting mission this year i wondered what to do with these glass pebbles and this is the outcome

I started with a 20cm foam football and took a slice off the bottom so it can sit flat in the garden.  I then glued on randomly in stages lots of glass pebbles.  Then used bathroom grout - something i won't be doing again, this was definitely a labour of love doing a bit at a time.


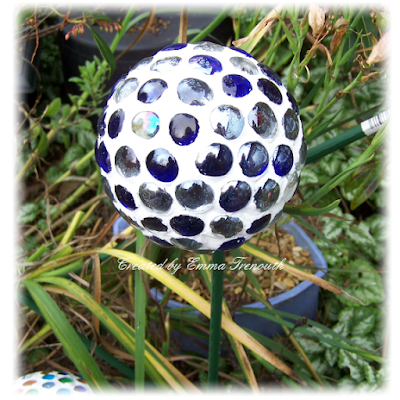
A smaller version on a garden stake, i used just blue and clear glass pebbles on this one, a 7cm foam ball that id pushed a metal garden stake into.  I actually made this one first and base painted the bright yellow ball black but the colours didn't stand out so much so the bigger version i base painted white, this also helps seal the ball.


 Just showing both together


Thank you for stopping by. 
I hope you all enjoy the festive period and stay safe. Big hugs Emmaxxx


Monday, 20 December 2021

Merry Christmas to you all

Good Morning everyone

Today im sharing my last Christmas cards of the year.  I used a tree panel die for the background and some of my alcohol inked mirror card for the reindeer


Size approx 4.5.5"   I first made a background with oxide inks and pixie powders.  This card essentially came about after a previous card  - see here -  to use up the left over trees.
I then die cut the tree panel from white card and adhered to a larger panel from gold glitter card.  I then paper pieced the green trees back into place. I adhered the first green panel to the base card and then the tree panel on top at an angle.  
I die cut the reindeer from scraps of alcohol inked mirror card, mounted onto a die cut circle from vellum with stamped greeting to finish.

Just a close up,the photo doesn't really show the shine from the mirror card but i love the mottled effect using the pink & purple alcohol inks on silver mirror card gives.

Version 2 was red alcohol inks on gold holographic mirror card, you can make out the holographic shimmering.  

Items Used:
Tree background panel die - unknown brand
MFT deer love die
Circle die
Oxide inks - pistachio, twisted citron, peacock feathers
Pixie powder
Tim holtz alcohol inks
Gold glitter card - B&M
Silver mirror & Gold holographic card - B&M
Vellum - papermania
White card - CraftUK ltd

Thank you for stopping by today and all your support this year.  Wishing you all a very Merry Christmas and a Happy & Healthy new year.  Stay safe.  Hugs Emmaxxx


Id love to enter the following:

***

***

***


***

***


Thursday, 16 December 2021

Card box set

Good Morning everyone

I made up 2 box sets as Christmas presents for non cardmaking friends.  I used the Katzelkraft farm animals stamps, brushos & pixie powders for the backgrounds and tim holtz snarky chat stickers

I used A3 cream card to make my box and then decorated the sides and tops to make it sturdier.  On the top i stamped all the animals from the set using an ombre ink pad and stamped quote.

5x7" white cards.   I first die cut stitched rectangles from white cardstock, then stamped the animals in black.  I then did brusho backgrounds, by first stamping the character in place it gave me an idea where i could use different colour brusho's for the sky and ground areas.  Once dry i doodled in the ground for them to stand on and a few little details to make up a scene. I used gel pens, alcohol markers & paint pens to add colour to the doodled scene.   I mounted the topper onto black cardstock and added to the base card.  I used small strips of card coloured with the same brusho's to add interest 

I stamped the animals again onto white card and added a little shading with distress inks, i wanted to keep them mostly white so they stood out against the really colourful backgrounds - plus as you know i dislike colouring in greatly😀.  I cut them out, gave a little shape an added with glue gel on top of the original one stamped on the background.

I picked a chit chat sticker for each one to finish.  I did 2 for each animal, so one for each box set


Left one reads - 'of course i talk to myself....sometimes i need an expert opinion'
Right one reads - 'I'm not arguing, I'm explaining why i'm right'

Left reads - Today is full of possibilities
Right - Look on the bright side


Left reads - It's the little things that make life big
Right reads - Stay curious

Left reads - Lucky is a state of mind 
Right - Listen, before I had my coffee, I didn't know how awesome I was going to be today, either

Left reads - I admit that my weirdness is above the national average, but I'm comfortable with that
Right reads - I am Fabulous

Left reads - Relax, we're all crazy... it's not a competition
Right - Im just waiting to see if my coffee chooses to use its powers for good or evil today

Left reads - Be fearless
Right - Not only does my mind wander... sometimes it walks off completely

Items Used:
Katzelkraft farm animal stamps
Double stitched rectangle dies
Brusho powders
Cosmic shimmer pixie powders
Distress inks
Tim Holtz snarky chat stickers
Paint pens
Fine liner pens
Black cardstock
CraftUK ltd white card

Thank you for popping by, i really do appreciate it and all your amazing comments.  I hope you have a good end to the week and weekend.  Stay safe.  Hugs Emmaxxx


Id love to enter the following:


Monday, 13 December 2021

Christmas Owls

Good Morning everyone

Just this last lavinia stamps card to share as my last Christmas card this year.  I made a couple of these Lavinia owl cards, one for my parents for Christmas.  Ive stamped onto a kind of pinky/coffee colour pearl cardstock.

Approx 6x6" card.  I used the hexagon dies to make my base card and die cut a smaller hexagon from white i cut a smaller one from the middle.  On the frame i stamped the fir trees towards the bottom and stencilled some small dots with oxide ink to act as snow.  I inked around the top edge with the same oxide ink and around the bottom with green distress inks. I added 3d foam tape to the back and added it to the base card.

On the smaller hexagon i first stamped the owls with black archival ink and then i stamped the pine branches around them with archival inks to make it look like they are standing on the branches.  I lightly stencilled patina oxide ink dots to act like snow around them.  I glue this hexagon flat inside the frame.  I die cut a couple of little branches from gold mirror card and glued under the owls.

I stamped lots of pine ones with brown ink tones onto scraps of the pearl card, cut them out and arranged with glue gel.  Stamped quote cut up and added to finish. 

Just a close up, i used a white gel pen on the owls eyes as they were a bit lost and also to highlight the pine cones a bit.

Items Used:
Lavinia Stamps - 'echo & drew' 'fern branch' 'mini pinecone'
 'fir tree' 'seasons change'
Memory box stems die
Hexagon die set
Dotty stencil
Oxide inks - Tumbled glass, salvaged patina
Distress ink - forest moss, pine needles
Archival ink - Library green, sepia, potting soil
Pearl cardstock - payper box
Gold mirror card


Thank you all for stopping by once again.  I hope you all have a good week.  Stay safe and keep warm.  Hugs Emmax


Id love to enter the following:

***

***

***


Thursday, 9 December 2021

Winter wonderland

Good Morning everyone

Another small batch of Christmas cards using lavinia stamps on soft gold pearl cardstock....I am slowly making a dent in my coloured cardstock😀


approx size 5x7" I first die cut my base card from soft gold pearl cardstock using crealies arch dies, and cut a smaller panel.  From the smaller panel i die cut a bauble shape from the middle. To the outside frame panel i stencilled snow with tumbled glass oxide ink and stamped fir trees with green archival ink and i added this frame to the base card with 3d foam.  

On the bauble i first stamped the wolf, then using paper masks i stamped the first trees to build up a little scene aroun him.  I added shading to ground the wolf and trees with black soot distress ink and a grey inktense pencil. I glued the bauble flat into the frame after inked the edges with the blue oxide ink.

I stamped the berries onto more pearl card, coloured red and added glossy accents and cut out, these i arranged at the top of the bauble to sort of give the effect the bauble is hanging from them.

I stamped the quote of more gold pearl card, cut out and added.  Glitter glue highlights to finish
A close up, you can make out the glitter here.  I love how the pearlescent still shines through when the light hits it.   

Version 2 is the 2nd fox in the stamp set

Version 3 is using 2 hares

Items Used:
Lavinia stamps - 'fox set 2' 'wild hares' 'fir tree' 'winter berries' 'seasons change'
Spellbinders bauble die set
Crealies arch dies
Dot stencil
Soft old gold pearl card
Oxide inks tumbled glass
Distress ink - black soot
Archival ink - library green, jet black
Glossy accents
Stickles glitter glue - diamond

Thank you all for stopping by once again.  I hope you have a good end of the week and weekend.  Stay safe.  Hugs Emmaxx


Id love to enter the first card into the following:


***

***

***

***


Monday, 6 December 2021

Dads Birthday

Good Morning everyone, i hope you had a good weekend.

I made these 2 cards for my dads birthday yesterday. 

6x6 scalloped card.  I found this fab brusho background in my background stack, i cut it to fit the cardfront and then die cut both a inverted scallop square frame and the circle burst dies from the middle. Behind the circle burst i added gold mirror card - to give the effect of the sun shining, i added it to the card front, adding the square frame up on foam tape. 

I then stamped Mr Crow twice onto white card, left one white and cut it it all out, from the 2nd one i coloured the cravat & hat with orange and cut out and added to the white version. Glossy accents added to his eye & goggles. I glued him into place slotting the bottom edge into the inside of the frame.

I then got die cut lots of leaves from scraps of papers in orange tones and a couple of gold mirror card swirls and arranged them around him with stamped sentiment to finish.

When i saw this stamp i bought it with the idea for my dads birthday as he has quite a few rooks that are friendly, every time he is in the yard or fields they come down to keep him company and they enjoy the fruity snacks he puts out for them, they are full of character.  Mum chose to give him this card as she loved it too.  


and onto the 2nd card i made for me which i gave to him

6x6 Kraft stepper card.  I first die cut my stepper card using a very old presscut die set.  Id found a fab feather printed onto kraft paper background so lightly watercoloured around the feathers with oxide inks in blue tones, i then die cut it into the panel and attached to the front.  

I stamped the owl twice onto more kraft card, i cut one out leaving a small border around the stamp frame which i inked up blue and matted onto a larger kraft panel and added to the card front. For the moon i painted it with silver mica powder and added glossy accents over the top.  From the 2nd owl stamping i cut out the owl and around the foliage and added to the topper with foam tape.

Stamped sentiment die cut into an oval & matted onto a larger oval inked with the oxide inks to finish


Hopefully you can make out the shimmer of the moon, using the silver mica powder its subtle until the light hits it.

Items Used:
aall&create 'dashing crow' stamp
woodware owl stamp 'lino cut hunting owl'
Clearly besotted sentiment stamp
Presscut stepper die set
Leaf die
MFT Scalloped frame die
Memory box circle burst die
Spellbinders oval dies
Brusho's - moss, olive, emerald
white silver mica powder
Distress oxide inks tumbled glass, salvaged patina

Thank you all for popping by once again.  I hope you all have a good week.  Keep safe. Hugs Emmax


Id love to enter my crow card into the following:

***

***

***